
The Reteno iOS SDK for Mobile Customer Engagement and Analytics solutions
See the video manual on iOS SDK setup:
Overview
Reteno is a lightweight client-side SDK that helps mobile teams integrate Reteno features into iOS apps, including push notifications, analytics, in-app messages, and personalization.
Minimum SDK Requirements
- iOS: 14.0+
- Xcode: 15.0+
- Swift: 5.7+
NoteAlthough the SDK binary technically supports iOS 12+, we recommend targeting iOS 14+ to ensure full compatibility with modern APIs and features.
Privacy Manifest and Data Collection
The Reteno iOS SDK ships with a privacy manifest that describes what data is collected and which APIs require a declared reason, in line with Apple’s privacy requirements.
Data collected by the SDK
| Data type | Purpose | Linked to the user |
|---|---|---|
| Device ID | Analytics, push delivery | No |
| Push token | Push notifications | Yes |
| User ID | Personalization | Yes |
APIs with required reasons
The SDK accesses the following APIs that have mandatory “required reasons” declared in the privacy manifest:
NSUserDefaults— App functionality (C56D.1)systemUptime— Analytics timestamping (35F9.1)
Getting Started with Reteno SDK for iOS
You can install the Reteno SDK for iOS via:
- Swift Package Manager
- CocoaPods
License
The Reteno iOS SDK is released under the MIT license. See LICENSE for details.
Install the SDK via Swift Package Manager
The Swift Package Manager is a tool for automating the distribution of Swift code and is integrated into the swift compiler.
Once you have your Swift package set up, adding Reteno as a dependency is as easy as adding it to the dependencies value of your Package.swift.
dependencies: [
    .package(url: "https://github.com/reteno-com/reteno-mobile-ios-sdk.git", .upToNextMajor(from: "2.7.3"))
]
Installation Process:
1. Go to the project settings and select Package Dependencies:
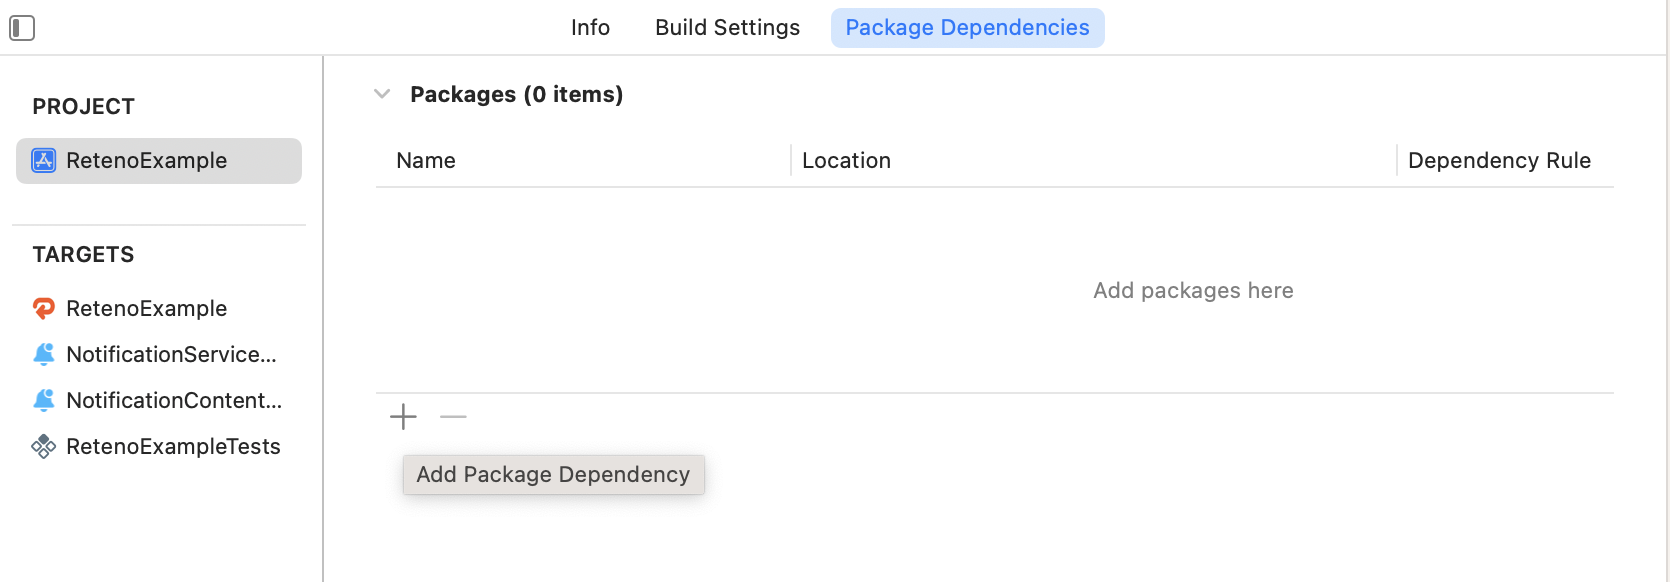
2. Click + to add a package. In the search field, enter reteno-ios-sdk or paste https://github.com/reteno-com/reteno-mobile-ios-sdk.git. Select the package, configure the dependency rule, and choose the project to which you want to add it.
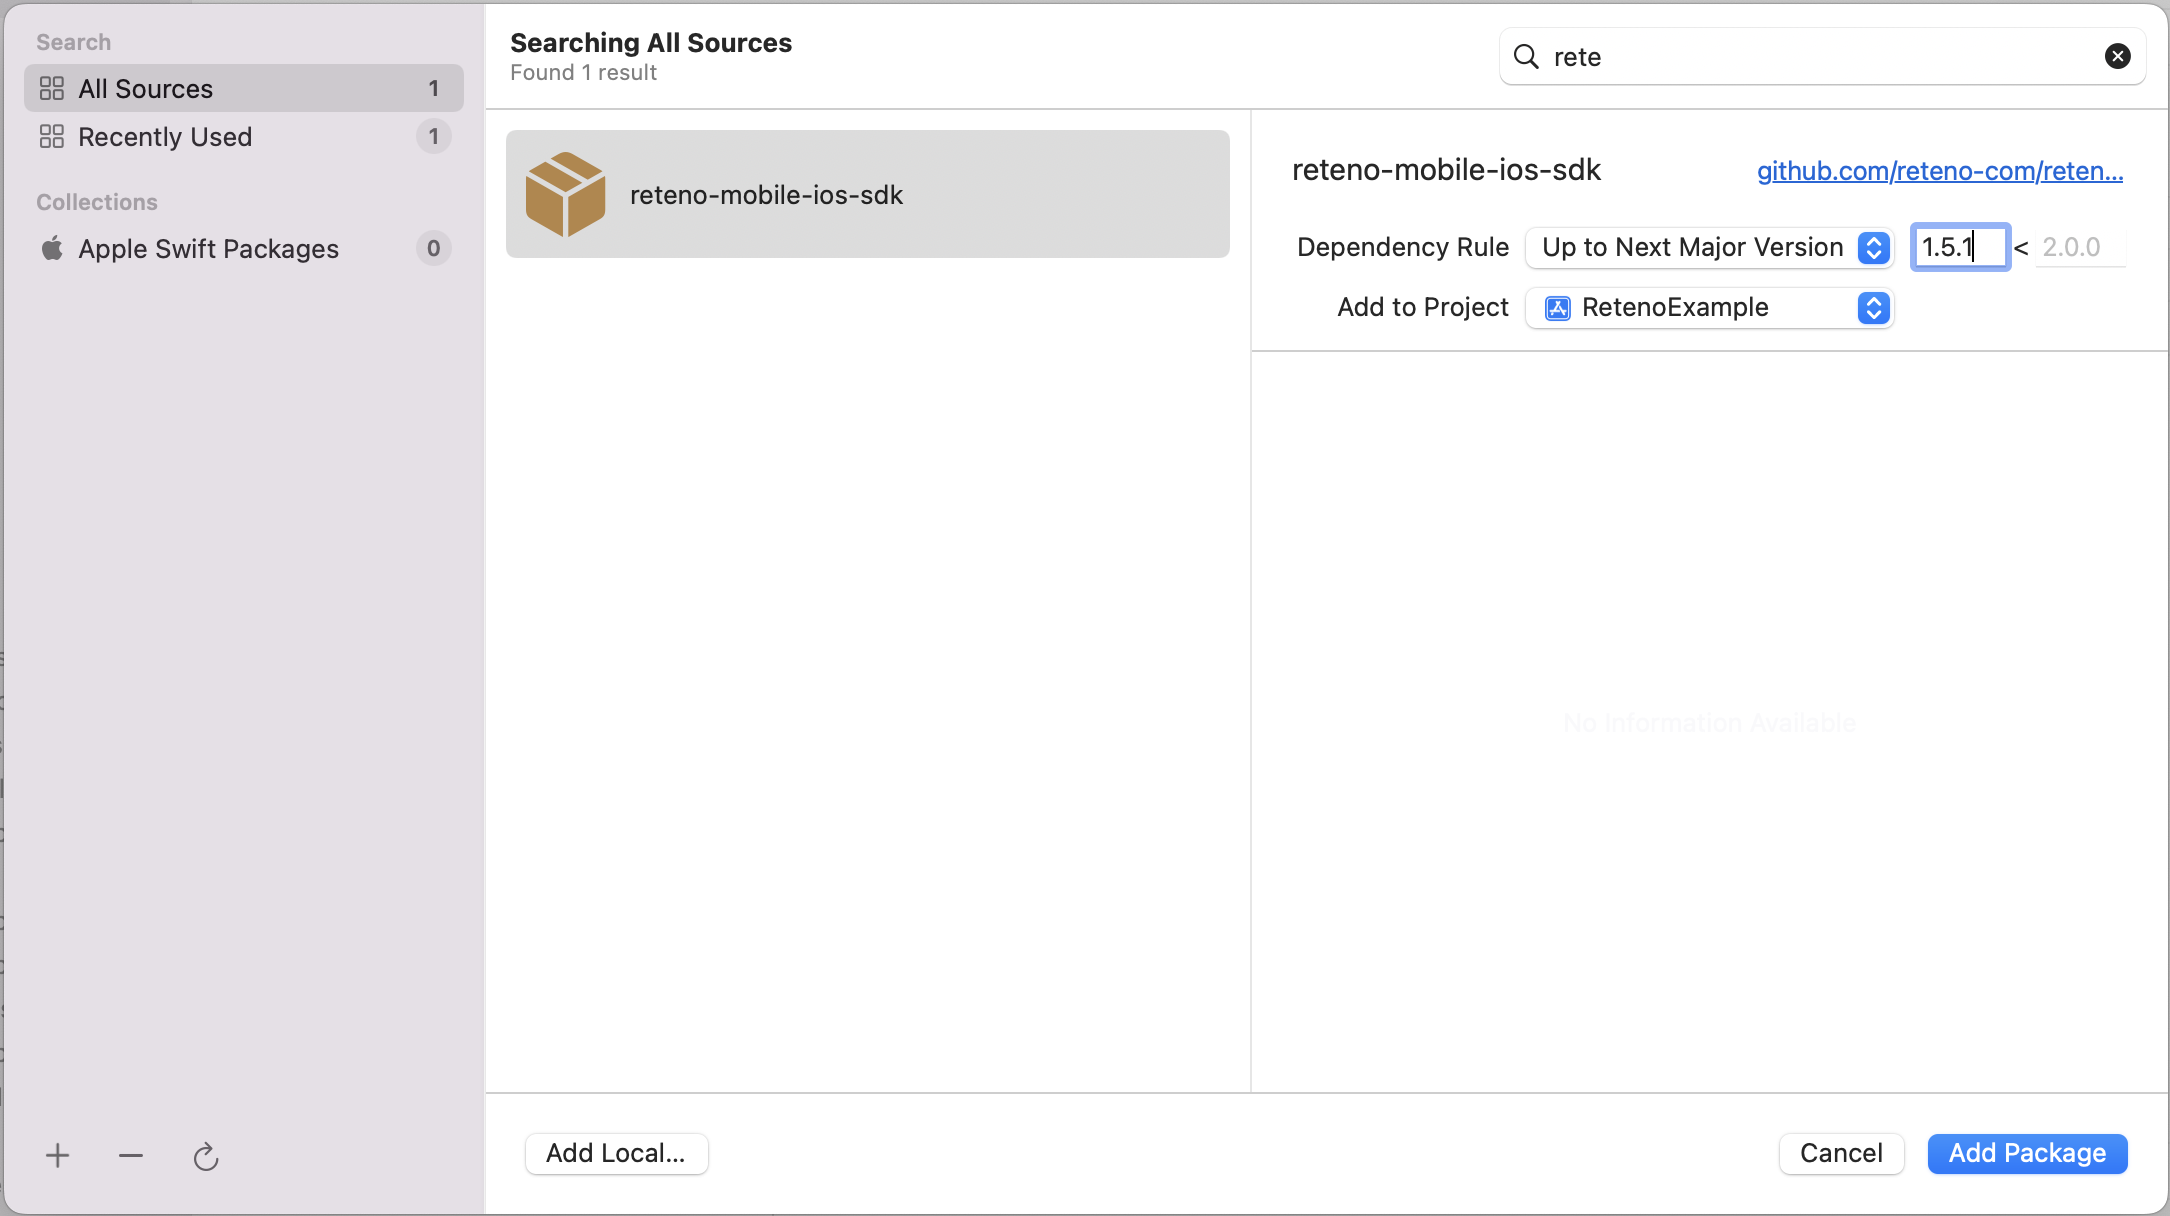
3. Add the Reteno package to the main target.
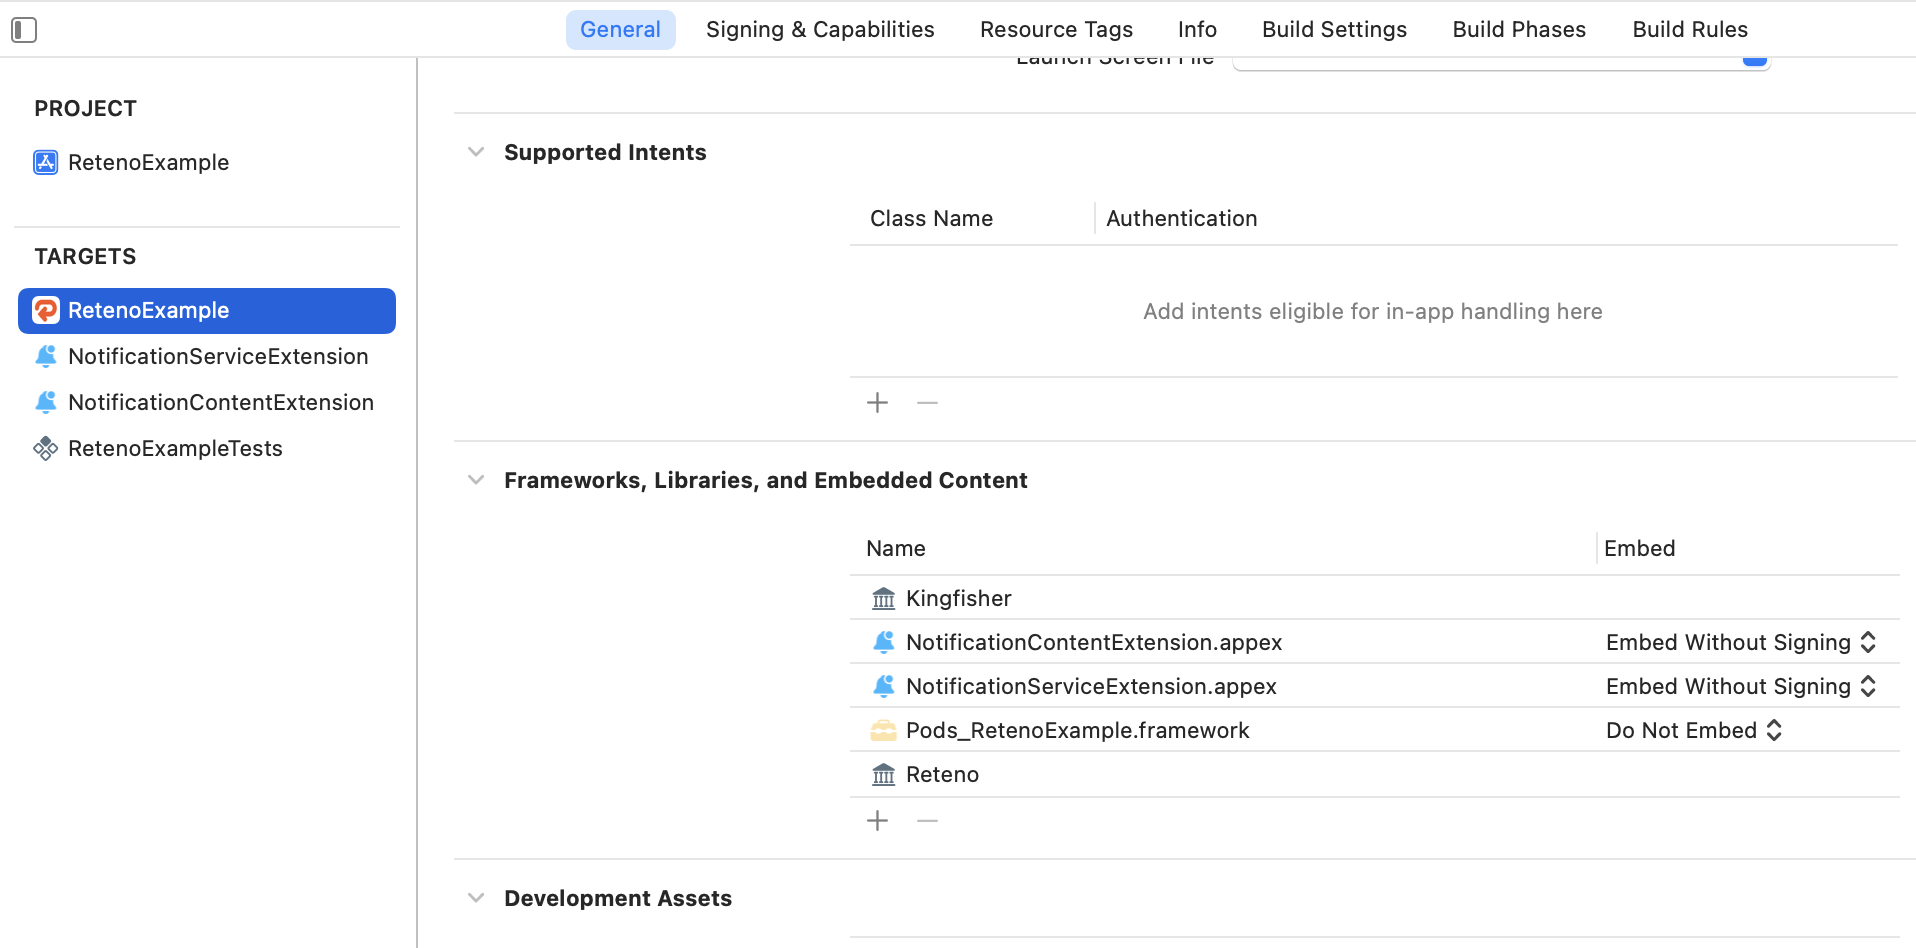
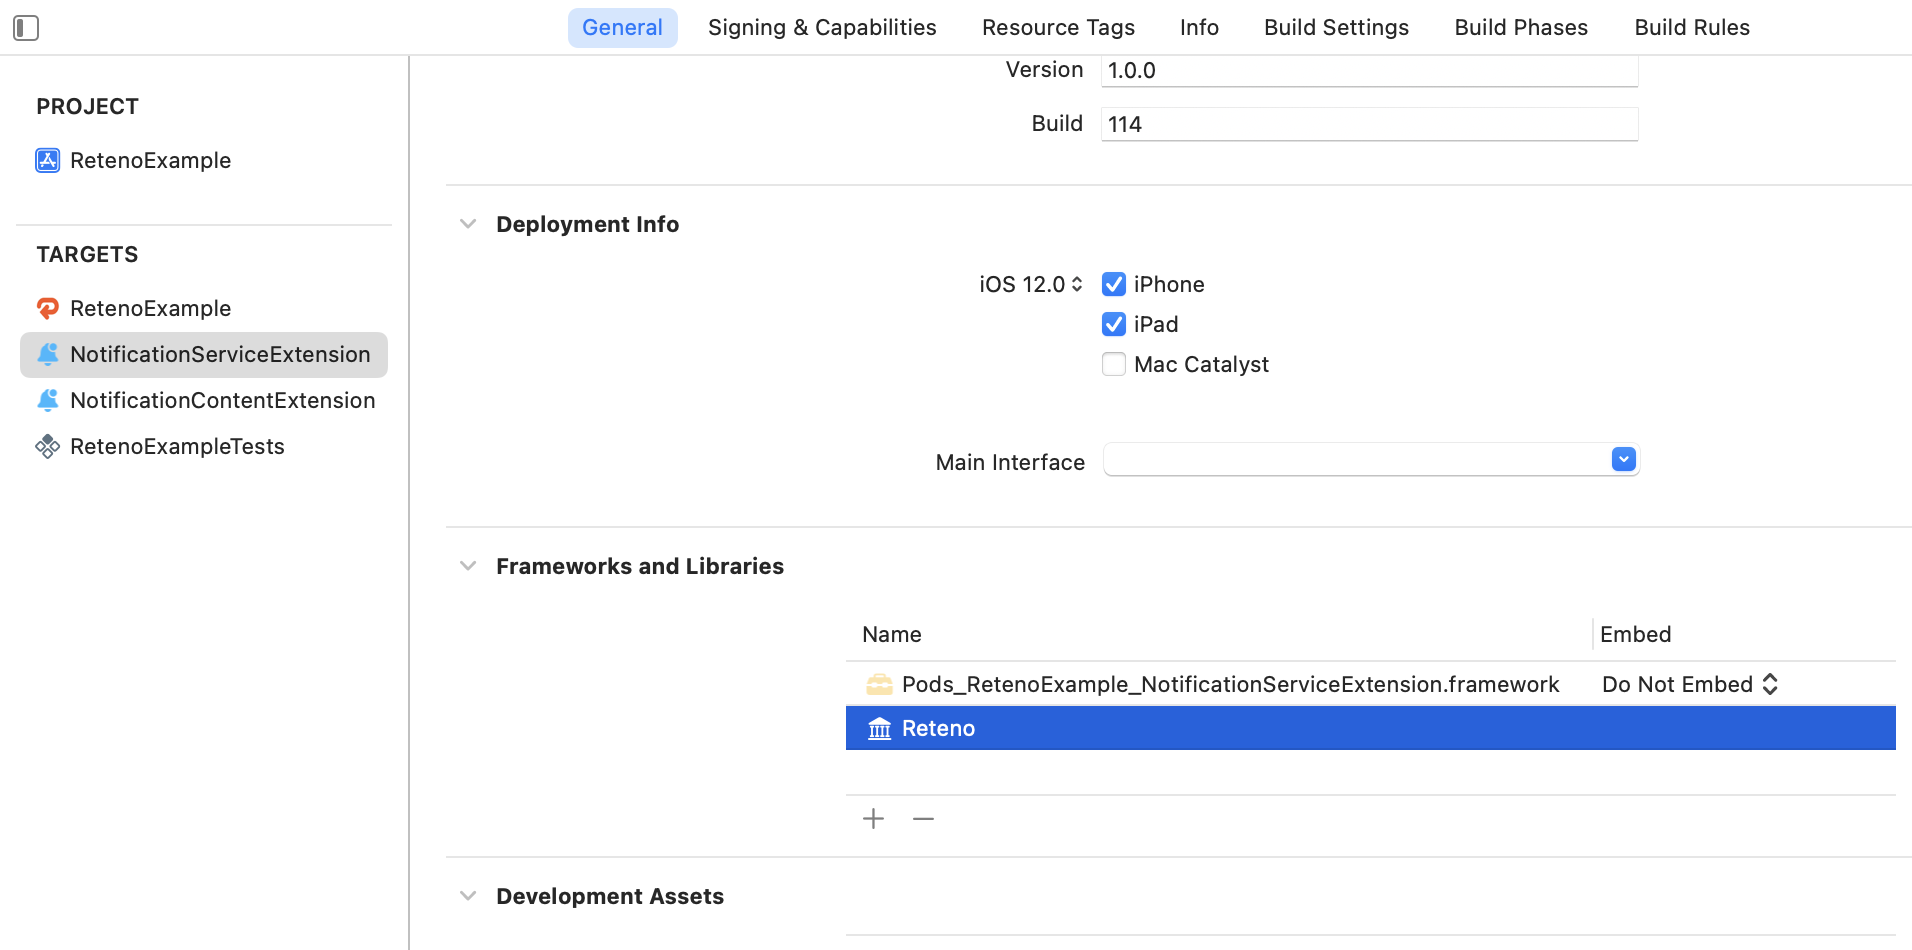
Also add it to the NotificationServiceExtension target.
Install the SDK via CocoaPods
CocoaPods is a dependency manager for Cocoa projects. For usage and installation instructions, visit their website.
To integrate Reteno into your Xcode project using CocoaPods, specify it in your Podfile:
pod 'Reteno', '2.7.3'Installation Process:
1. If you don't have CocoaPods installed, run sudo gem install cocoapods in Terminal.
2. In your project directory, run pod init.
3. Open the Podfile in your code editor.
4. Add the Reteno dependency to your app target and the NotificationServiceExtension target:
platform :ios, '14.0'

target 'RetenoExample' do
  use_frameworks!

  pod 'Reteno'

  target 'NotificationServiceExtension' do
    use_frameworks!

    pod 'Reteno'
  end
end
5. In your project directory, run pod install.
6. Open the newly created <project-name>.xcworkspace file.
Setting Up the SDK
Follow our setup guide to integrate the Reteno SDK with your app.
Step 1: Add the Notification Service Extension
The NotificationServiceExtension allows your iOS app to receive rich notifications with images and action buttons and report message statuses such as delivered and clicked.
1.1 In Xcode, select File → New → Target.
1.2 Select Notification Service Extension, then click Next.
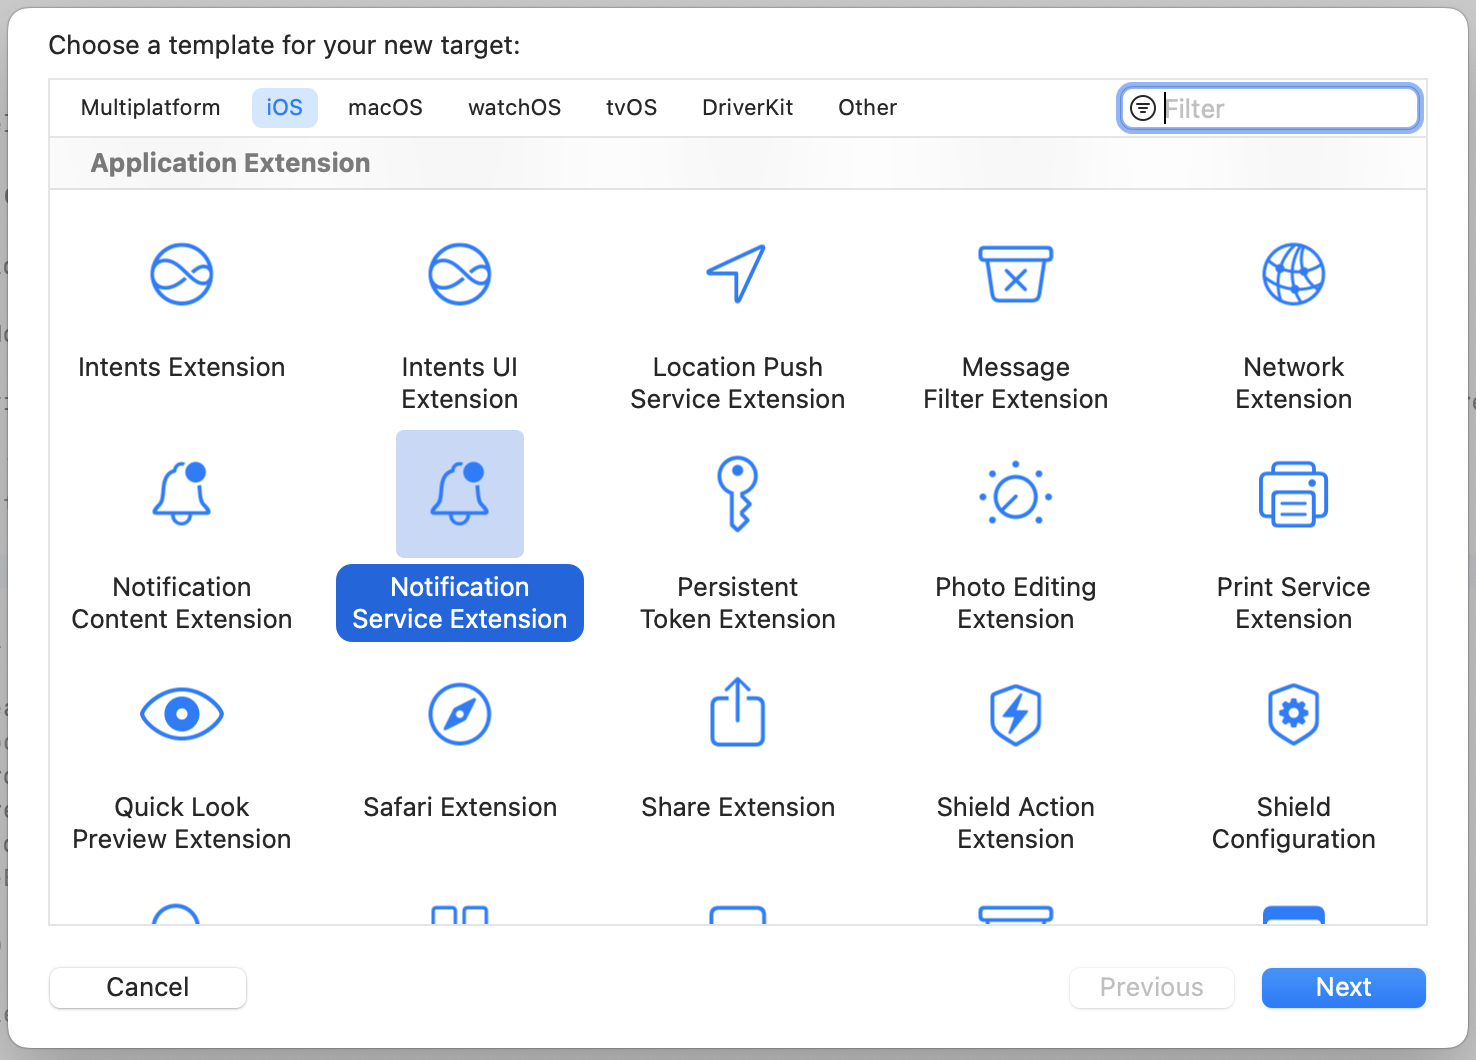
1.3 Enter NotificationServiceExtension as the product name and click Finish.
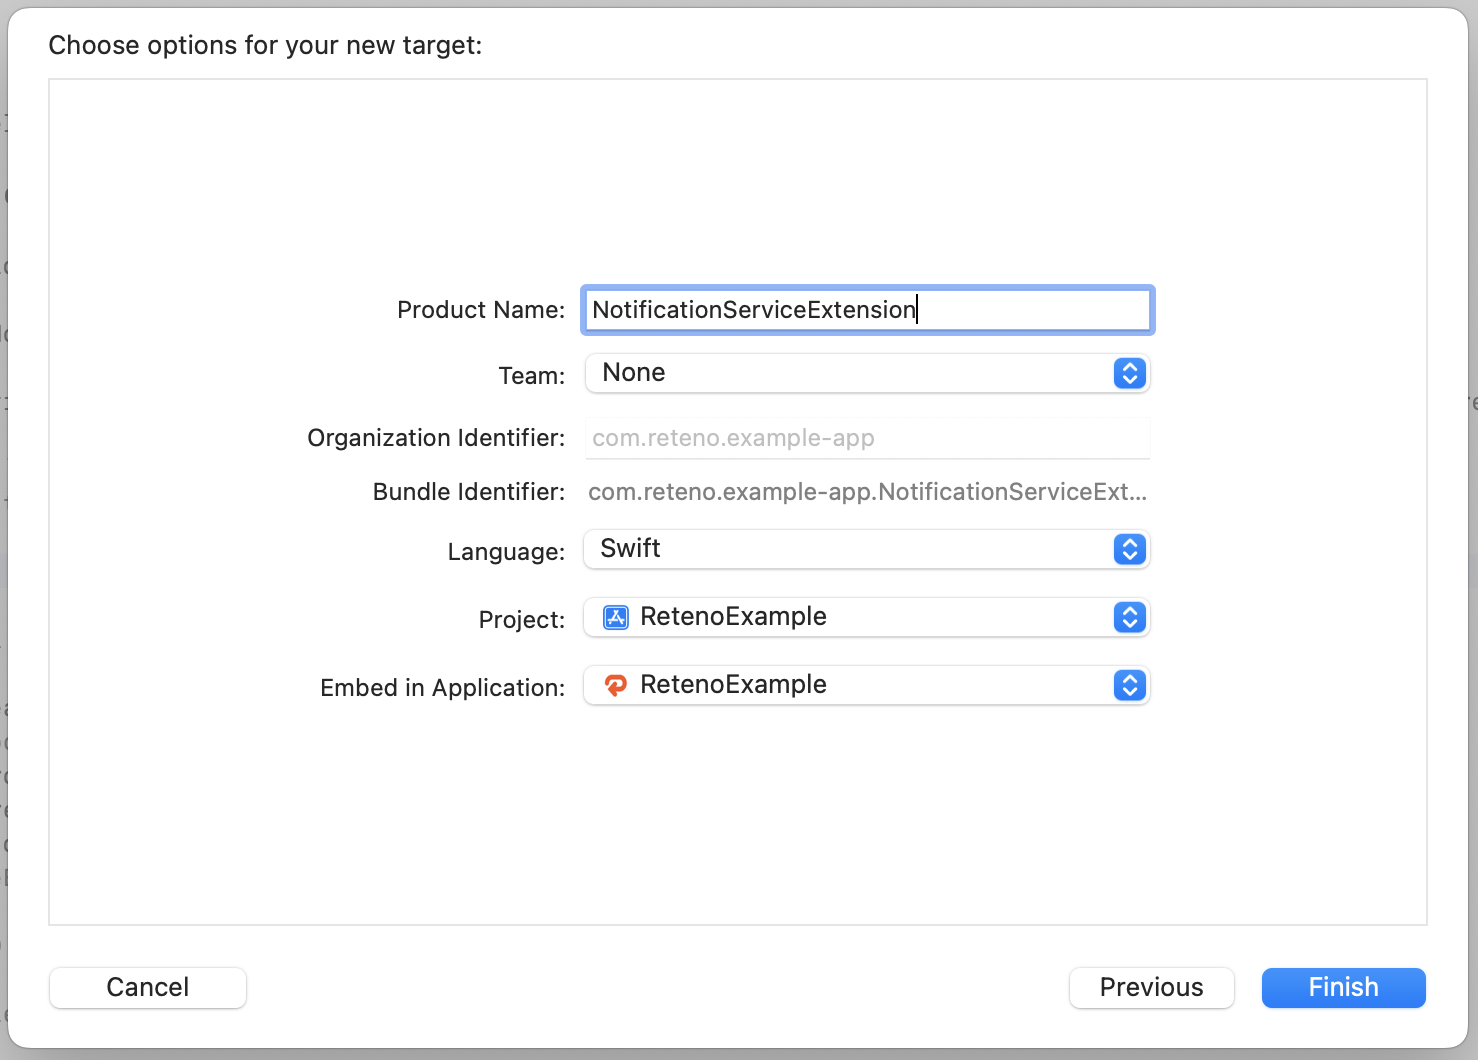
1.4 Click Cancel in the Activate scheme prompt.
By canceling, you keep Xcode debugging your app instead of the extension you’ve just created.
If you activate the prompt by accident, you can switch back to debugging your app in Xcode (next to the Play button).
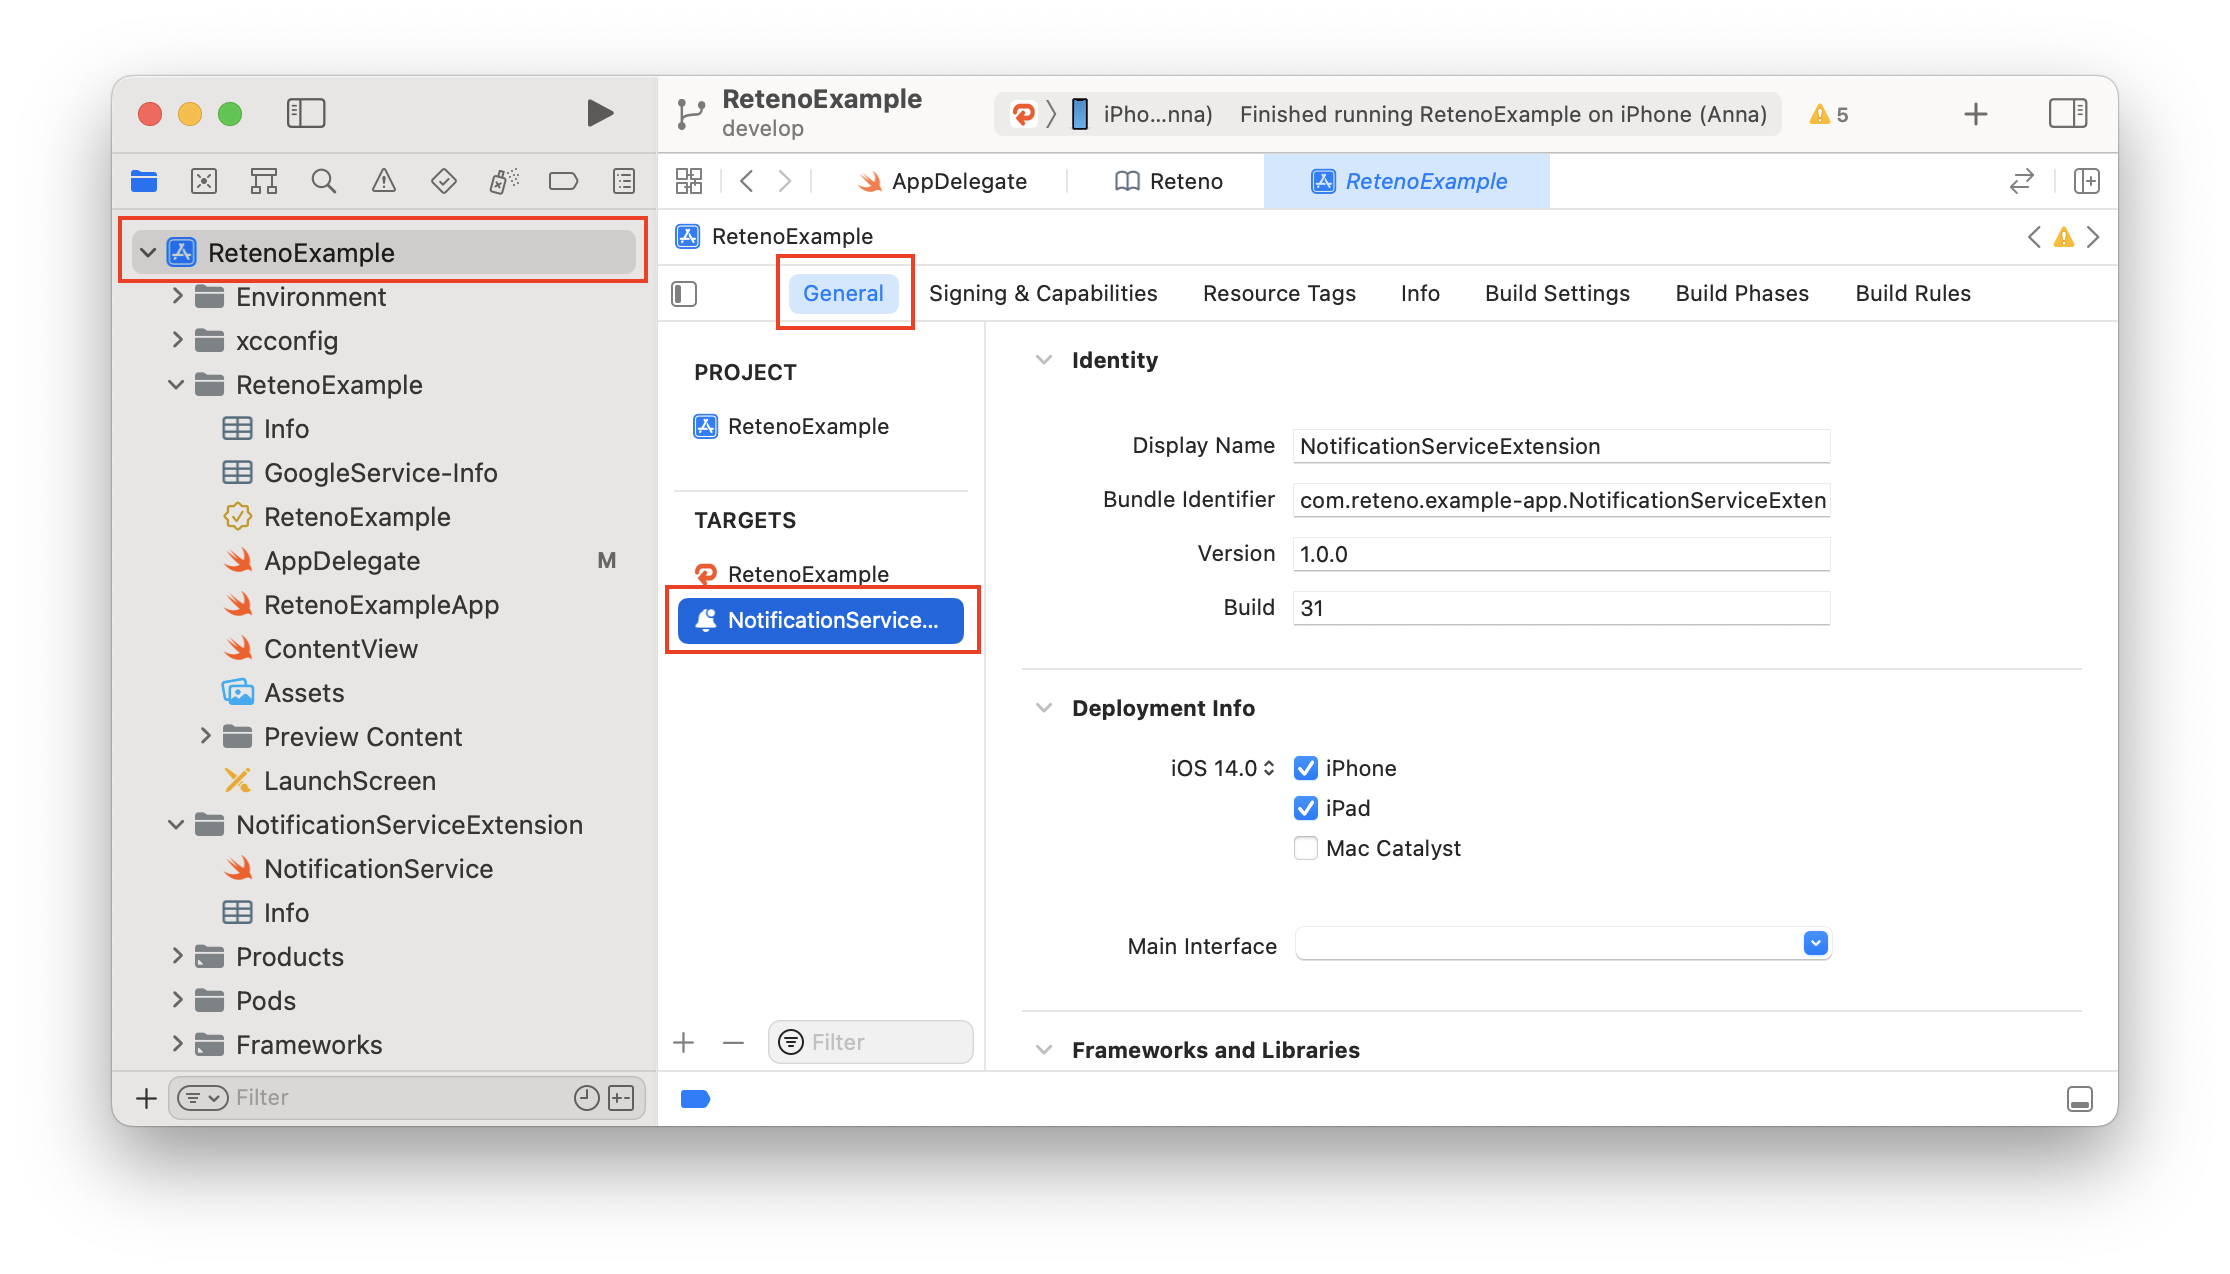
1.5 In the project navigator, select the project, then select the NotificationServiceExtension target from the targets list.
Make sure its deployment target is not higher than the deployment target of the main app.
1.6 In the project navigator, open NotificationService.swift in the NotificationServiceExtension folder and replace its contents with the following code. If you see build errors before adding the Reteno package to the extension target, you can ignore them at this stage.
import UserNotifications
import Reteno

class NotificationService: RetenoNotificationServiceExtension {}
For more information, see Apple's Modifying Content in Newly Delivered Notifications documentation.
Step 2: Import Reteno into Your App Delegate File
NoteTo set up the SDK, you need an
SDK_ACCESS_KEY. See Managing Mobile SDK Access Keys to create or copy one.
Before adding the initialization code, choose how the SDK should obtain the device push token:
.automatic— use this mode when you send notifications directly through APNs. The SDK retrieves the token through method swizzling, so you do not need to implementapplication(_:didRegisterForRemoteNotificationsWithDeviceToken:)or complete Step 5..manual— use this mode with Firebase Cloud Messaging (FCM) or when your app handles token registration. In this case, complete Step 5.
The examples below use .automatic. Replace it with .manual when using FCM or your own token-handling logic.
Method 1: Storyboard
For a Storyboard-based app, open AppDelegate.swift, import the Reteno module, and add the initialization code to application(_:didFinishLaunchingWithOptions:):
import UIKit
import Reteno

@UIApplicationMain
class AppDelegate: UIResponder, UIApplicationDelegate {

    func application(
        _ application: UIApplication,
        didFinishLaunchingWithOptions launchOptions: [UIApplication.LaunchOptionsKey: Any]?
    ) -> Bool {
        // Reteno initialization
        Reteno.start(apiKey: "SDK_ACCESS_KEY", deviceTokenHandlingMode: .automatic)

        return true
    }

    // Remaining contents of your AppDelegate Class...
}
Method 2: SwiftUI
For a SwiftUI app, create an app delegate and connect it to the main app structure. Replace YOURAPP_NAME with your app name.
import SwiftUI
import Reteno

class AppDelegate: NSObject, UIApplicationDelegate {

    func application(
        _ application: UIApplication,
        didFinishLaunchingWithOptions launchOptions: [UIApplication.LaunchOptionsKey : Any]? = nil
    ) -> Bool {
        // Reteno initialization
        Reteno.start(apiKey: "SDK_ACCESS_KEY", deviceTokenHandlingMode: .automatic)

        return true
    }

}import SwiftUI
import Reteno
@main
struct YOURAPP_NAME: App {
@UIApplicationDelegateAdaptor(AppDelegate.self) var appDelegate
var body: some Scene {
WindowGroup {
ContentView()
}
}
}
Upgrading from an Older SDK VersionSee iOS SDK Old Versions Support for changes to
Reteno.startandRetenoConfigurationthat may affect an existing integration.
Configure SDK Behavior
To customize SDK behavior, pass only the settings you need to change in a RetenoConfiguration. All omitted parameters keep their default values.
The following example enables automatic reporting of foreground lifecycle events:
let configuration = RetenoConfiguration(
    isApplicationForegroundLifecycleReportingEnabled: true
)

Reteno.start(
    apiKey: "SDK_ACCESS_KEY",
    deviceTokenHandlingMode: .automatic,
    configuration: configuration
)
The available configuration parameters are:
| Parameter | Default | Description |
|---|---|---|
isAutomaticScreenReportingEnabled | false | Enables automatic screen view reporting. |
isAutomaticAppLifecycleReportingEnabled | true | Enables automatic app lifecycle reporting. |
isApplicationForegroundLifecycleReportingEnabled | false | Reports ApplicationOpened and ApplicationBackgrounded events. Requires isAutomaticAppLifecycleReportingEnabled to be true. |
isAutomaticPushSubsriptionReportingEnabled | true | Enables automatic push subscription status reporting. |
sessionConfiguration | .default | Controls automatic session tracking and reporting. |
isPausedInAppMessages | false | Pauses the display of in-app messages. |
inAppMessagesPauseBehaviour | .postponeInApps | Defines what happens to in-app messages while their display is paused. |
isDebugMode | false | Enables SDK Debug Mode. |
useCustomDeviceId | false | Configures the SDK to use a custom device ID. |
If you omit configuration, the SDK uses the default RetenoConfiguration().
The default sessionConfiguration uses a three-hour inactivity interval, reports session start events, and does not report session end events. Use .disabled to turn off automatic session tracking and reporting, or create a custom RetenoSessionConfiguration with your own duration and reporting flags.
When useCustomDeviceId is true, the SDK defers initialization until you call Reteno.customDeviceIdProvider.setDeviceId(_:). Call it as soon as the device ID is available.
Step 3: Register for Receiving Push Notifications
You can let the SDK request notification permission or keep your existing registration flow.
Option 1: Register Using the SDK
Call registerForRemoteNotifications after Reteno.start, for example in application(_:didFinishLaunchingWithOptions:). The method shows the native iOS notification permission prompt. Pass the required UNAuthorizationOptions or use the defaults.
Reteno.userNotificationService.registerForRemoteNotifications(
    with: [.sound, .alert, .badge],
    application: application
)
The method also supports a completion closure, so you can request permission at a more appropriate point in the user journey, such as after onboarding:
func onboardingCompleted() {
    Reteno.userNotificationService.registerForRemoteNotifications(
        with: [.sound, .alert, .badge]
    ) { granted in
        // granted == true when the user allows notifications
    }
}
To customize how notifications are presented and handled, see Step 6.
Option 2: Keep an Existing Registration Flow
If your app already manages notification registration and uses UNUserNotificationCenterDelegate, pass notification responses to Reteno so the SDK can report notification interactions:
extension AppDelegate: UNUserNotificationCenterDelegate {

    func userNotificationCenter(
        _ center: UNUserNotificationCenter,
        willPresent notification: UNNotification,
        withCompletionHandler completionHandler: @escaping (UNNotificationPresentationOptions) -> Void
    ) {
        completionHandler([.sound, .badge, .alert])
    }

    func userNotificationCenter(
        _ center: UNUserNotificationCenter,
        didReceive response: UNNotificationResponse,
        withCompletionHandler completionHandler: @escaping () -> Void
    ) {
        Reteno.userNotificationService.processRemoteNotificationResponse(response)
        completionHandler()
    }
}
Step 4: Add App Groups
App Groups provide shared storage and communication between the main app and the Notification Service Extension. Reteno uses the shared container to make SDK data available to both targets.
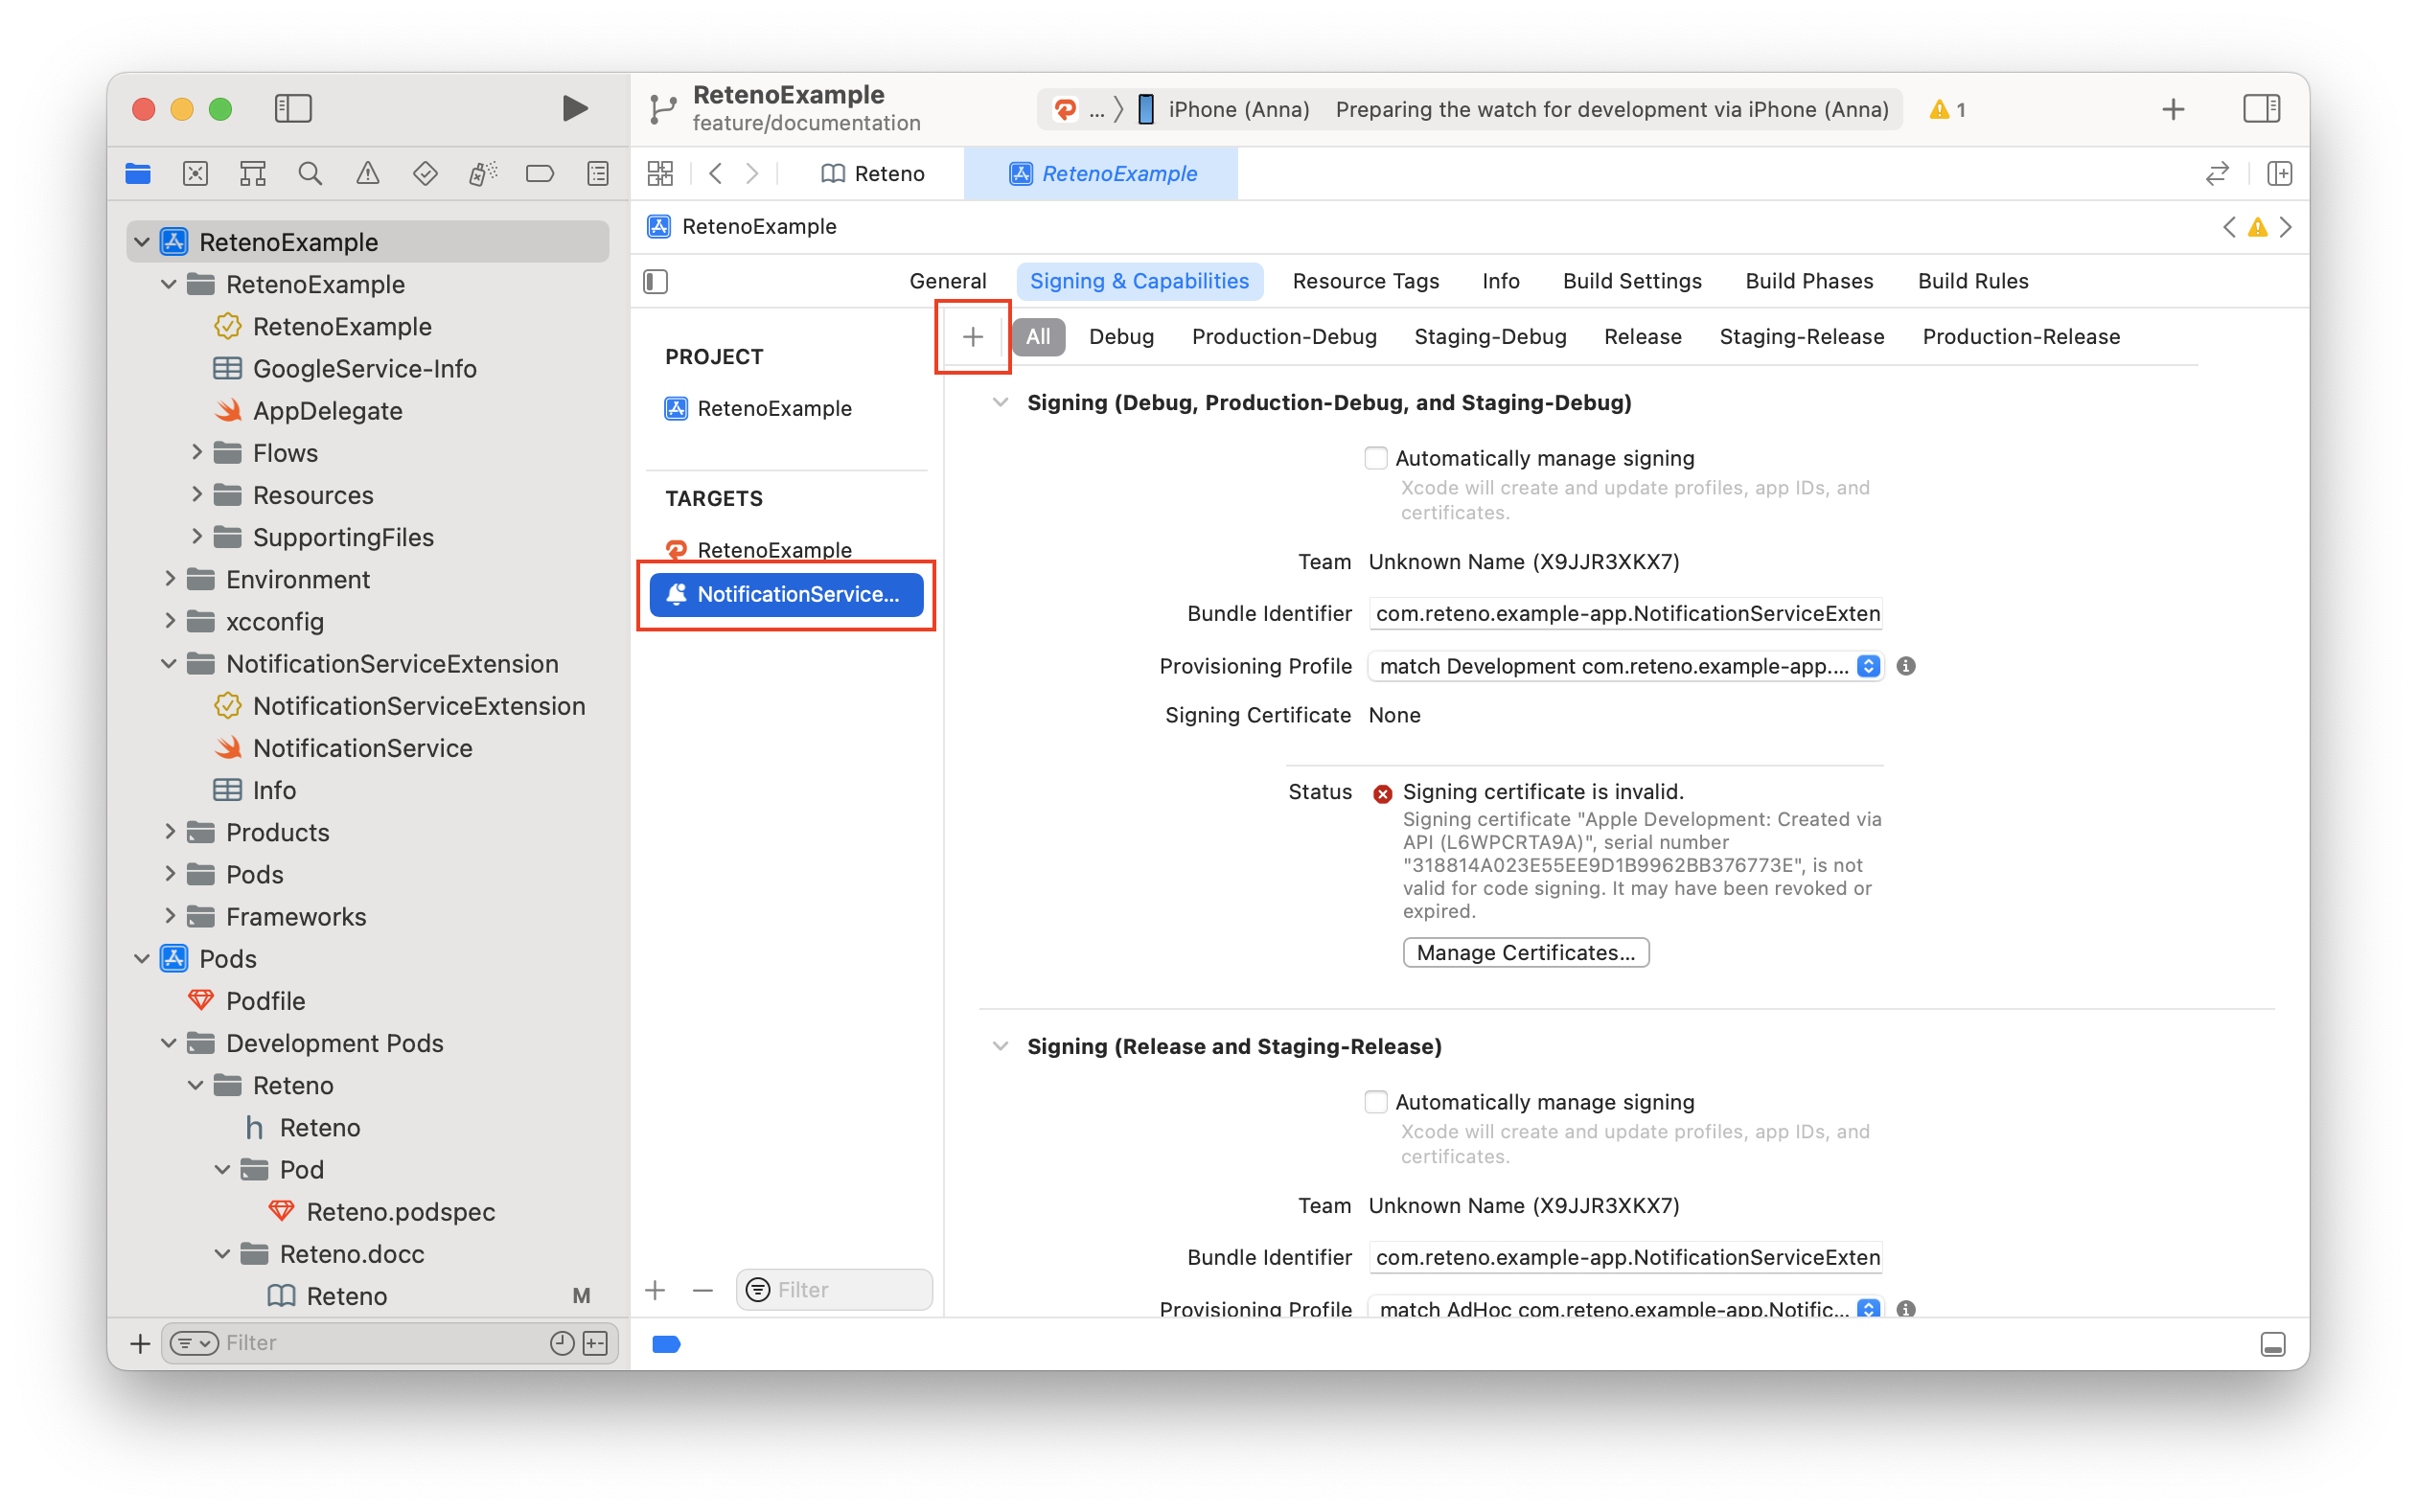
4.1 In the main app target, go to Signing & Capabilities → All.
4.2 Click + Capability if App Groups have not been added yet.
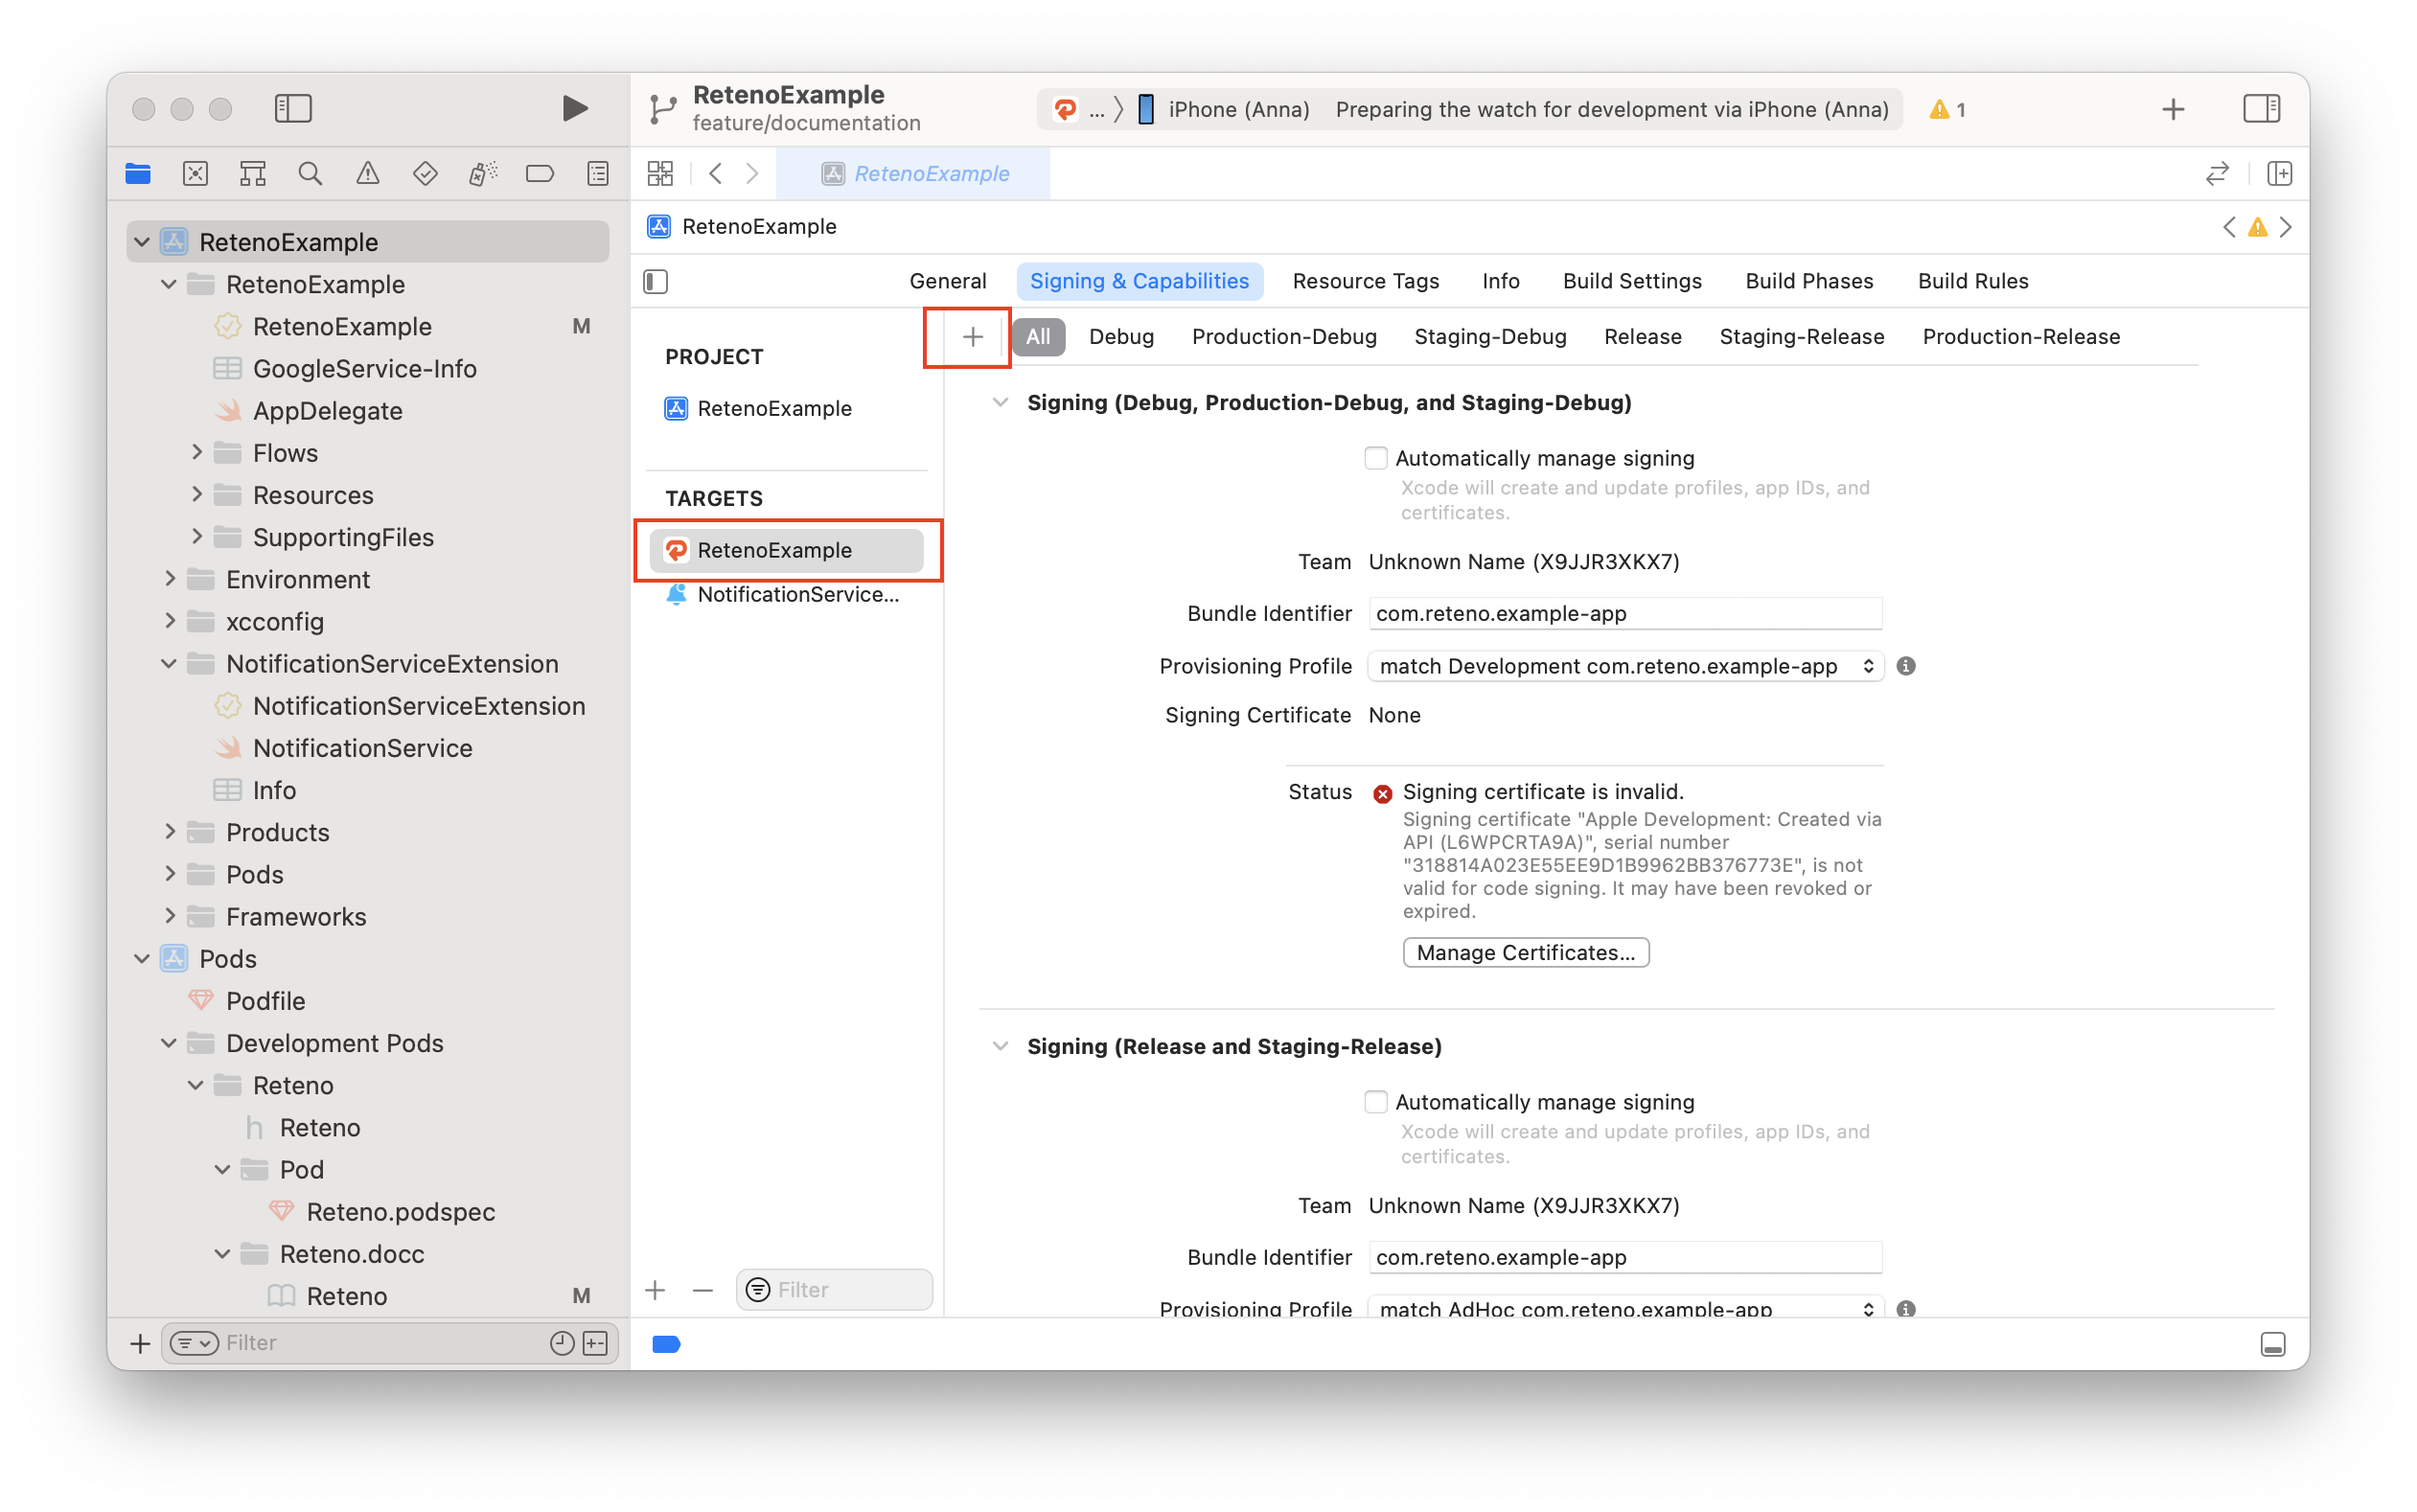
4.3 Select App Groups.
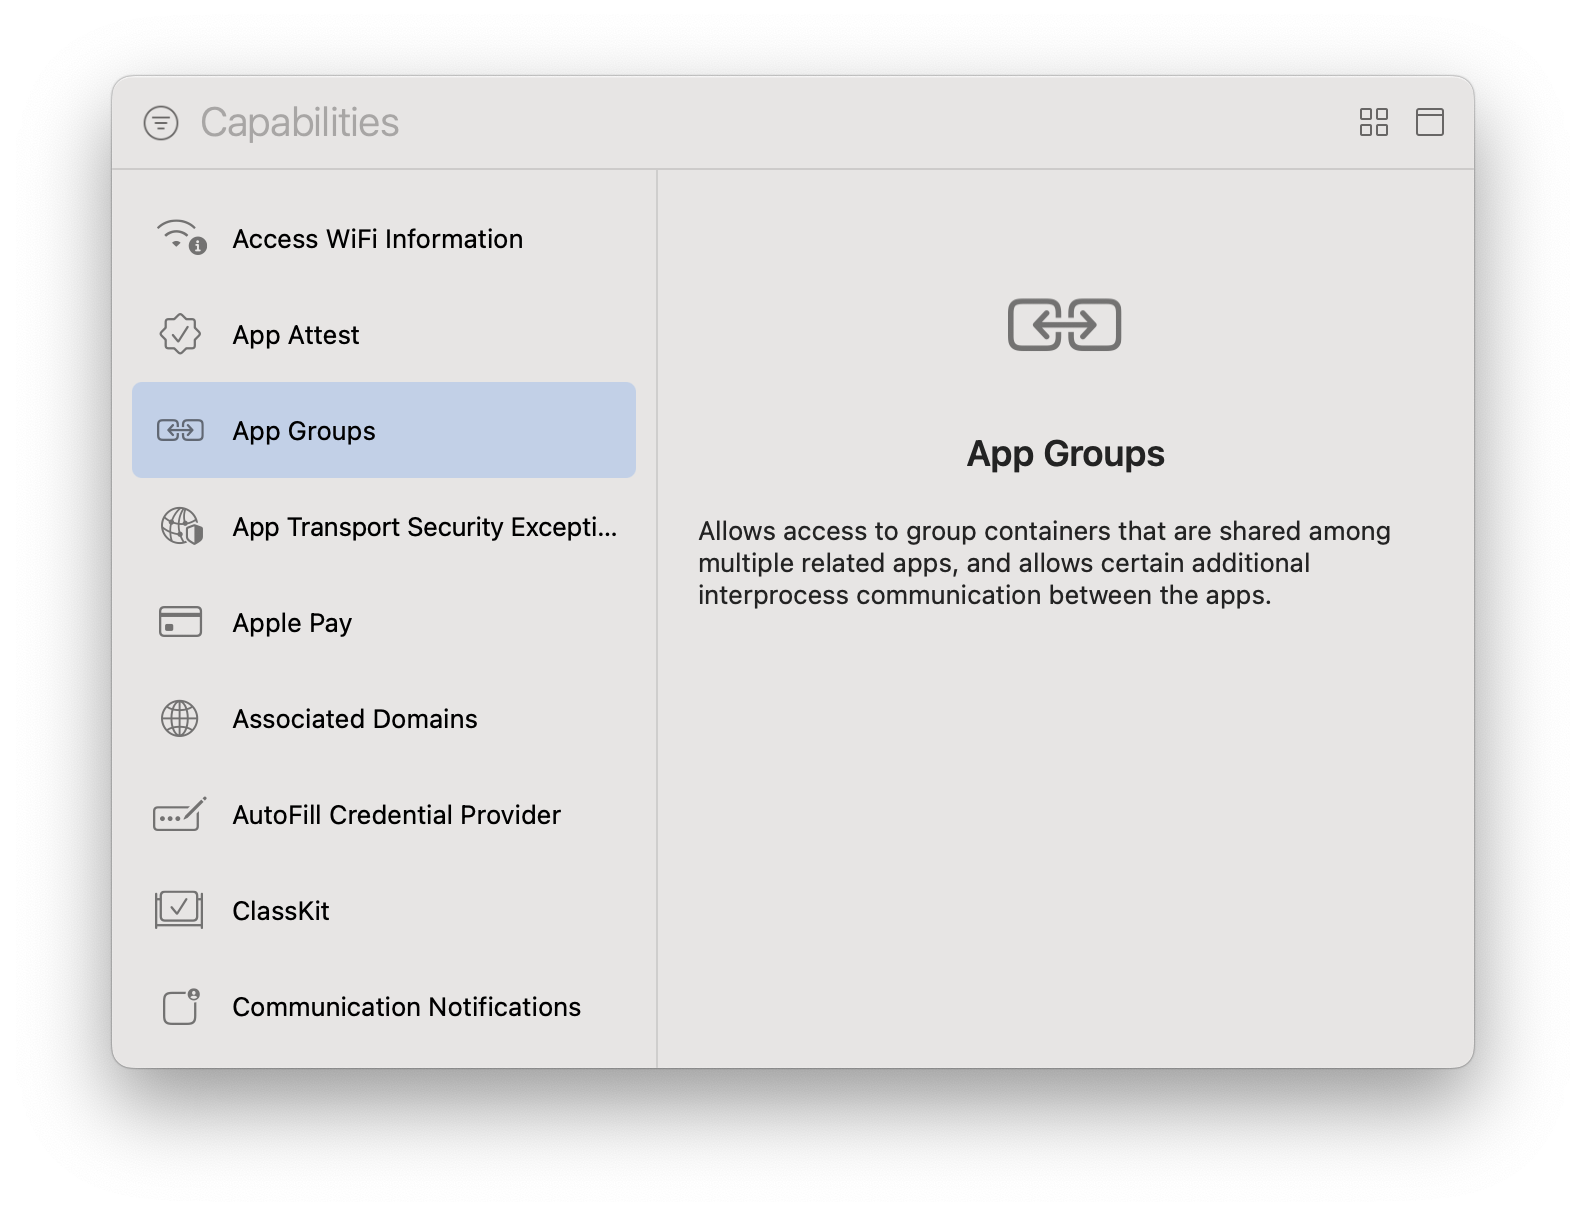
4.4 Under App Groups, click +.
4.5 Create the container group.{bundle_id}.reteno-local-storage, where {bundle_id} is the Bundle Identifier of the main app target, then click OK.
4.6 In the NotificationServiceExtension target, repeat steps 4.2–4.5 and select the same App Group.
NoteThe App Group must use the format
group.{bundle_id}.reteno-local-storage, where{bundle_id}is the Bundle Identifier of the main app target. Do not addNotificationServiceExtensionto the group name.
For more information, see Apple's Configuring App Groups documentation.
Step 5: Provide the Device Token Manually
Complete this step only when deviceTokenHandlingMode is .manual. This mode is required for FCM and for apps that manage APNs token registration themselves.
Pass the token to the SDK using:
Reteno.userNotificationService.processRemoteNotificationsToken(_ deviceToken: String)Option 1: Firebase Cloud Messaging
If you use Firebase Cloud Messaging (FCM), pass the FCM registration token from MessagingDelegate:
extension AppDelegate: MessagingDelegate {

    func messaging(_ messaging: Messaging, didReceiveRegistrationToken fcmToken: String?) {
        guard let fcmToken = fcmToken else { return }

        Reteno.userNotificationService.processRemoteNotificationsToken(fcmToken)
    }
}
Option 2: APNs with Manual Token Handling
If you send notifications directly through APNs but manage token registration yourself, convert the APNs token to a string and pass it from application(_:didRegisterForRemoteNotificationsWithDeviceToken:):
func application(
    _ application: UIApplication,
    didRegisterForRemoteNotificationsWithDeviceToken deviceToken: Data
) {
    let tokenString = deviceToken.map { String(format: "%02.2hhx", $0) }.joined()
    Reteno.userNotificationService.processRemoteNotificationsToken(tokenString)
}
Do not pass an APNs token to this method when using FCM. Pass only the FCM registration token.
Testing APNs DeliveryDevelopment builds installed from Xcode or signed with a development provisioning profile receive sandbox device tokens. Apps installed from the App Store, through Ad Hoc distribution, or through TestFlight normally receive production tokens. Sandbox and production tokens are not interchangeable.
Reteno uses the production APNs endpoint by default. To test a development build, contact Reteno support to enable
sandbox = truefor the corresponding app.For ongoing development, use one of these approaches:
- Create separate Reteno apps for development and production and keep
sandbox = truefor the development app.- Use separate accounts or projects for development and production, with a dedicated app in each.
Step 6: Add Custom Behavior for Notifications
To add custom behavior for foreground notifications and notification interactions, configure the corresponding handlers after initializing the SDK:
Reteno.userNotificationService.willPresentNotificationHandler = { notification in
    // Called only when the app is in the foreground.
    // Return the presentation options appropriate for your app.

    let authOptions: UNNotificationPresentationOptions
    if #available(iOS 14.0, *) {
        authOptions = [.badge, .sound, .banner]
    } else {
        authOptions = [.badge, .sound, .alert]
    }
    return authOptions
}Reteno.userNotificationService.didReceiveNotificationResponseHandler = { notification in
// Called when the user opens or dismisses the notification
// or selects a UNNotificationAction.
}Step 7: Run the App and Send a Test Notification
Run the app and make sure it builds successfully. You can test on a physical device or, with Xcode 14 and iOS 16 or later, on an iOS Simulator that supports remote push notifications.
After the permission prompt appears, allow notifications and send a test notification directly from Reteno rather than Firebase. See Sending Test Messages from the Event Debug View.
We also recommend enabling Debug Mode to identify issues in the SDK integration and event logging.
Troubleshooting
Push Notifications Are Not Delivered
-
Verify the push provider configuration
- For direct APNs delivery, make sure the APNs Auth Key (
.p8) or APNs certificate (.p12) is uploaded in Reteno. - Confirm that the Bundle ID in Reteno exactly matches the app's Bundle ID.
- Ensure the correct Team ID is configured.
- For direct APNs delivery, make sure the APNs Auth Key (
-
Verify notification registration and the device token
- Enable SDK Debug Mode and check that the device registers for notifications.
- With
.automatic, verify that registration succeeds; the SDK obtains and sends the APNs token automatically. - With
.manual, verify that your app receives the FCM or APNs token and passes it toprocessRemoteNotificationsToken(_:). - Do not pass both an FCM token and an APNs token for the same integration.
-
Verify App Groups
- The main app and the Notification Service Extension must use the same App Group.
- The expected format is
group.<bundle_id>.reteno-local-storage.
Rich Push Notifications Are Not Shown
- Make sure the
NotificationServiceExtensiontarget exists in the project. - Check that its deployment target is not higher than the main app's deployment target.
- Ensure the extension class inherits from
RetenoNotificationServiceExtension. - Verify that the Reteno package is linked to the extension target.
- Verify that both targets use the same App Group.
Common Errors
| Error | Cause | Solution |
|---|---|---|
Missing App Group | App Groups are not configured | Configure the App Group as described in Step 4 |
Invalid token format | The wrong token type is passed | Pass either the FCM token or the APNs token required by your integration, not both |
SDK not initialized | Reteno.start() has not been called | Call Reteno.start() in application(_:didFinishLaunchingWithOptions:) |