
Reteno Flutter Android SDK Setup
1. Install the plugin
flutter pub add reteno_plugin:1.11.0The plugin already includes Reteno com.reteno:fcm:2.10.1, Firebase Messaging 23.1.0, and RetenoFirebaseMessagingServiceBridge. Do not add those dependencies or a Reteno-only messaging service manually, except for the custom service below.
Your application must use AndroidX and resolve dependencies from google() and mavenCentral():
# android/gradle.properties
android.useAndroidX=true
Android version support
The manifests declare minSdkVersion 21, so the application builds and installs on Android 5.0. Reteno 2.10.1 itself is gated at API 26: core initialization and FCM message and token handling do nothing below Android 8.0. Use minSdkVersion 26 if every installed device must receive Reteno functionality; otherwise treat Reteno as unavailable on API 21–25.
Enable core library desugaring
The plugin enables desugaring for its own module, but Android Gradle Plugin also requires it in the consuming :app module. Without it, a clean build fails before installation.
// android/app/build.gradle
android {
    compileOptions {
        coreLibraryDesugaringEnabled true
        sourceCompatibility JavaVersion.VERSION_1_8
        targetCompatibility JavaVersion.VERSION_1_8
    }
}

dependencies {
    coreLibraryDesugaring 'com.android.tools:desugar_jdk_libs:1.2.2'
}
In Kotlin DSL, use isCoreLibraryDesugaringEnabled = true and coreLibraryDesugaring("com.android.tools:desugar_jdk_libs:1.2.2"). Version 1.2.2 matches the plugin; a newer version is fine when your Android Gradle Plugin requires one. Applications already compiling with Java 11 or 17 keep that compatibility level and still enable desugaring.
2. Configure Firebase Cloud Messaging
- Add the Android application in Firebase Console with the exact
applicationId. - Download
google-services.jsonand place it atandroid/app/google-services.json. - Apply the Google Services Gradle plugin to the application module by following the Firebase Flutter setup guide.
- Download the Firebase service-account JSON and use it to connect your mobile app in Reteno.
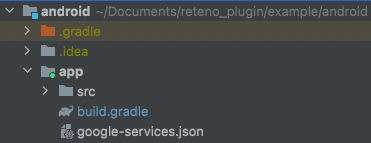
Do not ship the service-account JSON inside the application; only google-services.json belongs in the Android project.
Reteno uses native Firebase on Android, so firebase_core is not required for Reteno alone. If the application also uses FlutterFire, initialize Firebase before Reteno.
3. Initialize Reteno from Flutter
Initialize the SDK once during application startup. A custom Application class and native RetenoImpl initialization are no longer required.
import 'package:flutter/widgets.dart';
import 'package:reteno_plugin/reteno.dart';

Future<void> main() async {
  WidgetsFlutterBinding.ensureInitialized();

  await Reteno().initialize(
    accessKey: '<your_access_key>',
    options: RetenoInitOptions(
      lifecycleTrackingOptions: LifecycleTrackingOptions.all(),
      defaultNotificationChannelConfig:
          const RetenoDefaultNotificationChannelConfig(
        name: 'General notifications',
        description: 'Default Reteno notification channel',
        showBadge: true,
        lightsEnabled: true,
        vibrationEnabled: true,
      ),
    ),
  );

  runApp(const MyApp());
}
The options are optional:
lifecycleTrackingOptionsdefaults to all tracking enabled. Use.all(),.none(), or provide individual lifecycle, push-subscription, and session flags.isPausedInAppMessagesstarts the SDK with in-app messages paused.isDebugenables Reteno native debug mode.defaultNotificationChannelConfigcustomizes the default Android notification channel.deviceTokenHandlingModeis ignored on Android; Android always handles the FCM token automatically.
To use an application-defined device ID, pass an asynchronous provider separately. It is awaited once before native initialization; return one stable, non-empty value across launches, or null to keep the platform default. A blank value throws ArgumentError, and there is no timeout, so a provider that never completes leaves initialize() pending.
await Reteno().initialize(
  accessKey: '<your_access_key>',
  customDeviceId: () async => analyticsDeviceId,
);
4. Request push permission and verify setup
Android 13 and later require the POST_NOTIFICATIONS runtime permission, which the plugin manifest already declares. Request it at the appropriate point in your user flow:
final granted = await Reteno().requestPushPermission();
final issues = await Reteno().diagnose();
If another package or native code owns the permission prompt, call Reteno().updatePushPermissionStatus() after that flow completes.
An empty issues list means the bridge-local checks passed. It does not prove native readiness or validate the access key, Firebase credentials, or delivery. See Push notifications for diagnostic codes and troubleshooting.
Finish with an end-to-end test on a physical API 26+ device: identify a test contact, send a push from Reteno, and check foreground, background, and terminated-state behavior.
Custom FirebaseMessagingService
Most applications do not need a custom FirebaseMessagingService. Use this setup only when the application already has its own native FCM logic.
The bridge's supertypes are implementation dependencies of the plugin, so add them explicitly in the app module:
dependencies {
    implementation "com.google.firebase:firebase-messaging:23.1.0"
    implementation "com.reteno:fcm:2.10.1"
}
If the app uses the Firebase BoM, keep its resolved Firebase Messaging version instead of forcing 23.1.0, and keep Reteno at 2.10.1. Then:
- Keep exactly one application-level service with the
com.google.firebase.MESSAGING_EVENTintent filter. - Extend
RetenoFirebaseMessagingServiceBridge. - Call
superfromonNewTokenandonMessageReceived. - Remove the plugin bridge service from the merged application manifest.
- Include
Retenoin the class name; plugin diagnostics use it to recognize the custom handler.
<manifest xmlns:android="http://schemas.android.com/apk/res/android"
    xmlns:tools="http://schemas.android.com/tools">
    <application>
        <service
            android:name="com.reteno.reteno_plugin.RetenoFirebaseMessagingServiceBridge"
            tools:node="remove" />

        <service
            android:name=".MyRetenoMessagingService"
            android:exported="false">
            <intent-filter>
                <action android:name="com.google.firebase.MESSAGING_EVENT" />
            </intent-filter>
        </service>
    </application>
</manifest>package com.example.app // Replace with the app namespace.
import com.google.firebase.messaging.RemoteMessage
import com.reteno.reteno_plugin.RetenoFirebaseMessagingServiceBridge
class MyRetenoMessagingService : RetenoFirebaseMessagingServiceBridge() {
override fun onNewToken(token: String) {
super.onNewToken(token)
// Application token logic.
}
override fun onMessageReceived(message: RemoteMessage) {
super.onMessageReceived(message)
if (!isRetenoMessage(message)) {
// Application logic for non-Reteno messages.
}
}
}Place the class in the package referenced by the manifest, or use its fully qualified name in android:name. Check the merged manifest, not only the source manifest, and use Reteno().diagnose() to detect a missing service or a conflict.
Notification icon
To set a custom icon for Reteno push notifications, add the com.reteno.notification_icon meta-data entry to AndroidManifest.xml inside the application tag:
<meta-data
    android:name="com.reteno.notification_icon"
    android:resource="@drawable/ic_notification" />
The standard Firebase meta-data com.google.firebase.messaging.default_notification_icon is not applied to Reteno notifications — use the Reteno entry above.
Notification grouping
See Android notification grouping to assign Reteno notifications to a constant group or derive the group ID from a push payload field.
Upgrading from the previous guide
Older documentation required native Reteno wiring. When migrating to 1.11.0, remove:
- the custom
Application/RetenoApplicationbootstrap andRetenoImplinitialization; - the matching
android:namemanifest attribute, if that class existed only for Reteno; - old Reteno-only
MESSAGING_EVENTservices; - manually added Reteno and Firebase dependencies, unless you keep the custom service above.
Keep google-services.json, the Google Services Gradle plugin, Reteno provider credentials, and application-specific FCM logic.
R8 and ProGuard
Reteno Core 2.10.1 ships its own consumer rules, so no additional keep rules are required. Validate your minified release build when enabling R8.