Use OAuth 2.0 when your server-side app needs to access the Reteno API on behalf of a Reteno user without storing the user's credentials or using a static API key.
OAuth 2.0 lets a user grant your app access to specific Reteno API resources. The app receives tokens and uses them to call Reteno API according to the selected access scopes.
Quick Start
- Register an OAuth app.
- Get your Client ID and Client Secret.
- Build the authorization URL and redirect the user.
- Exchange the authorization code for tokens.
- Call the API with the access token.
- Refresh tokens when needed.
- Check token status when needed.
How OAuth 2.0 Works
OAuth 2.0 allows a third-party app to access Reteno API on behalf of a Reteno user without receiving the user's login or password.
Example flow:
- A user connects your app to their Reteno account.
- Reteno shows an authorization form.
- The user logs in, completes MFA if it is enabled for their account, and grants access.
- Reteno redirects the user back to your app with an authorization code.
- Your app exchanges this code for an access token and a refresh token.
- Your app uses the access token to call Reteno API.
Note: The implementation is supported only for apps with a server part, using
response_type=code.
Access Scopes
Access to Reteno API resources is determined by the access scopes selected during app registration.
| Access scope | Allows the app to |
|---|---|
| Full access to API | Use all available API methods |
| Access to events | Generate events |
| Access to events and contacts | Generate events, add or update contacts, and get contact activity |
| Access to messages | Send prepared messages |
Choose only the scopes your app actually needs. Scopes limit what your access token can do.
Note: If you change the access scope after registration, already issued tokens continue to work with the old set of permissions. To get a token with updated permissions, the user must go through authorization again.
Register an OAuth App
Before you start integrating with OAuth 2.0, register your app in Reteno.
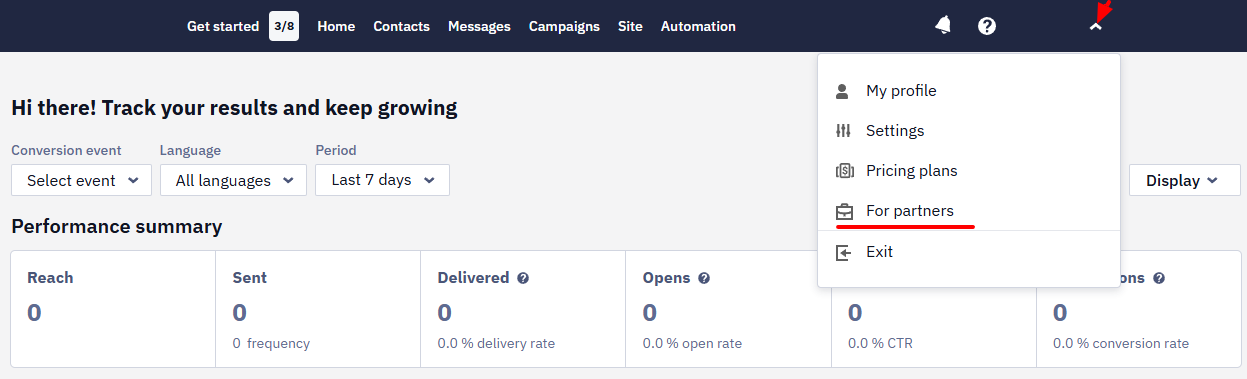
- Click the account menu in the upper-right corner and open For partners.
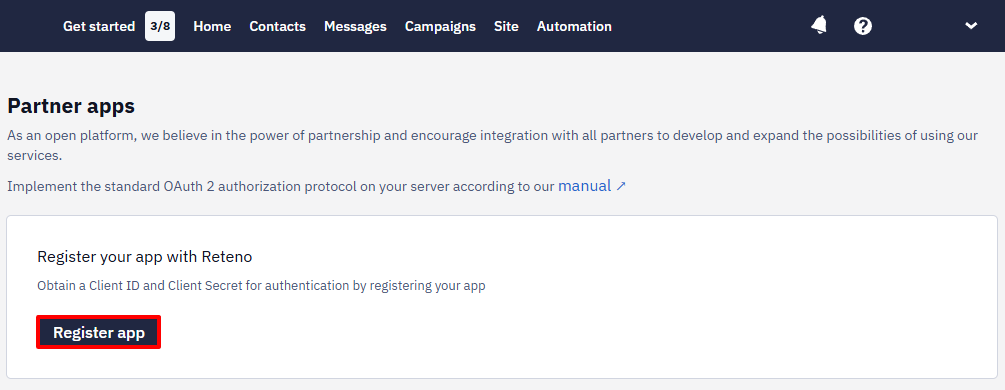
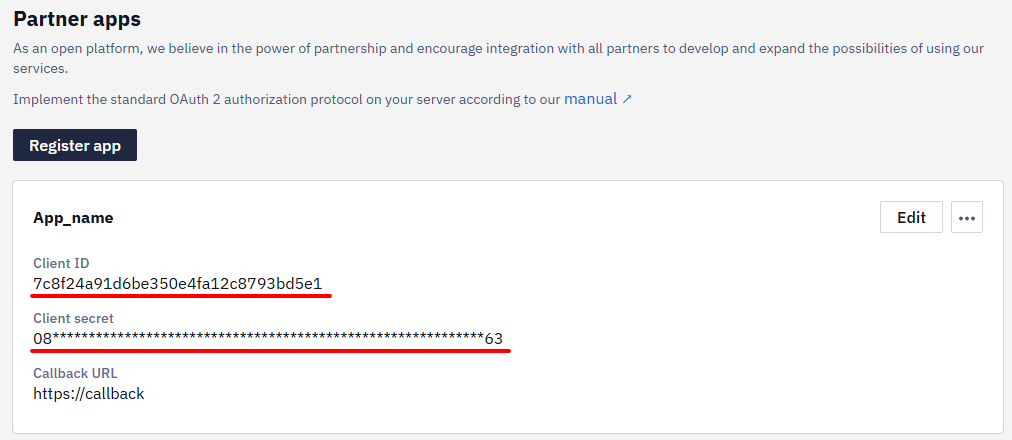
- On the Partner apps page, click Register app.
-
Provide app information:
- Name — change it if needed
- Callback URL — the URL where Reteno redirects the user after they approve or deny authorization (you can leave this blank and add it later)
- Access scopes — select from the table above
-
Click Register.
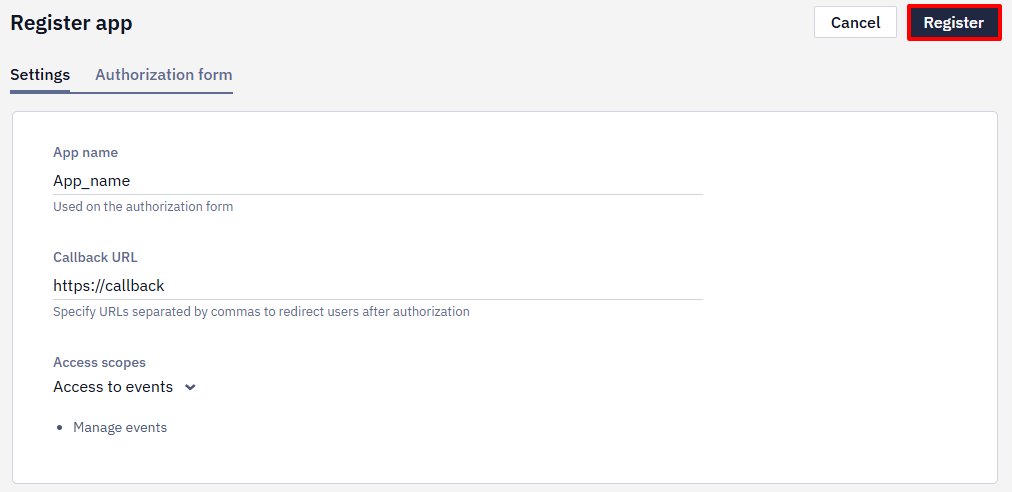
After registration, Reteno generates a Client ID and Client Secret for your app. Save them and store them securely — you will need them to request tokens.
Customize the Authorization Form
You can customize how your app appears on the Reteno authorization form. This helps users recognize your app before granting access.
- Click the account menu in the upper-right corner and open For partners.
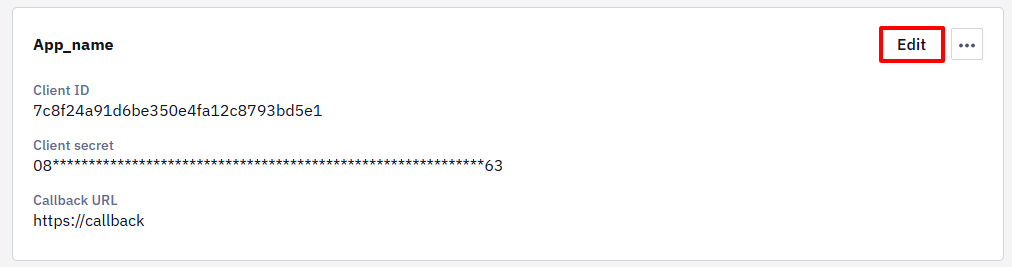
- Find your OAuth app on the Partner apps page.
- Click Edit.
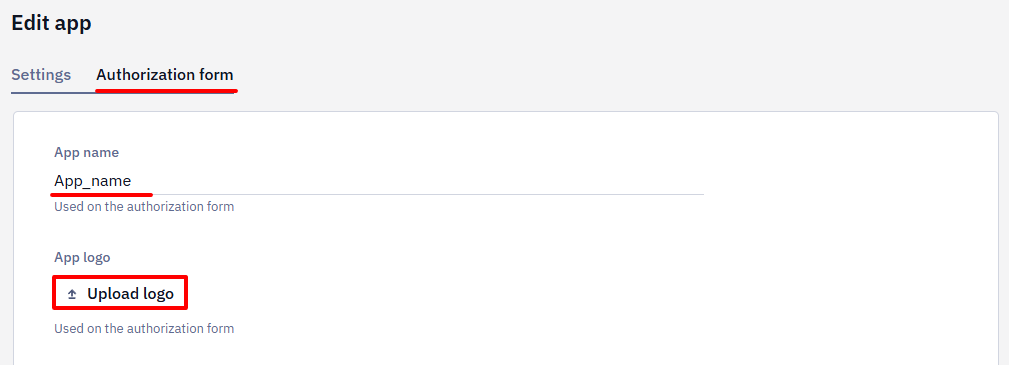
- Go to the Authorization form tab.
- Update the form details:
- App name — change it if needed
- Logo — upload your app logo
- Click Save.
Logo requirements:
- Supported formats:
JPG,GIF,PNG - Maximum file size:
1 MB - Recommended aspect ratio:
1:1 - Recommended size:
96 × 96 px - Larger images are cropped to 100% width and center-aligned
Manage an OAuth App
After registration, the app appears on the Partner apps page.
From there, you can:
- copy the Client ID and Client Secret
- edit app settings
- customize the authorization form
- preview the authorization form
- delete the app
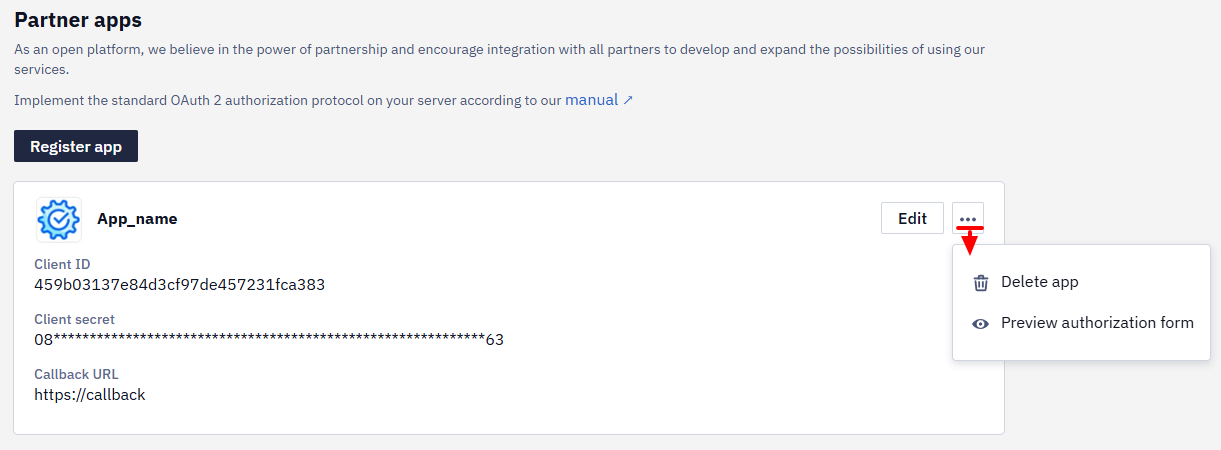
Warning: Once an OAuth app is deleted, all related keys, tokens, and integrations become invalid. Any integration using this app will stop working and must be reconfigured with a new OAuth app.
Authorization Flow
Step 1 — Build the Authorization URL
Redirect the user to:
https://uaa.reteno.com/uaa/oauth/authorize?response_type=code&client_id=YOUR_CLIENT_ID&redirect_uri=YOUR_CALLBACK_URLParameters:
| Parameter | Description |
|---|---|
response_type=code | Requests the authorization page with login fields |
client_id | Your Client ID, received when registering the app |
redirect_uri | Must exactly match the Callback URL registered for the app, including protocol, domain, path, and any trailing slash |
scope | Optional. The access scope requested by the app, for example: role.full.api.methods. If omitted, the scope is taken from the OAuth app settings associated with the provided client_id. |
Step 2 — User Authorization
The user logs in to Reteno. If MFA is enabled for their account, they enter the one-time code from their authenticator app. The user then grants access to your app. If MFA is not enabled, the authorization flow skips the one-time code.
After successful authorization, Reteno redirects to the Callback URL with an authorization code:
HTTP/1.1 302 Found
Location: https://yourapp.com/callback?code=YOUR_CODE
Save the code value — you will use it in the next step.
Step 3 — Obtain Tokens
Send a POST request to https://uaa.reteno.com/uaa/oauth/token.
Pass the following parameters in the request body:
| Parameter | Description |
|---|---|
grant_type=authorization_code | Requests an access token using an authorization code |
code | Authorization code received in Step 2 |
redirect_uri | Must exactly match the Callback URL used in Step 1, including protocol, domain, path, and any trailing slash |
client_id | Your Client ID, received when registering the app |
client_secret | Your Client Secret, received when registering the app |
Pass parameters in the request body with
Content-Type: application/x-www-form-urlencoded. Passing parameters as query string is also supported for backward compatibility but is not recommended.
Authentication — Basic Auth: username is your Client ID, password is your Client Secret.
Response:
{
  "access_token": "OvVWMW5Lh-GLCyASZXrEYtoIkUHQveP-fvtR5oYb41cY9LFlpGMjiQjNllxGUxZf6x4IW3MH_-7u4bOLPFEKPx7wIK35PXYjPVsaAWdhPByqeSRPYcU5gVTYJ0BvB7qV",
  "token_type": "Bearer",
  "refresh_token": "HLrduDsdL0BkJx1BkcDM_W_-ONoukTX7vToccDgagW-An9CLxORnVSdCtQ3l9I8NwhEquJXKSSxDqPfE4puMETI2-e0Npijn1Ve5GXklbu-2bXh6zoe296CqFtXf88yu",
  "scope": "role.full.api.methods",
  "expires_in": 172799
}
Token lifetimes:
- Access token: 48 hours
- Refresh token: 30 days
Both countdowns start from the moment the token is issued.
Step 4 — Call Reteno API
Pass the access token in the Authorization header of every API request:
Authorization: Bearer YOUR_ACCESS_TOKENThe available API methods depend on the access scope configured during app registration.
Step 5 — Refresh the Access Token
When the access token expires, use the refresh token to get a new pair of tokens without requiring the user to log in again.
Send a POST request to https://uaa.reteno.com/uaa/oauth/token.
Pass the following parameters in the request body:
| Parameter | Description |
|---|---|
grant_type=refresh_token | Requests a new token using a refresh token |
refresh_token | Refresh token received in Step 3 (or from the most recent Step 5) |
client_id | Your Client ID, received when registering the app |
client_secret | Your Client Secret, received when registering the app |
Pass parameters in the request body with
Content-Type: application/x-www-form-urlencoded. Passing parameters as query string is also supported for backward compatibility but is not recommended.
Authentication — Basic Auth: username is your Client ID, password is your Client Secret.
Response:
{
  "access_token": "OvVWMW5Lh-GLCyASZXrEYtoIkUHQveP-fvtR5oYb41cY9LFlpGMjiQjNllxGUxZf6x4IW3MH_-7u4bOLPFEKPx7wIK35PXYjPVsaAWdhPByqeSRPYcU5gVTYJ0BvB7qV",
  "token_type": "Bearer",
  "refresh_token": "HLrduDsdL0BkJx1BkcDM_W_-ONoukTX7vToccDgagW-An9CLxORnVSdCtQ3l9I8NwhEquJXKSSxDqPfE4puMETI2-e0Npijn1Ve5GXklbu-2bXh6zoe296CqFtXf88yu",
  "scope": "role.full.api.methods",
  "expires_in": 172799
}
After a successful refresh, the previous access token becomes invalid — only the new one can be used. Use the new refresh token for subsequent refresh requests.
Token Introspection
To check token status — whether it is active, when it expires, and what scopes it has — send a POST request to https://uaa.reteno.com/uaa/oauth/introspect.
Pass a single parameter in the request body with Content-Type: application/x-www-form-urlencoded:
| Parameter | Description |
|---|---|
token | The access token or refresh token to inspect |
Authentication — Basic Auth: username is your Client ID, password is your Client Secret.
The response contains token metadata: active status, expiration time, granted scopes, and other details.
The legacy endpoint
/oauth/check_tokenremains available for backward compatibility.
Code Examples
Python
import requests, json

authorize_url = "https://uaa.reteno.com/uaa/oauth/authorize"
token_url = "https://uaa.reteno.com/uaa/oauth/token"
callback_uri = "http://my_host:8081/test/callback"
protected_api_contacts = "https://reteno.com/api/v1/contacts"

client_id = 'YOUR_CLIENT_ID'
client_secret = 'YOUR_CLIENT_SECRET'

authorization_redirect_url = authorize_url + '?response_type=code&client_id=' + client_id + '&redirect_uri=' + callback_uri
print("go to the following url on the browser and enter the code from the returned url: ")
print("---  " + authorization_redirect_url + "  ---")
authorization_code = input('code: ')

data = {'grant_type': 'authorization_code', 'code': authorization_code, 'redirect_uri': callback_uri}
access_token_response = requests.post(token_url, data=data, allow_redirects=False, auth=(client_id, client_secret))

tokens = json.loads(access_token_response.text)
access_token = tokens['access_token']
print("access token: " + access_token)

api_call_headers = {'Authorization': 'Bearer ' + access_token}
api_call_response = requests.get(protected_api_contacts, headers=api_call_headers)
print(api_call_response.text)
Connected Apps
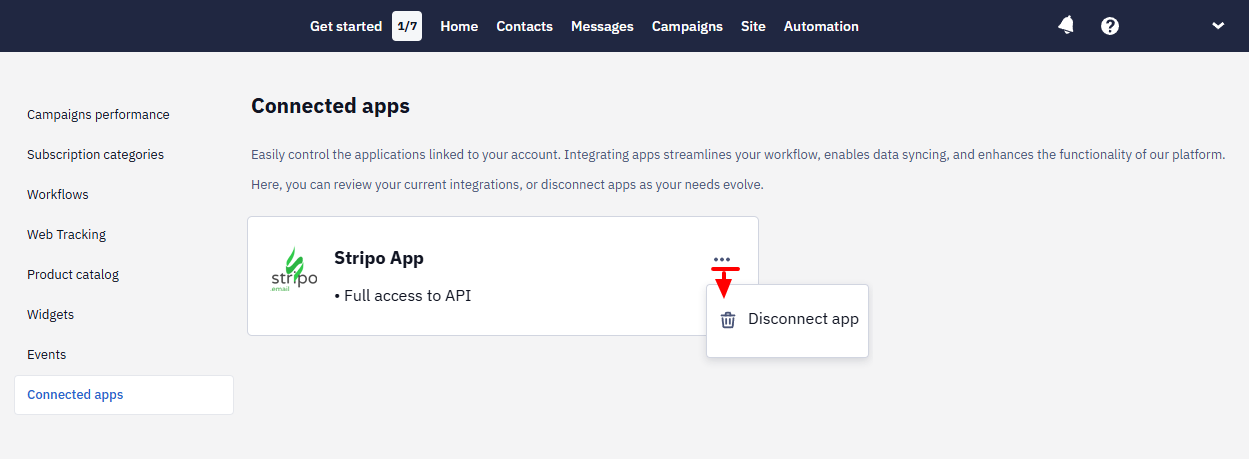
To view apps that have been granted access to your account, click the account menu in the upper-right corner, open Settings, and go to Connected apps.
To disconnect an app, click the three-dot menu next to it and select the appropriate option.