
Bulk Contact Uploading
You can carry out bulk contact uploading in two ways:
- Upload a CSV file — initial import of contacts and segments from other systems.
- Backend API request (server-to-server) — an alternative way to import volume and complicated contact lists, when your database contains more than several million contacts or includes more than several dozen fields.
Import duration is not fixed. Import jobs share processing capacity across accounts, so completion time depends on the current load and on how many additional fields must be created or updated. Contact imports run independently from campaign sending and message template editing, so you can continue these activities while an import is being processed.
Let’s consider the process of bulk contact uploading.
Contact Card and Additional Fields
Understanding contact cards and additional fields before uploading a contact list is crucial because these elements form the backbone of user data management.
A contact card is a user profile that contains user identifiers (external ID, email, phone number, mobile, and push tokens), activity data, and attributes stored in additional fields.
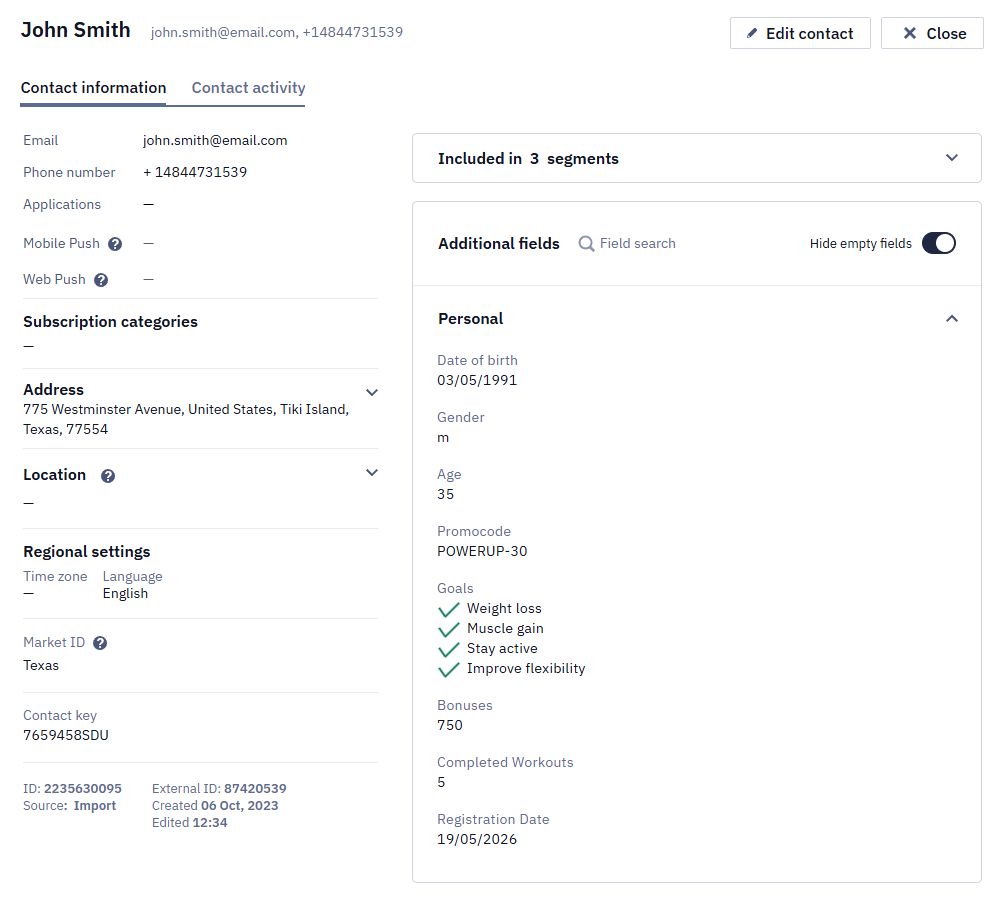
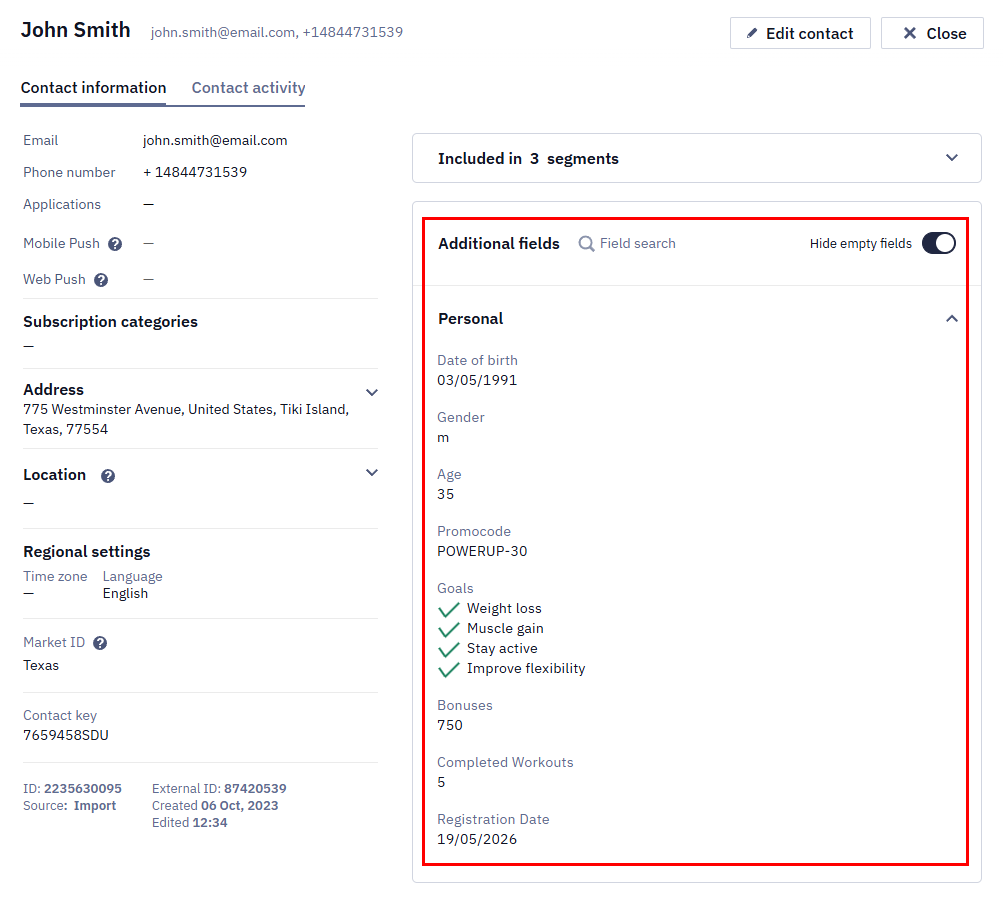
Attributes represent extended information about your users: the number of completed lessons, viewed product category, used promo code, plan type, and so on.
ImportantBefore sending specific contact data to Reteno in any way, you must create corresponding additional fields in your account.
NoteUse an external ID as the primary contact identifier to prevent data duplication when creating and updating contacts.
File Uploading
You can upload a file in the CSV format in the Contacts → Import section.
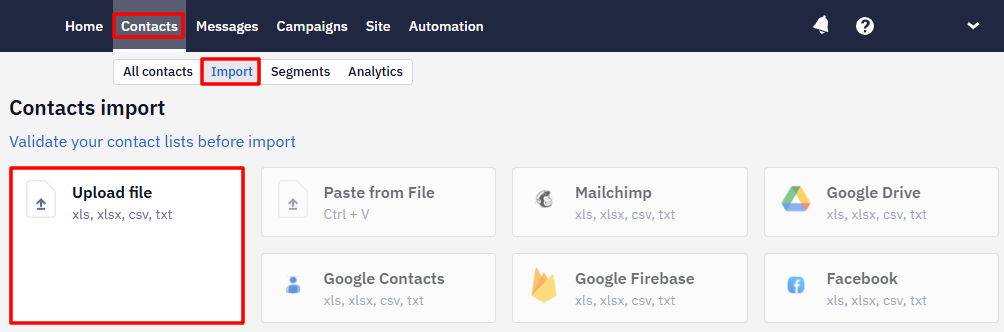
The process of import is divided into three stages:
NoteIf contacts in your file are in the Deleted status, a plain re-import won't bring them back. In Import Parameters Settings, enable the Restore and update previously deleted contacts switcher before starting the import.
The same applies over the API. Sending an event that carries only an external ID does not restore a deleted contact by itself: on arrival the event is matched only against active contacts, so the workflow starts without a
contactIdand without a media channel, and restoration happens later, when a message is sent. To restore on demand, call Add/update contacts with the sameexternalCustomerIdand"restoreDeleted": true, including the channels and fields you need.If a workflow has to send an email before the contact card is restored, pass the email address in the event and set
${emailAddress}explicitly as the recipient. Creation, restoration, and enrichment can be asynchronous, so add a delay and a Get contact block before checkingcontactIdor field values.
RecommendationImport your contacts via Get Started Section
Backend API
The Add/update contacts API method is used for bulk asynchronous contact creation and updating. One request allows you to add or update up to 3000 contacts, which are added or updated in Reteno within a few minutes.
Use the Add/update contacts method for initial imports and scheduled high-volume updates when changes can be processed asynchronously. For a single contact that must be updated immediately, use the Add/update a contact method.
Features:
- The response includes an
asyncSessionId, which you can use to get the import status and contact IDs using Get contact import status. - If the External ID in the request already belongs to another contact, the contact isn't updated: the method for a single contact returns the
Duplicated externalCustomerIderror, and the bulk method accepts the request, but the import status isERROR. - The API doesn't return an explicit flag showing that a contact is deleted — the bulk import response contains only the session identifier. You can detect it indirectly: with
"restoreDeleted": false, themappingfield of the import status response lists only created and updated contacts, so a contact that is missing frommappingis a deleted one. - When updating the
mobilepushchannel, pass thedeviceobject with at least theosfield. Without it, the token may fail sending after the update.
Method type: POST. The description of the method, fields, and request body format are available here.
URL to send request: https://api.reteno.com/api/v1/contacts
Batch Import vs. Individual Requests
When a scheduled sync updates many contacts every day, batch the changed contacts instead of sending one real-time request per contact. For example, a daily sync of 25,000 changed contacts would require 25,000 calls to the Add/update a contact method, but it can be sent as one CSV import job or split into bulk API batches of up to 3000 contacts per request.
To reduce API volume during a recurring contact sync:
- Export only contacts whose data changed since the previous sync.
- Include a stable identifier, such as an external ID, so existing contact cards are updated instead of duplicated. If your system can issue a new ID for the same person — for example, on every pass through a funnel — don't send that ID and deduplicate by email instead.
- Add only the fields, groups, and subscription data that need to be created or updated.
- Upload the changes as a file import or send them through the Add/update contacts bulk API method. For recurring updates from a data warehouse, you can also import contacts from BigQuery.
- Store the returned
asyncSessionIdand check the import status before treating the sync as completed.
| Requirement | Individual API requests | Batch import or bulk API |
|---|---|---|
| Best for | Immediate updates for one contact, such as a profile change or subscription update | Initial imports and scheduled high-volume updates, such as hourly or daily contact synchronization |
| Volume | One contact per request | One file import job or up to 3000 contacts per bulk API request |
| Processing | Synchronous: after a 200 response, the contact data is updated in Reteno | Asynchronous: contacts are added or updated within a few minutes |
| API load | Grows linearly with the number of changed contacts | Reduces request count by grouping many contacts in one import or batch |
| Status tracking | Use the response from each contact request | Use asyncSessionId and the import status method |
| Recommended frequency | Use only when every contact update must be available immediately | Use for planned recurring syncs; split large updates into batches and monitor each import session |
A one-off bulk import of tens of thousands of contacts (for example, around 60,000) doesn't need special timing or off-hours scheduling — processing is asynchronous, so a larger batch simply takes longer to finish rather than requiring a different approach.
A marker such as Imported isn't a system contact status — it's an additional field you create yourself. Update such a field through the API by its ID in the fields array rather than by its name: an additional field is addressed by id and value only.
If your integration already knows which contacts changed in an external segment, update a contact field or group membership during the import instead of querying every segment back from Reteno to find those changes.
An example of a request body:
{
  "contacts": [
    {
      "channels": [
        {
          "type": "email",
          "value": "[email protected]"
        },
        {
          "type": "sms",
          "value": "380942583691"
        },
        {
          "type": "mobilepush",
          "value": "8900-7654-6456-9876-0011",
          "device": {
            "appId": "83b77a49-fc28-409b-aeaa-68c9d544ab9d",
            "deviceModel": "iPhone 13",
            "os": "iOS",
            "appVersion": "4.1.6"
          }
        }
      ],
      "firstName": "John",
      "lastName": "Smith",
      "address": {
        "town": "London",
        "region": "West",
        "address": "First str. 1",
        "postcode": "12345"
      },
      "fields": [
        {
          "id": 12345,
          "value": "..."
        }
      ]
    }
  ],
  "dedupeOn": "email",
  "customFieldsIDs": [
    12345
  ],
  "groupNames": [
    "Customers"
  ],
  "groupNamesExclude": [
    "Subscribers"
  ],
  "restoreDeleted": false,
  "eventKeyForNewContacts": "newContact"
}
To retrieve the IDs, keys, types, and allowed values of additional fields, use the Get additional fields method.
The eventKeyForNewContacts field is optional. When it's set, an event with the specified key is generated only for contacts that are created by the request, not for the ones that are updated. Use that event key as a workflow start condition to run a workflow for new contacts only.
If the request doesn't specify contactFields, all contact fields are updated — including the ones you didn't send, which are written with null. To update only some fields, list them in contactFields.
customFieldsIDs works the same way for custom fields: a field whose ID is in that array but which the contact record doesn't contain is cleared, while a field outside the array is left as it is. The Add/update a contact resource behaves differently: a custom field missing from fields keeps its value even when its ID is listed in customFieldsIDs.
To remove the email channel using Add/update contacts, include email in contactFields and omit the email channel from the contact's channels array.
In the same way, you can remove a mobile push token and keep the email: include mobilepush in contactFields and omit the mobilepush channel from the contact's channels array.
The dedupeOn field controls which identifier is used to match existing contacts. Set it to "sms" to deduplicate by phone number instead of email — this matters because the real-time Add/update a contact method gives email priority by default, so an update with the same phone but a new email creates a new contact unless you dedupe by phone here.
Don't fire a dependent send at the same timeBecause Add/update contacts is asynchronous, don't fire a dependent Send prepared message call at the same moment — wait for the import to finish or verify the contact first. A stable
externalCustomerIdremains the most reliable identifier for matching.
Updated 19 days ago