
Webhooks for Tracking Activity
Webhooks allow you to track contact activity in the Reteno in real time and automatically send notifications about each event to a specified client URL
Webhooks are configured by adding an external URL to your account. After that, you will automatically receive data about contact actions across various media channels via POST requests.
The system sends requests to your server whenever one of the following events occurs:
- Sent — the message sent to the contact (for Mobile Push only).
- Delivered — the message was delivered to the contact.
- Undelivered — the message could not be delivered.
- Read — the contact opened the message.
- Unsubscribed — the contact unsubscribed from the campaign.
- Clicked — the contact clicked on a link in the message.
- Spam — the message was marked as spam.
- Subscription changed — the contact changed their subscription category.
NoteBefore setting up webhooks, you need to configure an URL on your server where you want to receive messages —
POSTrequests inJSONformat — and process the data accordingly.
Creating Data Export
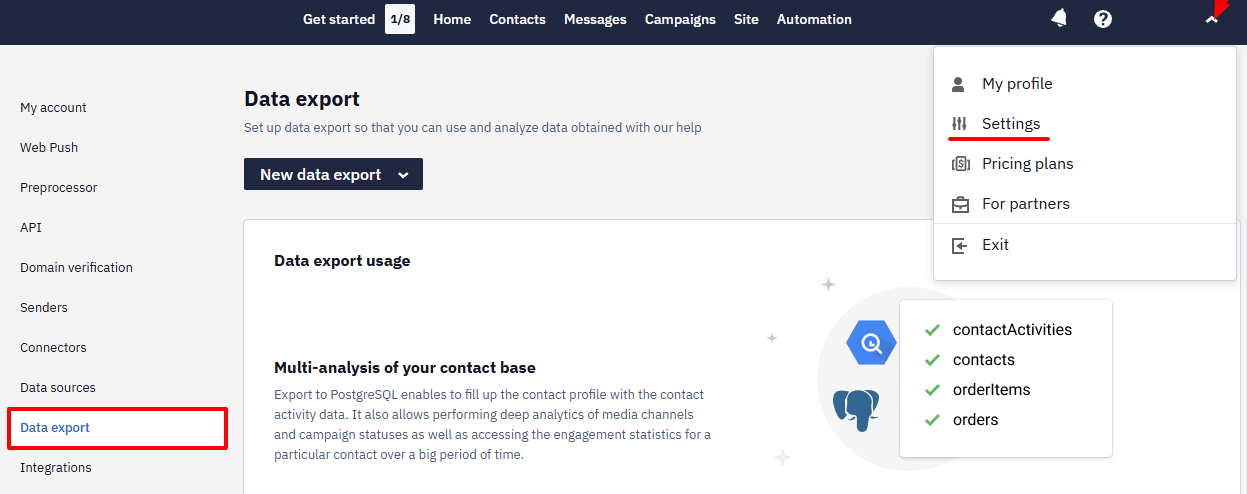
- Open the Data export tab in your account settings.
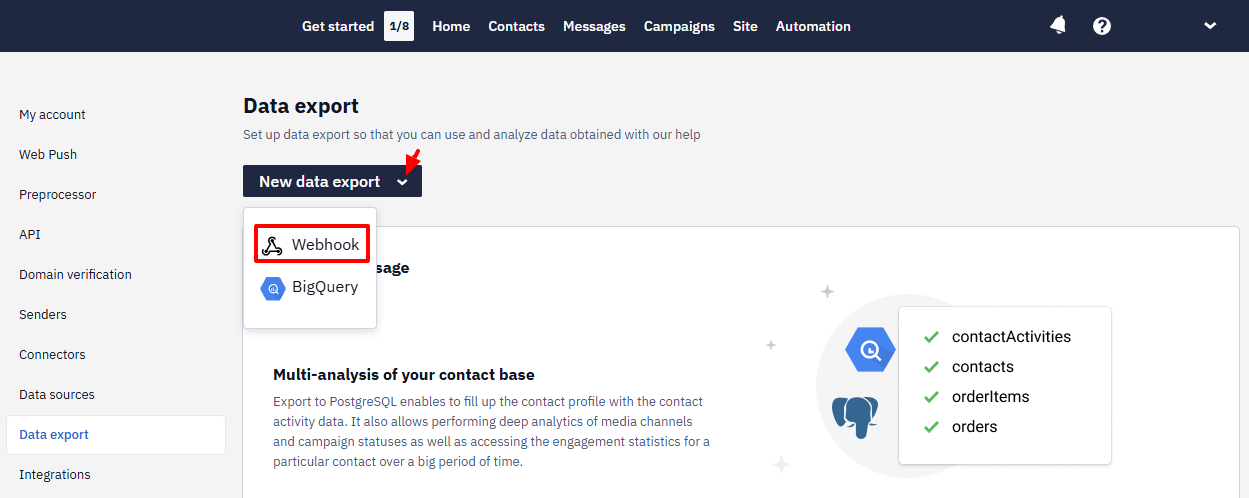
- Click the New data export button, and select Webhook.
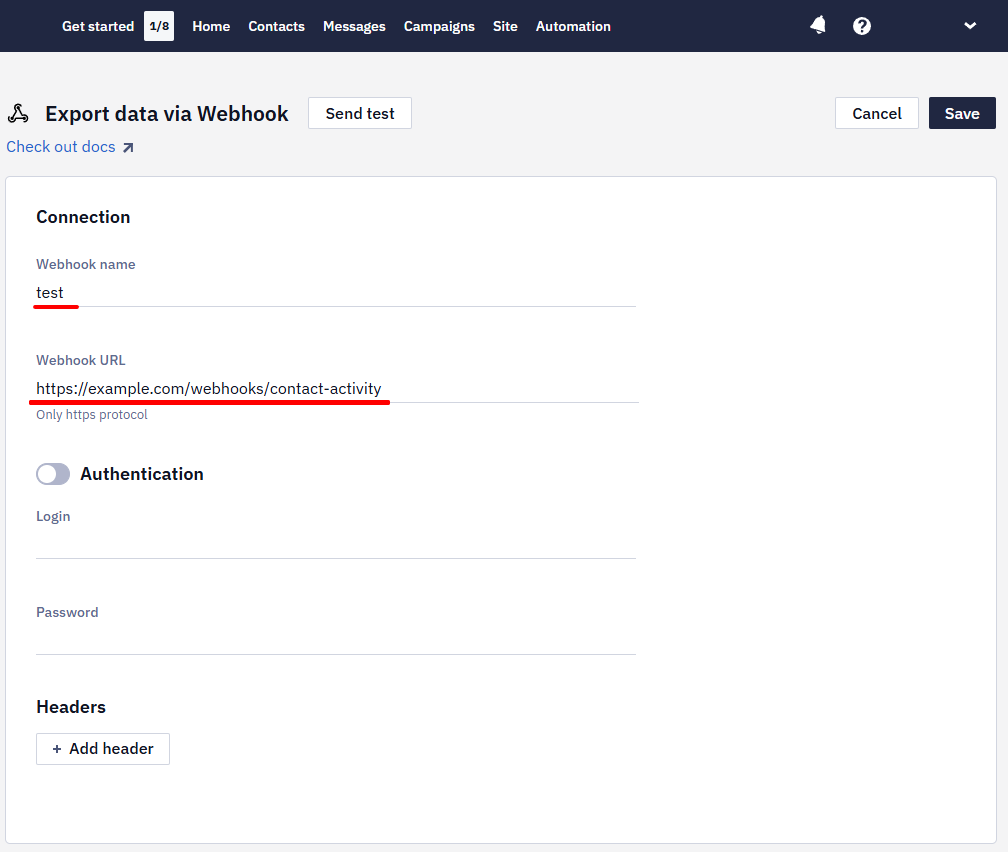
Connection
Add a Webhook name and specify the Webhook URL you previously set up on your server.
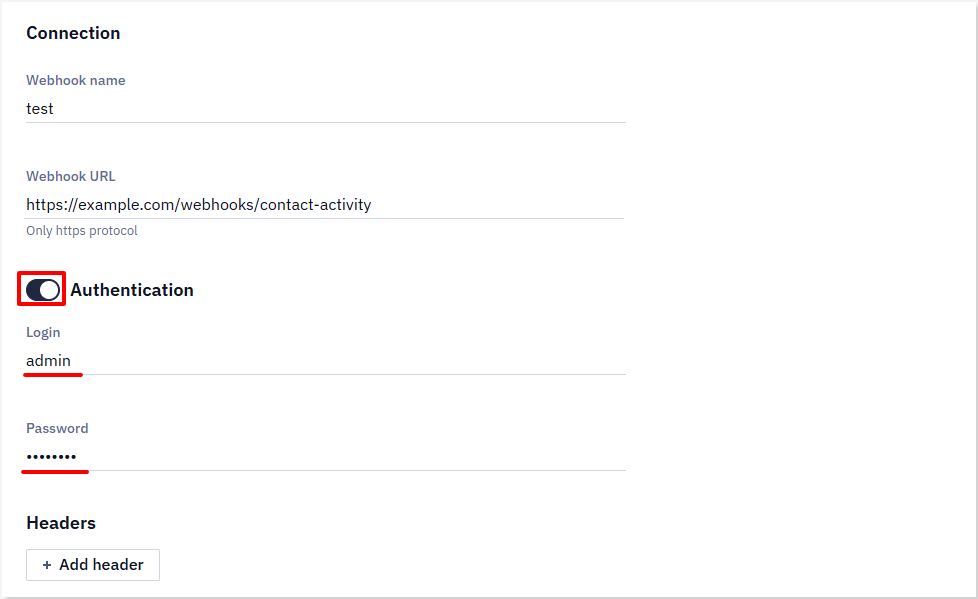
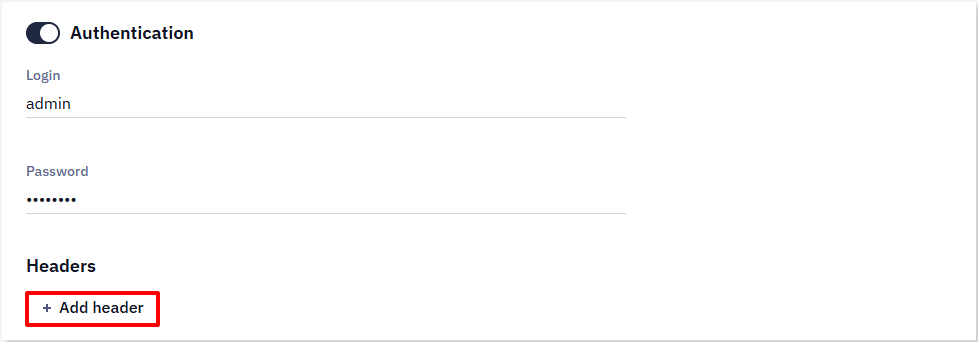
Authentication (optional)
If authentication is enabled on your server, enter the login and password that your server requires to accept requests. Enable the Authentication toggle and fill in the corresponding fields.
Headers
Webhook headers allow you to pass additional information along with the request. They help quickly identify where the data came from, what it is used for, verify security, and more. This simplifies working with integrations and makes the integrations more reliable.
- Click + Add header.
Maximum number — 5.
- Enter Key and Value.
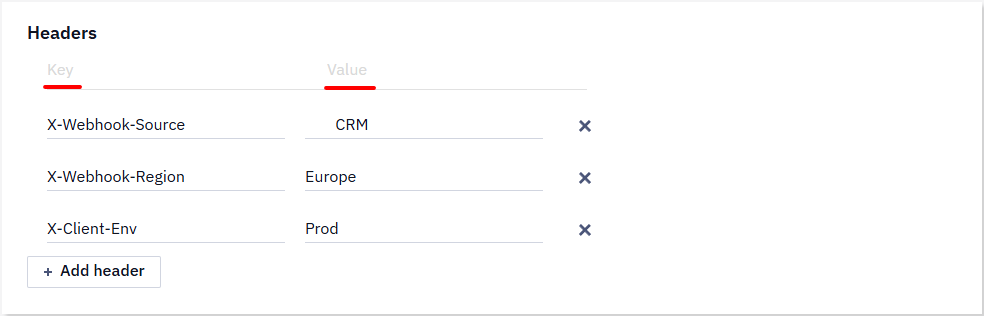
All specified headers will be automatically added to webhook requests.
Export Activity Statuses
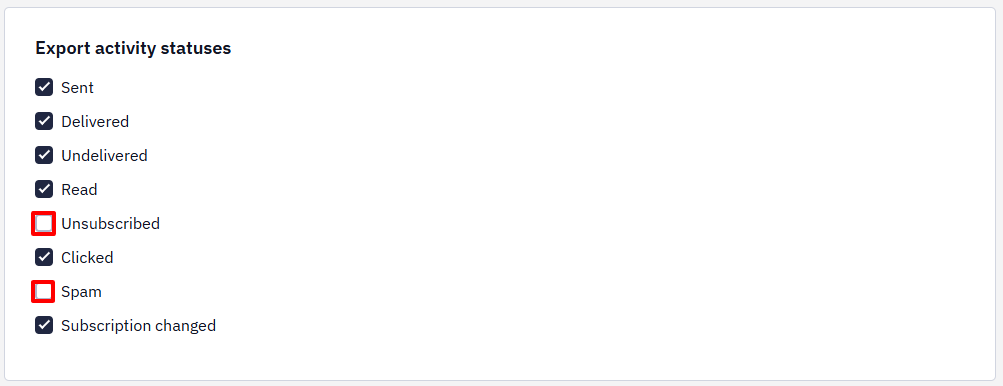
By default, all activity statuses are selected for tracking. You can modify this list by deselecting the checkboxes following to the statuses you don't want to track.
NoteIf some delivery statuses seem to be missing from your webhook data, check which channels are enabled for the webhook — status availability is channel-dependent, and not every status is generated for every channel. For example, the
SENTstatus is generated for the Mobile Push channel only.Channel filtering is set at the account level, not per webhook: contact support to enable it, and the same set of channels then applies to every webhook in the account. To keep one webhook narrower than the rest, filter by
mediaTypeon your side.
After setting up the data export via webhook, click the Save button.
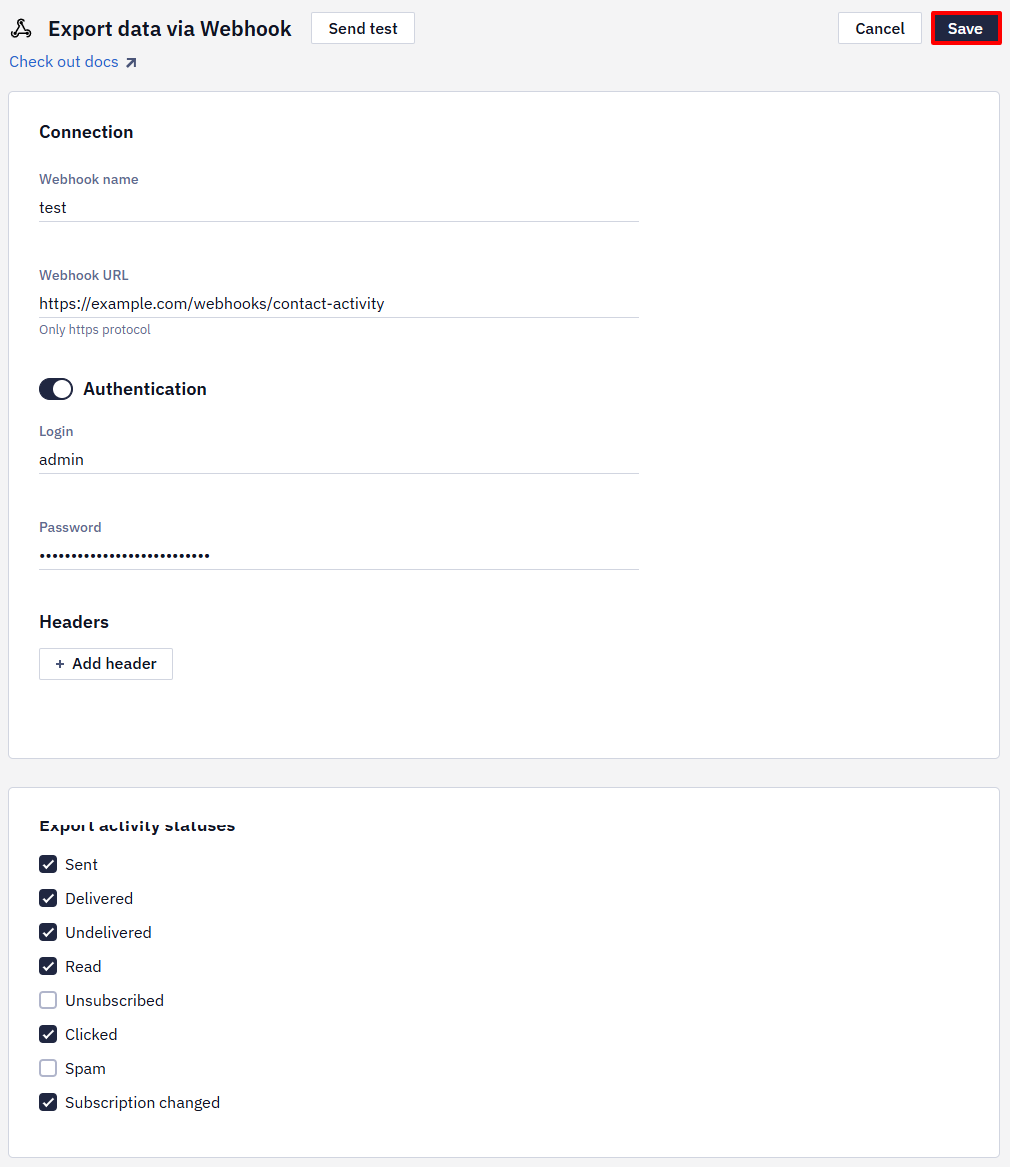
The webhook will be active, and data will be sent in real-time to the specified URL.
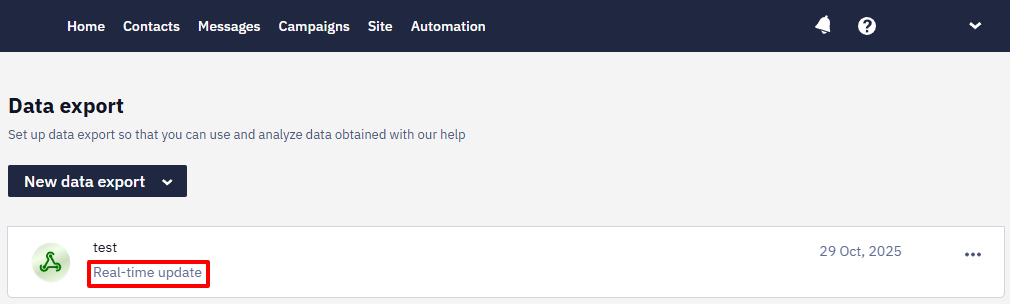
Webhook Integration Testing
After configuring a webhook, you can verify its operation without triggering a real event.
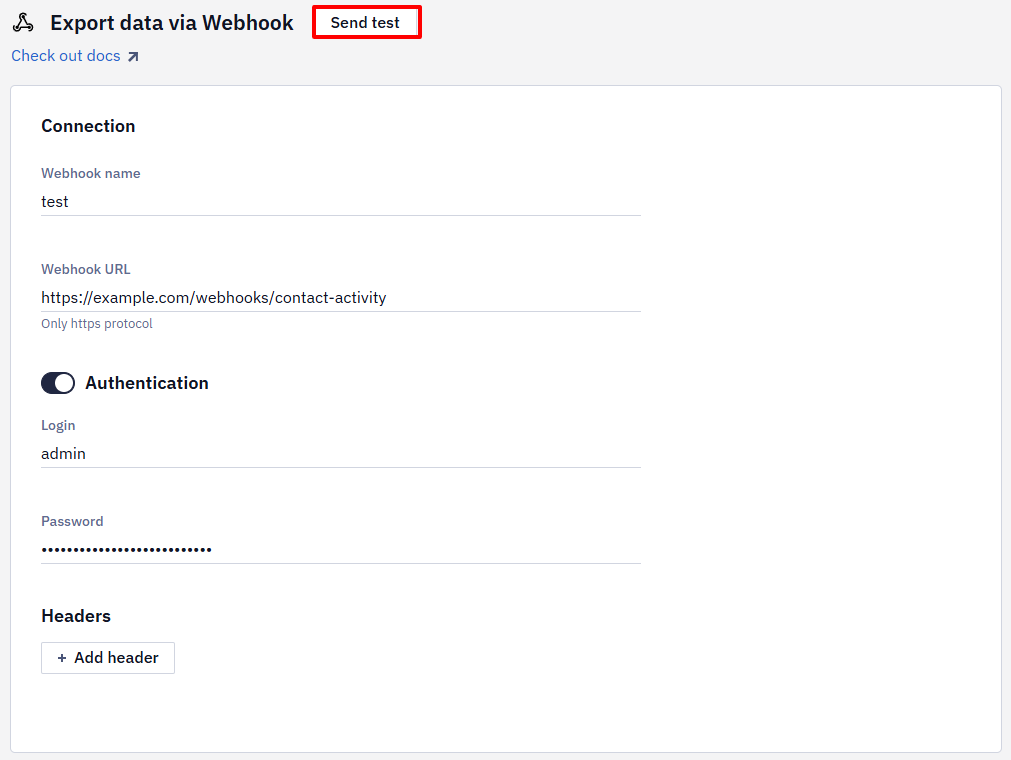
- Click Send test on the Data export via Webhook tab.
- In the Test an integration window, a test request will open. It contains a demo array with several objects — an example of how the system generates webhooks for different channels.
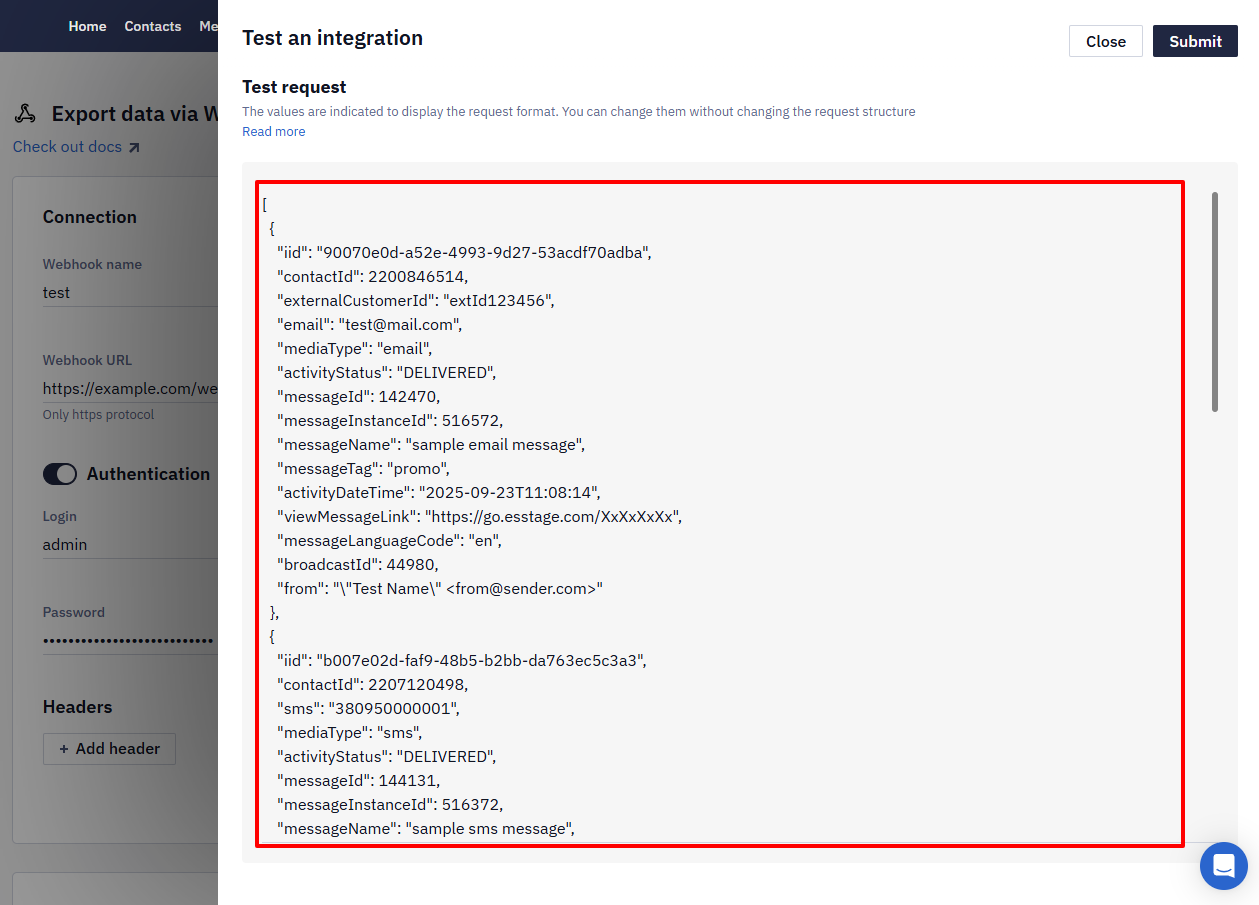
You can manually modify the request body to test how your handler processes different data formats.
For example, change field values, remove or add array elements, etc.
All defined headers will be included in the test request if they were configured.
- Click Submit.

- The system immediately sends a test
POSTrequest to the specified webhook URL and displays the test result:
- if the server successfully accepts the request, a green banner appears with a collapsed details section;
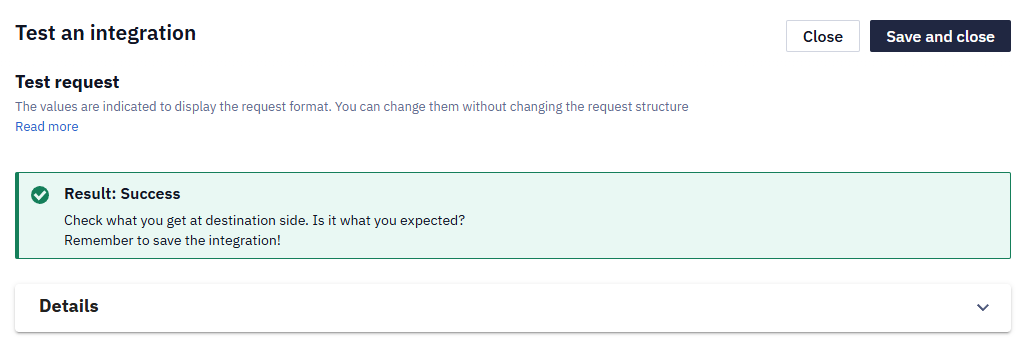
- if the server returns an error (for example,
403) — a red banner appears with the response code and expanded details for analysis.
You can copy the request and response details to the clipboard.
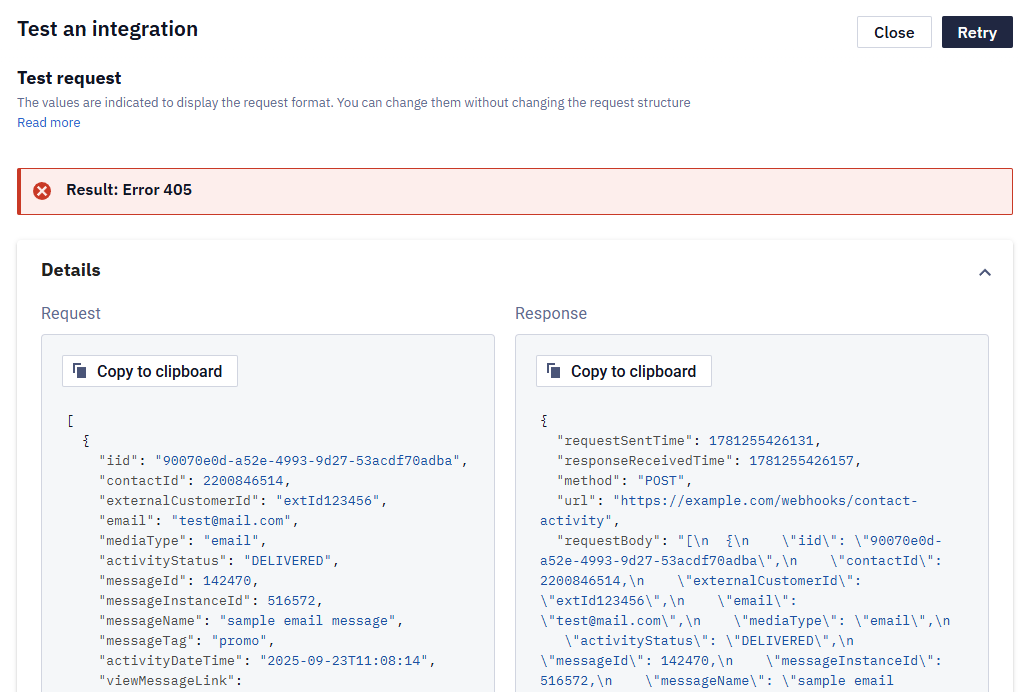
After testing:
- click Save and close if the test was successful and the webhook works correctly;
- if an error occurred — click Retry; or click Close, make adjustments to the configuration, and send the test request again.
Callback URL Availability Monitoring
Reteno monitors failed requests to the webhook's Callback URL and notifies every user with the Admin role about availability issues once a day by email and App Inbox:
- If more than 30% but less than 100% of requests fail, you receive a daily warning.
- If 100% of requests fail, you receive a daily warning. After three consecutive daily warnings with a 100% error rate, the webhook is automatically deactivated and activity export through it stops.
Deactivating / Deleting Webhooks
To deactivate or delete the webhook, click the three-dot icon, select the desired option, and confirm the action.
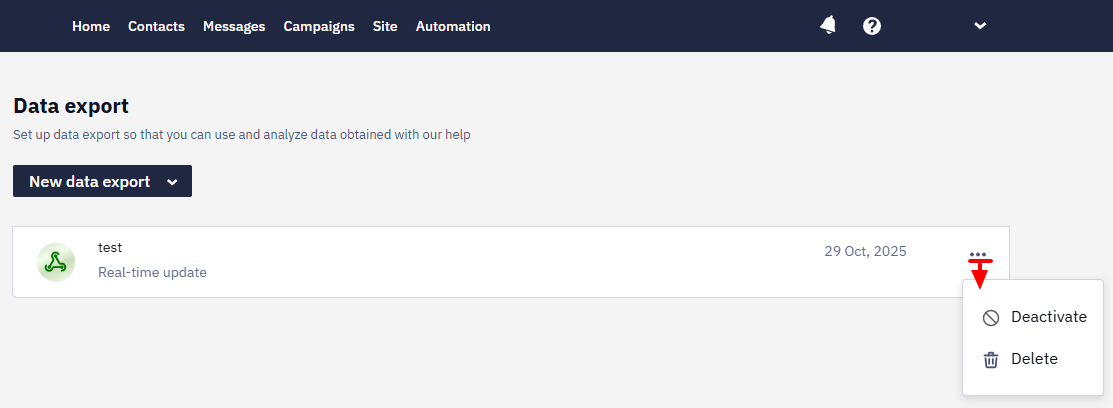
NoteDeactivation suspends the sending of requests, but the webhook remains saved in the system and can be reactivated later.
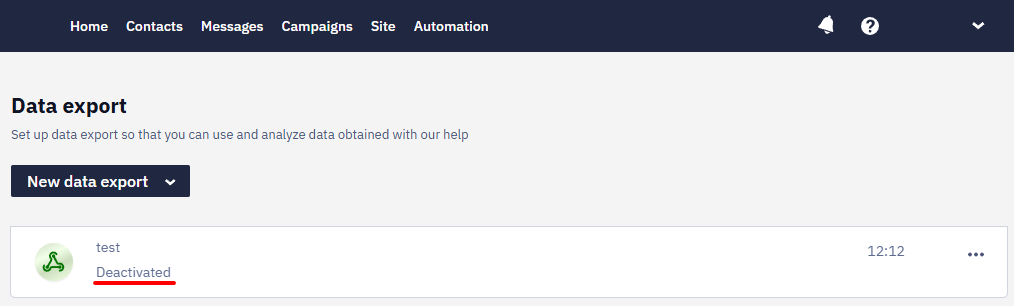
Data Export Editing
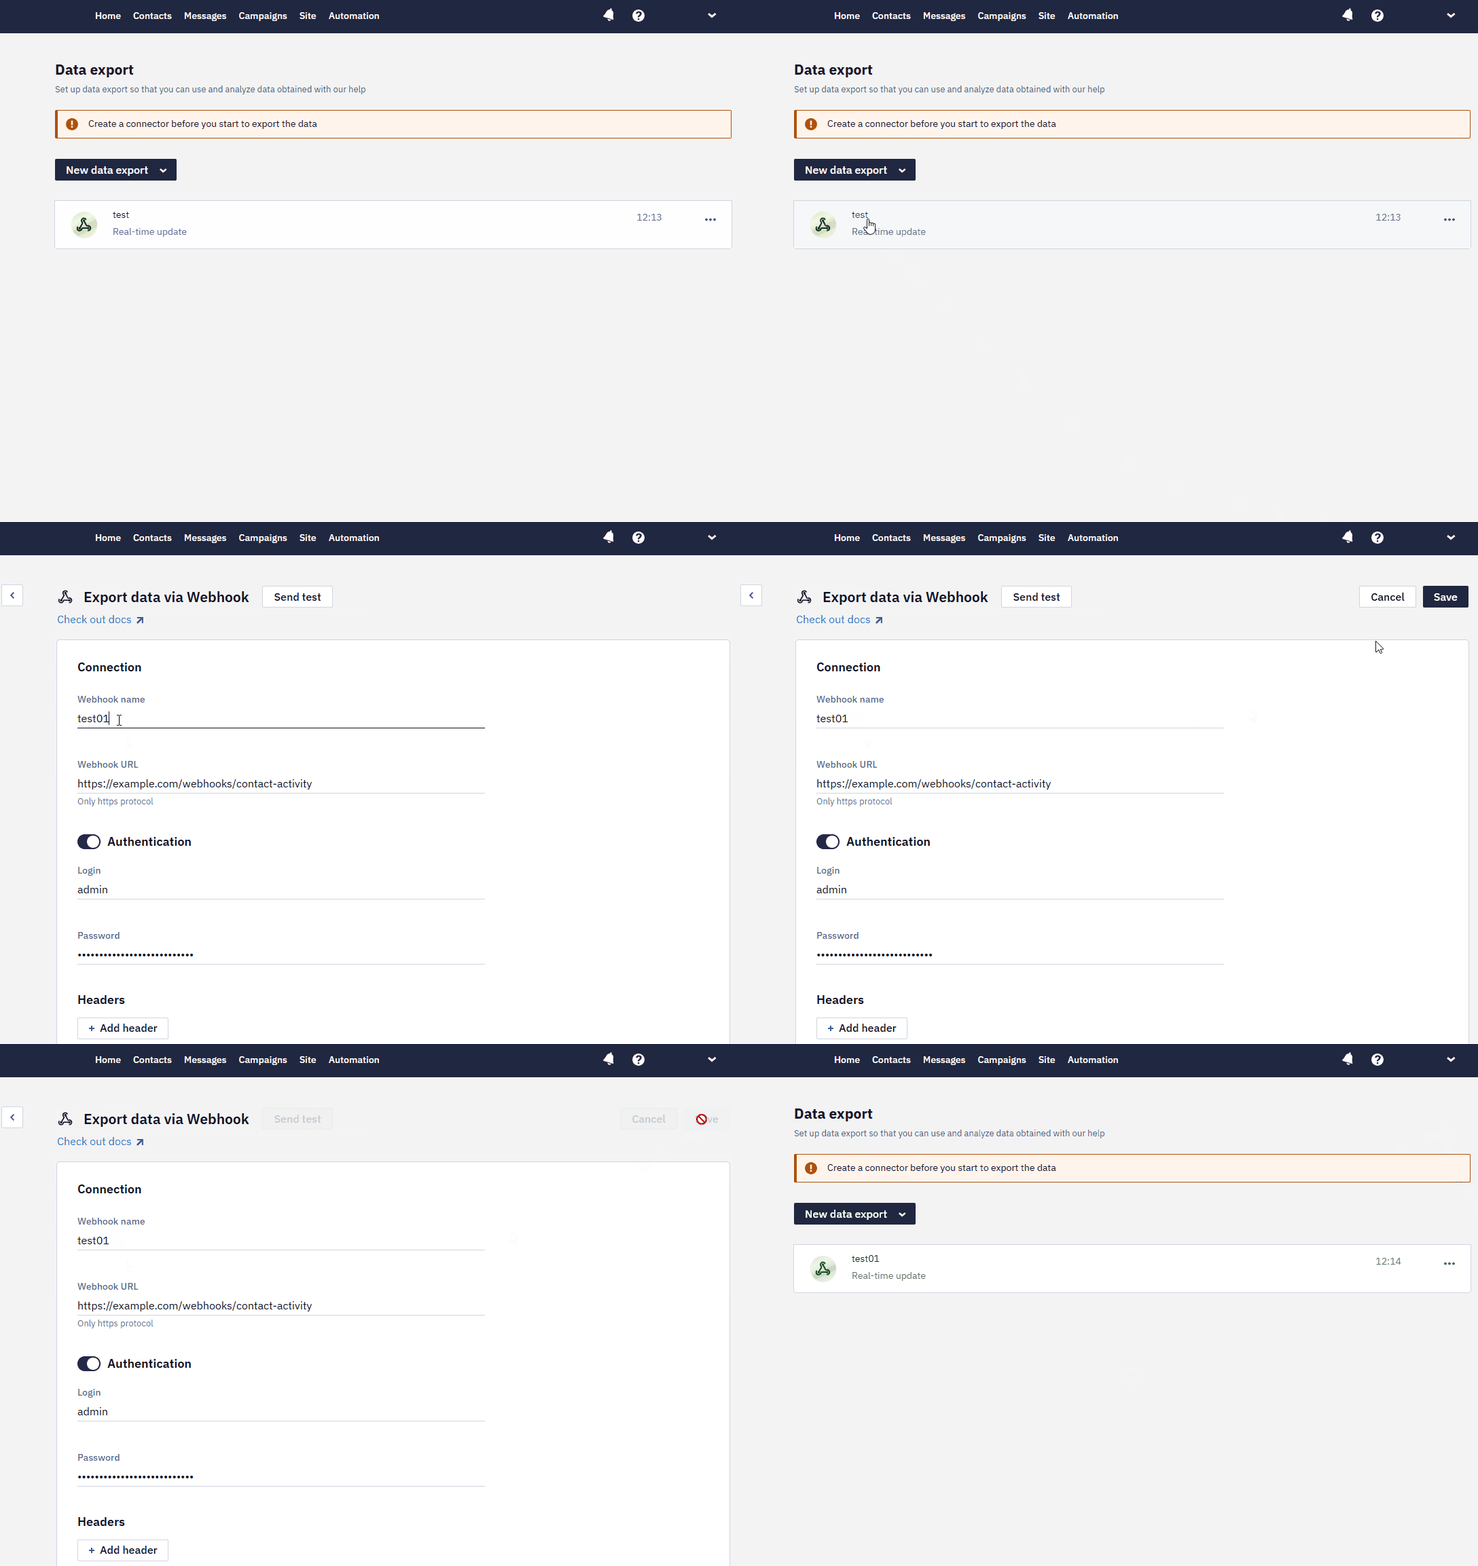
To change the settings, click on the webhook name, edit the data, and save the settings.
List of Possible Parameters
The payload carries no SMTP-level fields — no message headers, sending IP, or mail server response; for email it only includes viewMessageLink to the web version. It also has no deviceId and no contact blacklist status: a campaign and a message are identified by broadcastId, messageId, and messageInstanceId, a workflow launch by workflowInstanceId, and the blacklist status is available in the BigQuery export.
| Parameter | Type | Description |
|---|---|---|
| activityDateTime | string | Activity date and time. |
| activityStatus | string | Activity status:
|
| broadcastId | int | Broadcast ID. |
| bundleId | string | Mobile application identifier (iOS — Bundle Identifier, Android — Application ID). |
| clickEventLink | string | Contains the link clicked by a contact (when the status is CLICKED). |
| contactId | int | Contact ID. The value is an int64. |
| string | Contact Email. | |
| externalCustomerId | string | A unique customer ID in the client’s system. |
| externalRequestId | string | Your own identifier, passed in the Send prepared message request. Match on it to tie the activity back to that request. |
| from | string | Sender name (in Email and SMS messages). |
| hardBounce | bool | Returned only for the UNDELIVERED status and only for the Email channel. Indicates the type of error:
|
| iid | string | A unique identifier for the specific message delivery instance. Always a UUID. |
| imId | int | Individual message ID. Use this to associate contact activities with a specific message. |
| mediaType | string | Media type (SMS, Email, Web Push Mobile Push, App Inbox, Widget, In-App). |
| messageId | int | Message ID. |
| messageInstanceId | int | Message instance ID. |
| messageLanguageCode | string | Message language code. |
| messageName | string | Message name (empty for test emails). |
| messageTag | string | Message tag. |
| mobilepush | string | Mobile app subscriber token. |
| osName | string | Device operating system. |
| osType | string | Device type (Desktop/Mobile). |
| sms | string | Contact phone number. |
| smsParts | int | Number of parts the SMS was split into. Returned for SMS activities only. |
| sourceEventId | int | Source event ID. |
| sourceEventKey | string | Source event key. |
| sourceEventTypeKey | string | Source event type key. |
| statusDescription | string | This field is returned only in the event when the status is UNDELIVERED. It contains the reason why the message has been undelivered. This may be a recipient server response, a system response saying that message delivery was not possible, and other similar reasons. |
| subscriptions | array of strings | Subscription category keys. |
| viewMessageLink | string | Link to the web version of the message (Email only). This link is personalized and opens the message as the contact received it, unlike the static template link returned by the Get Email message view link API resource. |
| webpush | string | Web push subscriber token. |
| workflowBlockId | string | Identifier of the workflow block that sent the message. |
| workflowId | int | Workflow ID. |
| workflowInstanceId | uuid | The identifier of a particular workflow launch. Use it to group campaigns within the launch of a workflow. |
NoteTags on emails sent via the API are supported (e.g. via the tags array in v1/messages/email) — if they're missing from webhook activity data, check that your integration is actually sending the tags field correctly. Email subject is retrievable via the Get contacts activity (
contactmessages) method, but only for emails composed in the system, not raw HTML sent directly via the API.
Below are webhook test examples as a JSON array with all possible status options.
Broadcast:
[
  {
    "broadcastId": 3459207,
    "messageName": "test",
    "iid": "99d591ab-e7a5-49ed-8e16-b3023378fc18",
    "contactId": 1967597908,
    "externalCustomerId": "789456512",
    "email": "[email protected]",
    "mediaType": "email",
    "activityStatus": "DELIVERED",
    "messageId": 2489300,
    "messageInstanceId": 4702518,
    "activityDateTime": "2023-09-14T08:30:03",
    "viewMessageLink": "https://u51739.esclick.me/J9o6EvyAKGmB"
  },
  {
    "broadcastId": 3459207,
    "messageName": "test",
    "iid": "4af20897-de88-4ad0-ada3-dc4bcf14e8d8",
    "contactId": 889891911,
    "externalCustomerId": "262ac297-6ae1-11ec-a2ec-0050569bdf92",
    "email": "[email protected]",
    "mediaType": "email",
    "activityStatus": "DELIVERED",
    "messageId": 2489300,
    "messageInstanceId": 4702518,
    "activityDateTime": "2023-09-14T08:30:03",
    "viewMessageLink": "https://u51739.esclick.me/J9o6Dl1wrDeB"
  },
  {
    "broadcastId": 3459207,
    "messageName": "test",
    "iid": "b14dec37-806e-4bc4-ba71-a5911a7d7ce4",
    "contactId": 1026901517,
    "email": "[email protected]",
    "mediaType": "email",
    "activityStatus": "DELIVERED",
    "messageId": 2489300,
    "messageInstanceId": 4702518,
    "activityDateTime": "2023-09-14T08:30:03",
    "viewMessageLink": "https://u51739.esclick.me/J9o6Dttf6fOB"
  },
  {
    "broadcastId": 3459207,
    "messageName": "test",
    "hardBounce": false,
    "iid": "99d591ab-e7a5-49ed-8e16-b3023378fc18",
    "contactId": 1967597908,
    "externalCustomerId": "789456512",
    "email": "[email protected]",
    "mediaType": "email",
    "activityStatus": "UNDELIVERED",
    "messageId": 2489300,
    "messageInstanceId": 4702518,
    "activityDateTime": "2023-09-14T08:30:07",
    "statusDescription": "5.1.2 (bad destination system: no such domain)",
    "viewMessageLink": "https://u51739.esclick.me/J9o6EvyAKGmB"
  }
]
Triggered campaign:
[
  {
    "messageName": "test",
    "workflowId": 340484,
    "workflowBlockId": "_05cae26d9ae85e1eb40ed34765f9c7be",
    "sourceEventKey": "9d0c163d-cc3b-4f9e-bb03-2f5d1111ef91",
    "sourceEventTypeKey": "productViewed",
    "workflowInstanceId": "da33697d-52d8-11ee-9d24-7ec2059b5114",
    "iid": "019b7450-52d9-11ee-85c4-959256ea468c",
    "contactId": 889891911,
    "externalCustomerId": "262ac297-6ae1-11ec-a2ec-0050569bdf92",
    "email": "[email protected]",
    "mediaType": "email",
    "activityStatus": "DELIVERED",
    "messageId": 2489300,
    "messageInstanceId": 4702524,
    "activityDateTime": "2023-09-14T08:30:50",
    "viewMessageLink": "https://u51739.esclick.me/1RocjPwr0MwONsdn2P"
  },
  {
    "messageName": "test",
    "workflowId": 340484,
    "workflowBlockId": "_527e1f819b41bd379d75ebbe3392b879",
    "sourceEventKey": "9d0c163d-cc3b-4f9e-bb03-2f5d1111ef91",
    "sourceEventTypeKey": "productViewed",
    "workflowInstanceId": "da33697d-52d8-11ee-9d24-7ec2059b5114",
    "iid": "01777190-52d9-11ee-917a-ef6e91bfc7c3",
    "contactId": 889891911,
    "externalCustomerId": "262ac297-6ae1-11ec-a2ec-0050569bdf92",
    "email": "[email protected]",
    "mediaType": "email",
    "activityStatus": "DELIVERED",
    "messageId": 2489300,
    "messageInstanceId": 4702524,
    "activityDateTime": "2023-09-14T08:30:51",
    "viewMessageLink": "https://u51739.esclick.me/1RocjPwr0MwONsd3gP"
  },
  {
    "messageName": "test",
    "workflowId": 340484,
    "workflowBlockId": "_be178ec8aacbf249d8bb736e9df9fd0d",
    "sourceEventKey": "9d0c163d-cc3b-4f9e-bb03-2f5d1111ef91",
    "sourceEventTypeKey": "productViewed",
    "workflowInstanceId": "da33697d-52d8-11ee-9d24-7ec2059b5114",
    "hardBounce": false,
    "iid": "01a86ca0-52d9-11ee-85c4-959256ea468c",
    "contactId": 706515632,
    "sms": "380956490955",
    "mediaType": "sms",
    "activityStatus": "UNDELIVERED",
    "messageId": 3213684,
    "messageInstanceId": 4696769,
    "messageTag": "tag2,tag,test",
    "activityDateTime": "2023-09-14T08:30:51",
    "statusDescription": "401: null"
  }
]
Troubleshooting
A 401 When Adding a Webhook
The URL check that runs when a webhook is created is sent without the authorization header, so your endpoint can answer with 401 or 403. For the platform that still means the server exists and responds, so the webhook can be saved.
Receiving Webhooks Behind an IP Filter
Webhooks are sent from Reteno's IP addresses. If the receiving endpoint accepts traffic only from an allowlist, contact support for the current list of addresses — they can change over time.
Alternative Methods for Tracking Activity Statuses
Reteno offers three ways to get activity data into your own systems — pick based on how you plan to use the data:
| Method | How it works | Data window | Best for |
|---|---|---|---|
| Webhooks (this article) | Real-time POST push to your server on each event | No history — only events that occur after setup are sent | Real-time integrations that react immediately to activity |
| API (Get contacts activity) | You send GET requests on demand, with filters (email, status, time interval) | Up to ~3 months back | On-demand lookups, e.g., checking a specific contact's history |
| BigQuery export | Daily batch export into your BigQuery dataset | Full history from the date the export was activated | Building dashboards and analytics over large volumes of data |
NoteThe account UI (contact card) only stores the last open and click dates per contact, not the full history of opens/clicks. If you need the first open/click date or a full timeline, use webhooks (to build a full activity log as events happen) or the API/BigQuery methods above.
The Get contacts activity API is enabled on request — contact support to activate it for your account. Activation can take several hours. Once enabled, it supports filtering by contact, for example an
Updated 17 days ago