
Configuring App Inbox for Websites
Setting up App Inbox for websites includes:
- Getting authentication token.
- Script installation and initialization.
- Integration of a widget displayed on the site.
NoteApp Inbox functionality works only for users authorized on the site.
Getting Authentication Token
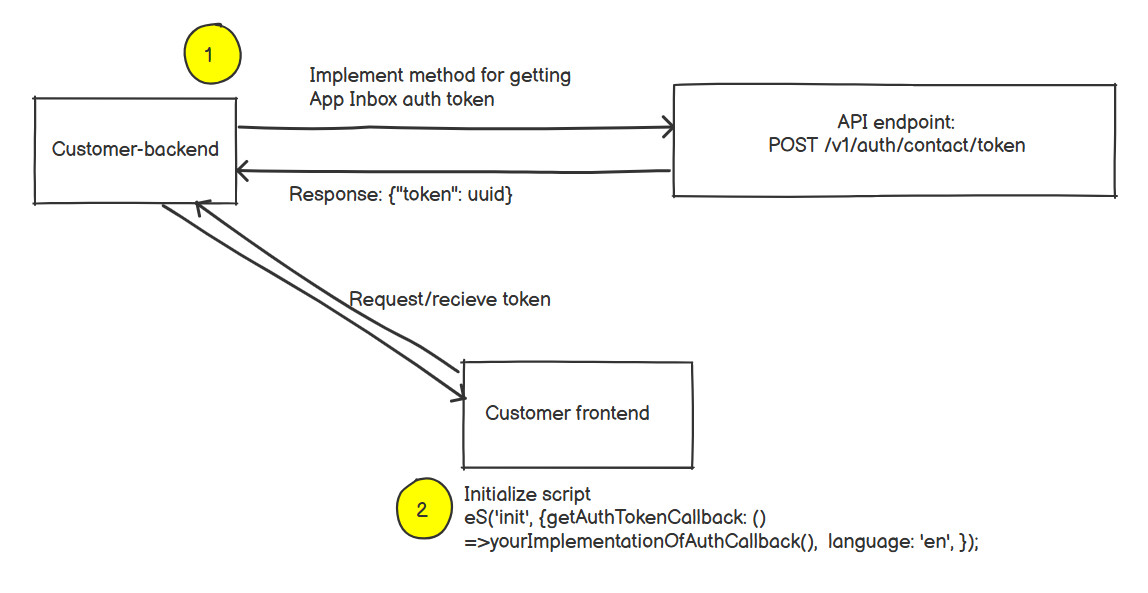
Getting authentication token
Send the request from your backend to Reteno API to receive the authentication token (authToken). Authenticate the request using one of the methods specified in the API instructions, for example, using an API key.
| Request method | POST |
| URL | https://reteno.com/v1/auth/contact/token |
| Request header | Content-Type: application/json |
| Request body | { "email": "string", "phone": "string", "externalCustomerId": "string" } |
| Response: HTTP 200 | { "token": "string" } |
The request has to contain the known contact fields: email, phone, externalCustomerId (at least one field is required). Those fields are used for searching a contact in Reteno. Afterward, the script uses authToken in requests to the Reteno server.
You can find additional information about managing contacts in API methods for adding contacts.
ImportantThe token can become invalidated at any moment for security considerations, so you get it more than once. The script renews the token automatically by calling
getAuthTokenCallback. If a contact is not in the Reteno system, the token is not returned, and the following response comes back instead:
{
  "token": ""
}
Script Installation and Initialization
Install and initialize the script on your frontend. Transmit getAuthTokenCallback in the parameters. This shall have the function calling your backend and returning the token.
If you have installed the Reteno script to work with web tracking, forms and recommendations, you don’t need to reinstall it. Just add parameters for App Inbox to the initialization call.
Example:
eS('init', {APP_INBOX: true}, {getAuthTokenCallback: () => yourImplementationOfAuthCallback(), language: 'en', });
ImportantCall the
'init'initialization command one time at every page loading.
If you have not installed the script before, contact the Reteno support team to get it, indicating that you need it for App Inbox.
You can get the script by yourself in the Settings → Web Tracking section.
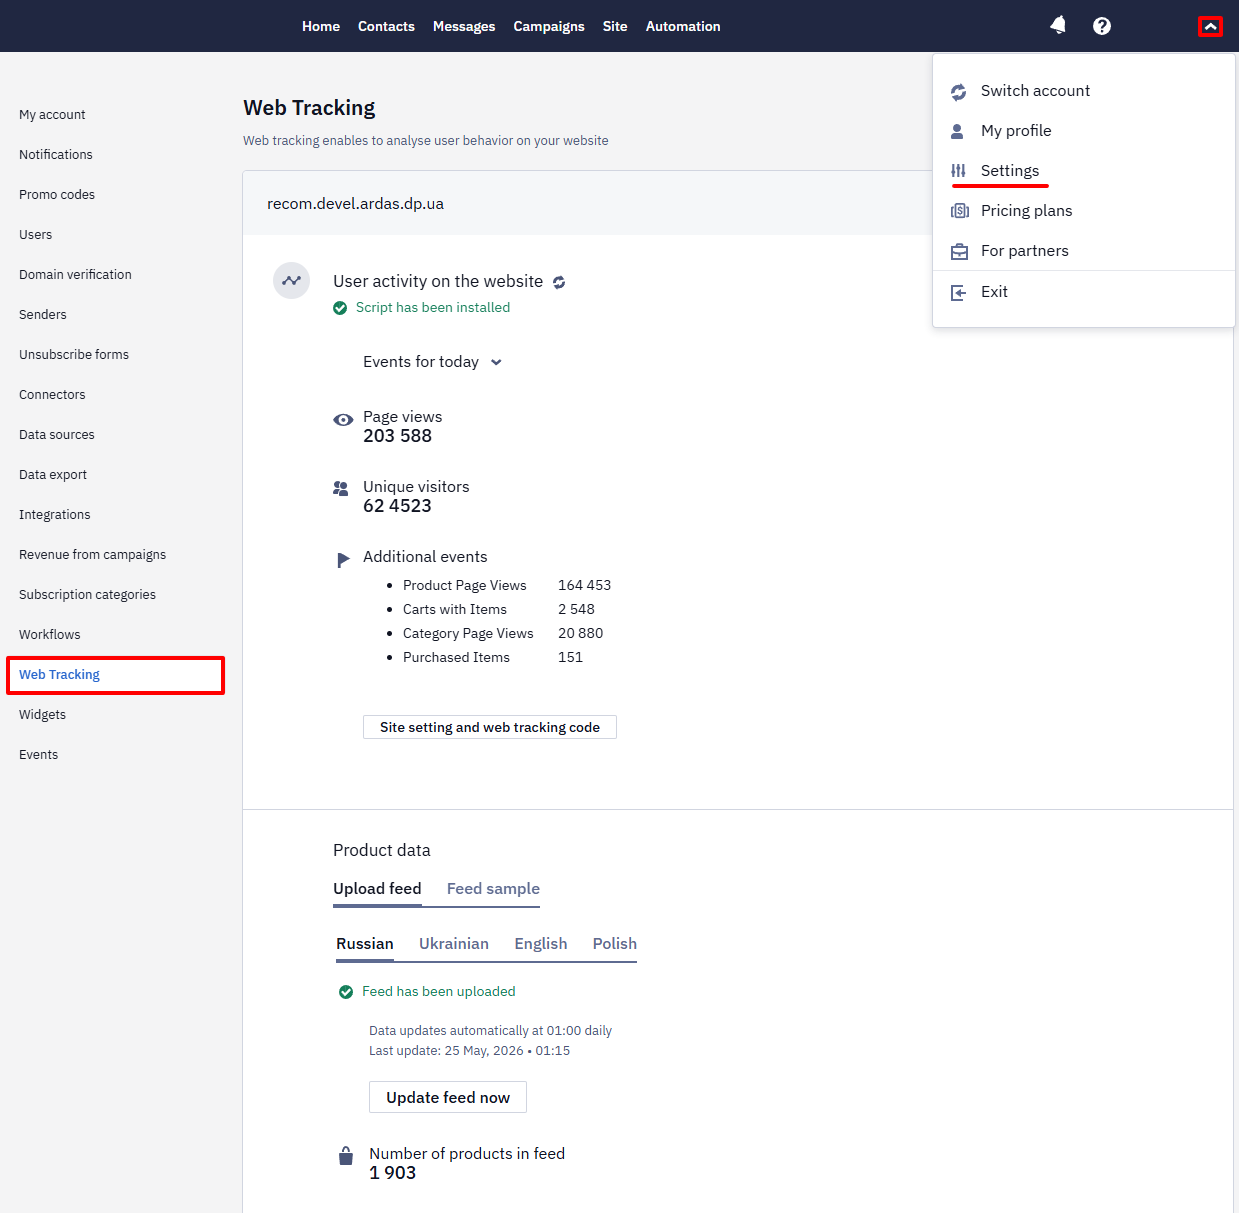
You can learn how to set up a web tracking code here.
Important: Modify the call of the 'init' command in the script generated in the Web Tracking section as follows: instead of
eS('init')it has to be
eS('init', {APP_INBOX: true}, {getAuthTokenCallback: () => yourImplementationOfAuthCallback(), language: 'en', });Example of a script with initialization:
<script> !function (t, e, c, n) {var s = e.createElement(c); s.async = 1, s.src = 'https://statics.esputnik.com/scripts/' + n + '.js'; var r = e.scripts[0]; r.parentNode.insertBefore(s, r); var f = function () {f.c(arguments); }; f.q = []; f.c = function () {f.q.push(arguments); }; t['eS'] = t['eS'] || f; }(window, document, 'script', 'UUID'); </script><script>eS('init', {APP_INBOX: true}, {getAuthTokenCallback: () => yourImplementationOfAuthCallback(), language: 'en', });</script>Parameters of the Object Passed to Reteno Function
| Name | Example | Description |
|---|---|---|
| getAuthTokenCallback | function yourImplementationOfAuthCallback() { return new Promise((resolve, reject) => { // place here code with your backend API request, parse token from response and pass it to type: () => Promise | Asynchronous function called by the script to get authToken. It has to address to the Customer Backend and return |
| language | en Required Type: String | ISO 639-1 |
Integration of App Inbox Widget
To integrate the widget on the site, the user has to provide to Reteno:
- CSS selector.
- Insert type position relative to other element(s) (insertAdjacentHTML method is applied).
In addition, you can submit an SVG file with the desired design of the notification icon (Bell button) and the design of notifications.
Also, you can ask Reteno to develop the design of the bell button and notifications for you.
Updated about 2 months ago