
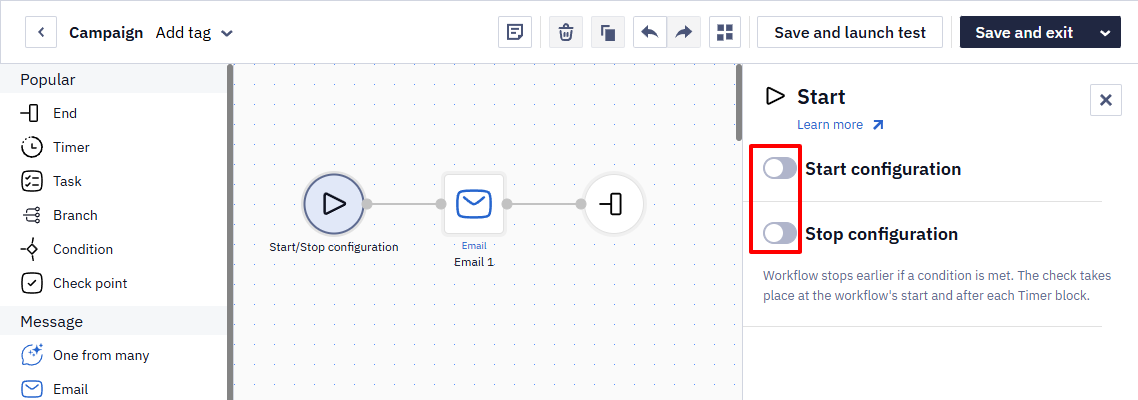
Configuring Workflow Start/Stop Conditions
Workflow start and stop conditions allow you to control how it operates. You can define conditions under which the workflow will run automatically — for example, to make it start or stop only at a specific time or after certain events occur (such as when a contact fills out a form, starts subscription etc.).
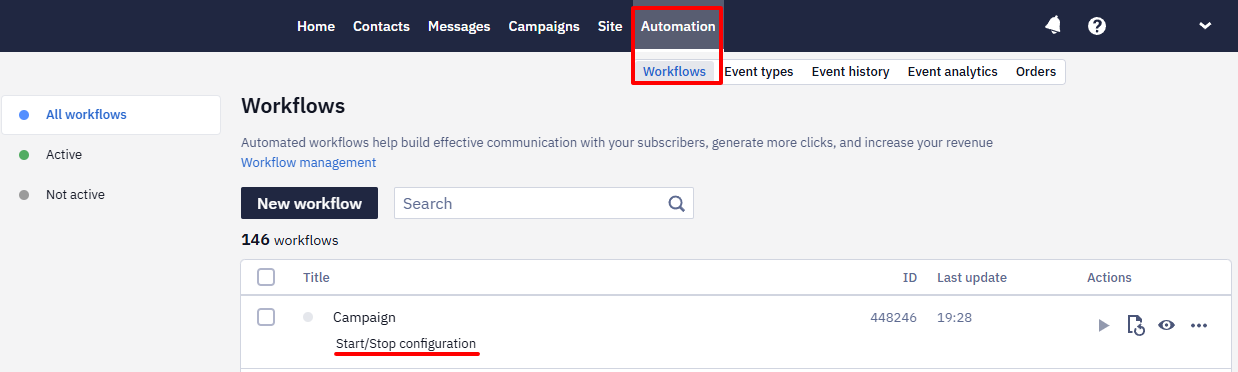
You can set start/stop conditions in two ways:
- In the Start block settings.
- In the general workflow list (Automation → Workflows section).
Click Start/Stop configuration next to the desired workflow.
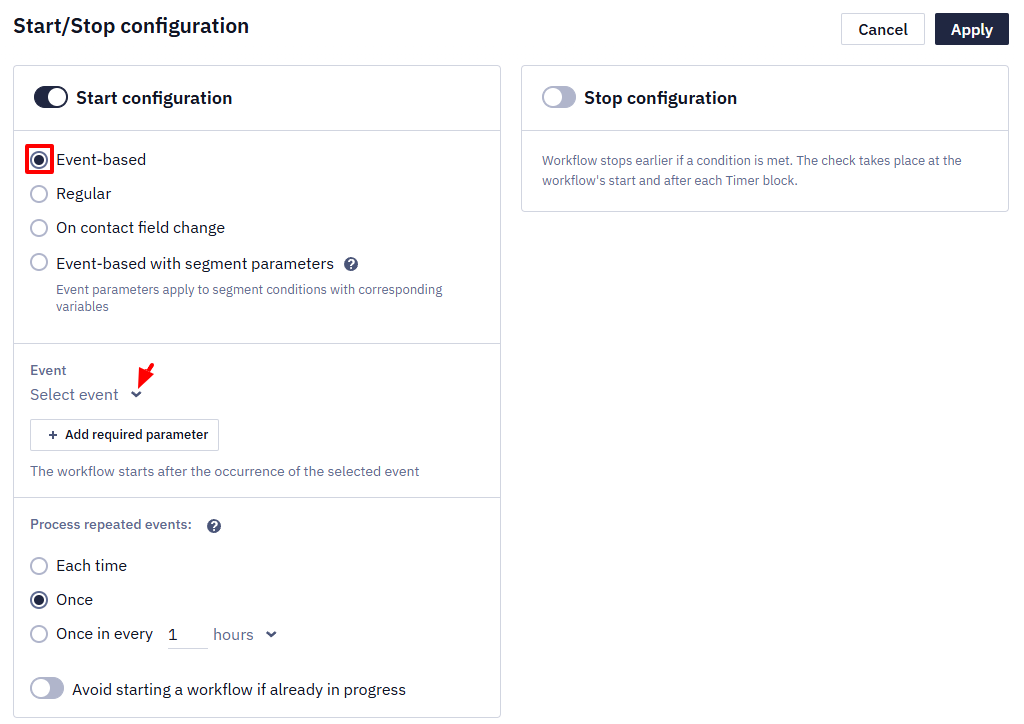
Setting Up Start Configuration
-
Enable the Start Configuration slide button.
-
Select one of the following conditions:
- Event-based
- Regular
- On contact field change
- Event-based with segment parameters
- Select the settings specific to the selected condition, as described below.
- When the Avoid starting a workflow if already in progress option is enabled, the workflow will not be launched for contacts that are already in the process of running it. For example, if a user receives a chain of reminders about an unlearned lesson and doesn’t complete a new lesson during this period of time, the workflow will not react to this event.
- Click Apply.

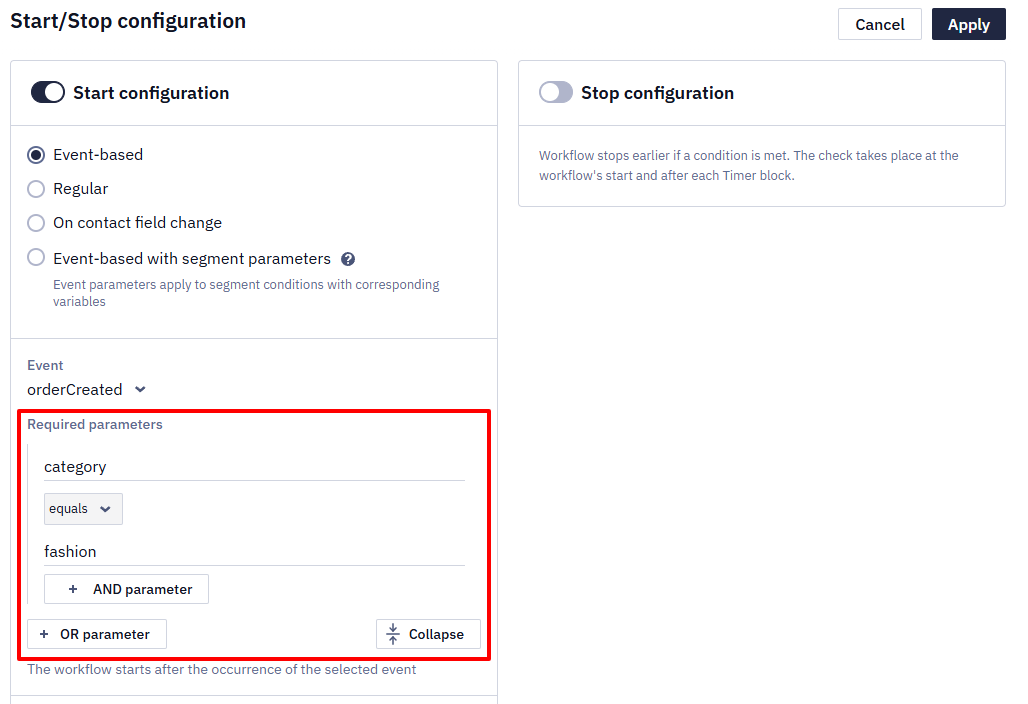
Event-based Start Configuration
The event-based settings in the start configuration allow you to start the workflow upon the occurrence of a specified event.
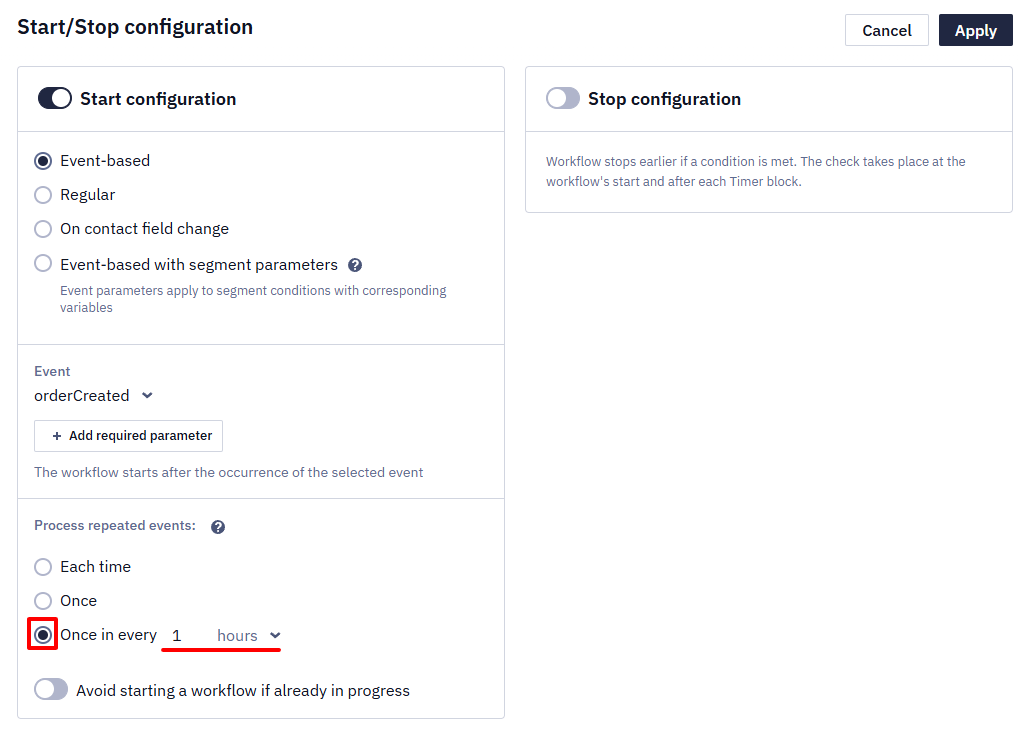
When you select Event-based, you can set up the following workflow settings:
- Event
- Required event parameters
- Process repeated events
Selecting event
Select an event to start a workflow.
The workflow will start when the selected event occurs.
NoteThe same event can trigger different workflows, which allows you to divide complex schemes into separate, independent chains of conditions and actions
Selecting Required Parameters
The workflow will only launch if the event parameters meet the conditions set in this section: for example, only if the purchased products match a certain category.
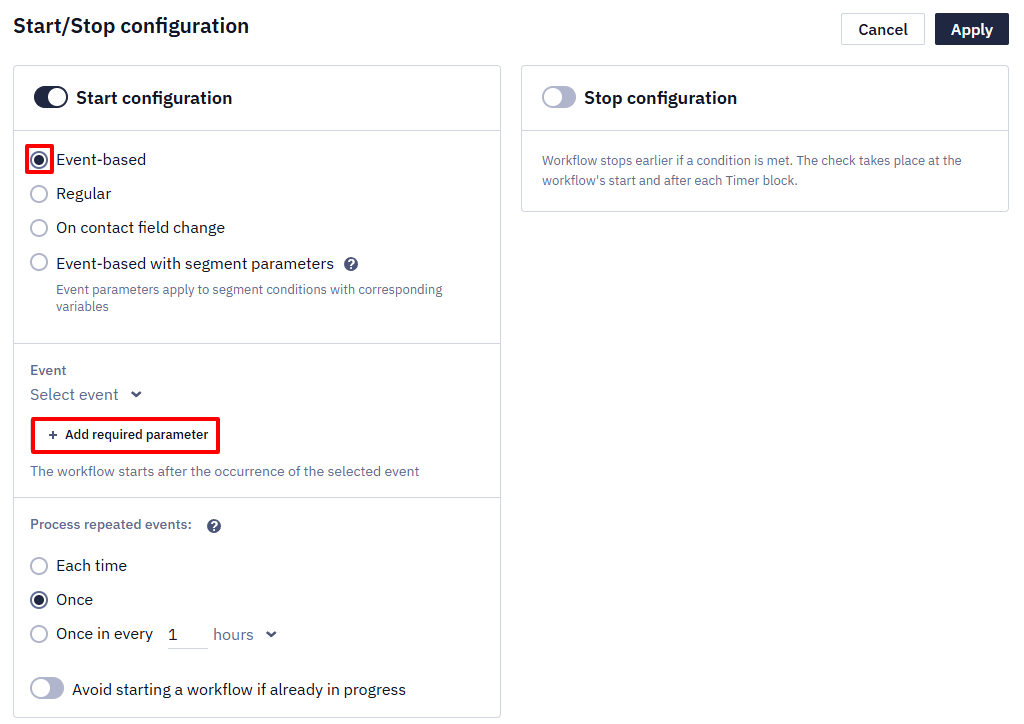
To set up a condition, click the Add required parameter button and specify the event parameter and the value you want to check it for.
NoteTo access nested parameters in the event payload, use the following selector formats:
- Dot selector —
order.orderId- Index selector —
items[0]- Combined —
order.items[0].titleThis allows you to filter workflow starts by values inside complex objects and arrays, not just top-level fields.
The following check options are available:
- equals,
- does not equal,
- is set,
- is empty,
- is true,
- is false,
- contains,
- does not contain,
- starts with,
- does not start with,
- ends with,
- does not end with,
- one of,
- is not one of.
For boolean event parameters, such as isFirst, you can use is true, is false, equals, does not equal, is set, is empty, contains, does not contain, starts with, and does not start with. For direct true/false checks, use is true or is false, or use equals with true or false.
If necessary, you can add checking for other values (AND/OR conditions, their number is not limited).
Selecting Process repeated events
The process repeated events define whether to:
- Repeat the workflow every time when an event occurs.
- Stop the workflow after the selected event occurs once.
- Run the workflow only once during the specified time, no matter how many times the specified event occurs during that time.
To select the required condition, select the radio button beside Process repeated events.
If you select the Once in every condition, enter the value in the field and select its definition from the dropdown list.
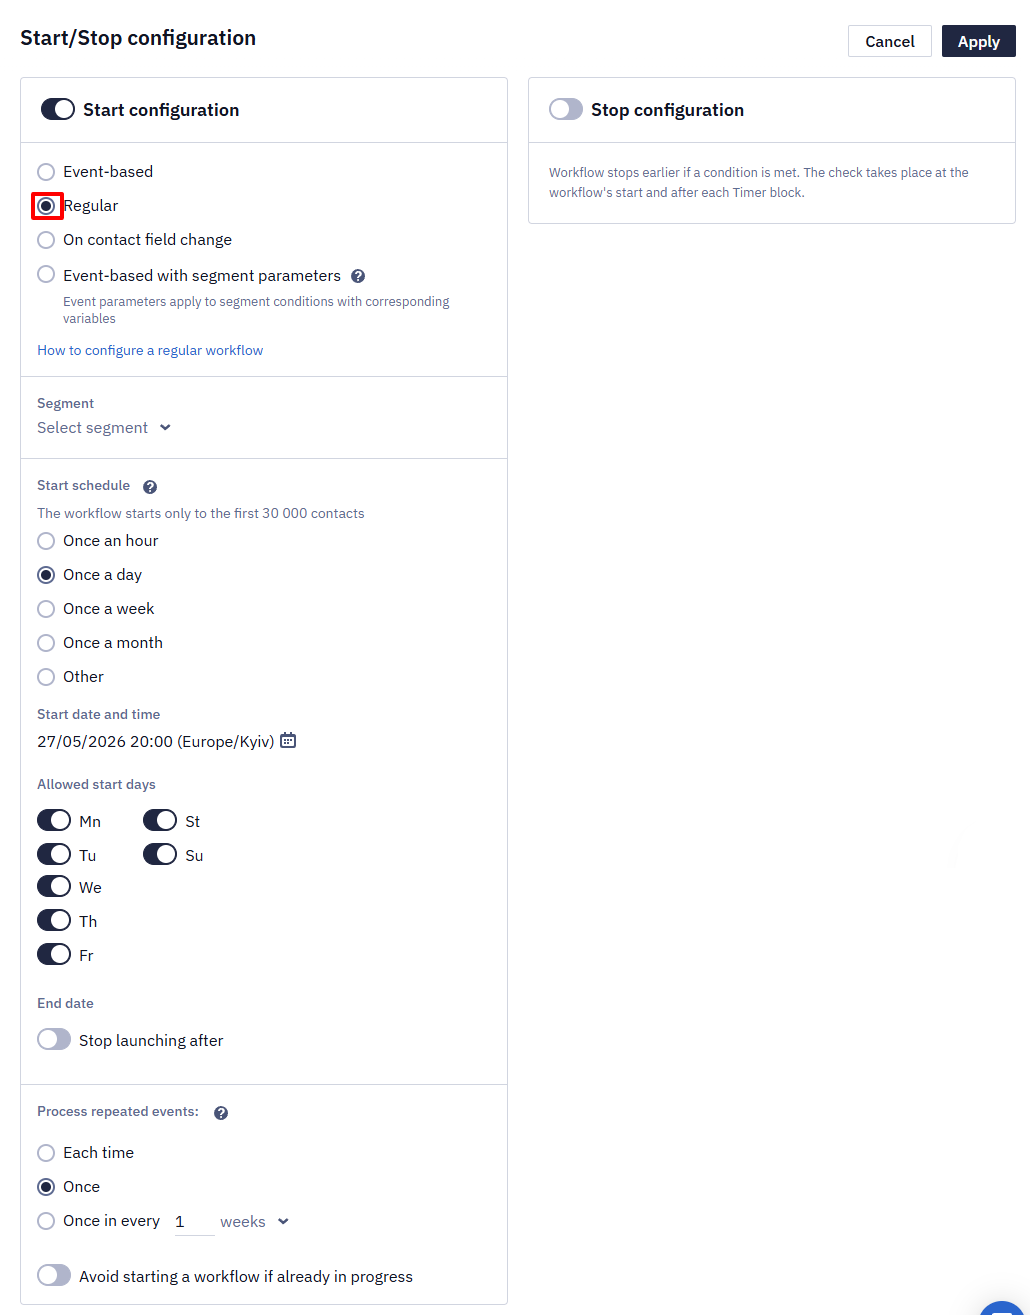
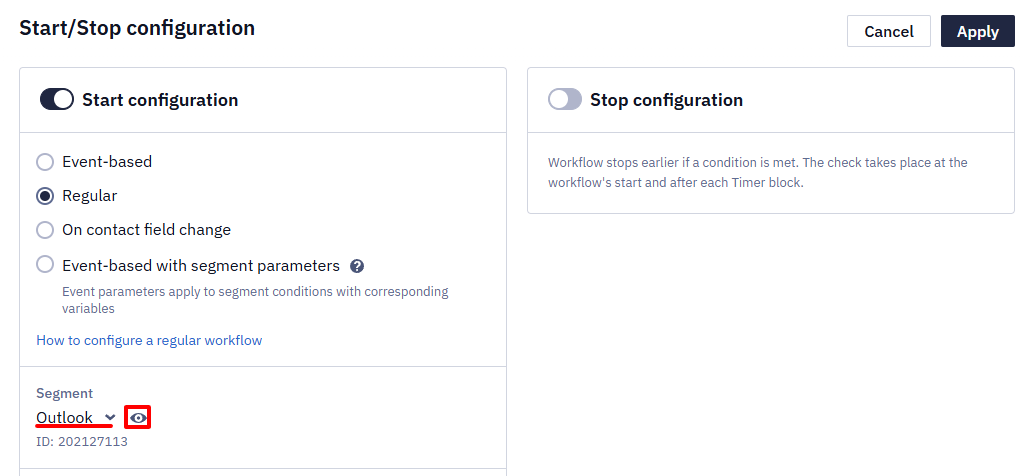
Regular Workflow Start Configuration
Workflow configuration settings:
- Segment. It allows you to select a segment of contacts.
- Start schedule. This setting defines the frequency of a workflow.
- Start date and time. This setting defines the workflow start date and time.
- Allowed start days. This setting allows you to set the specific days of a week for running a workflow.
- End. This setting allows you to set the workflow end date.
- Process repeated events. See Selecting Process Repeated Events.
- Avoid starting a workflow if already in progress.
When you add the segment in the settings, you can proceed to its preview or copy the ID.
The set values of date and time in the start configuration mean that the campaign will launch when the specified time and date occur. For example, if you set the start time from 09:00 to 10:00 once a day, it means that the workflow will automatically run within the specified time each day.
The same applies to the allowed start days — if you specify that the workflow should only be launched on Tuesday and Thursday, then it will only be automatically started on those days.
On Contact Field Change Start Configuration
When you select the On contact field change option, the workflow starts every time when the selected field changes for a selected contact.
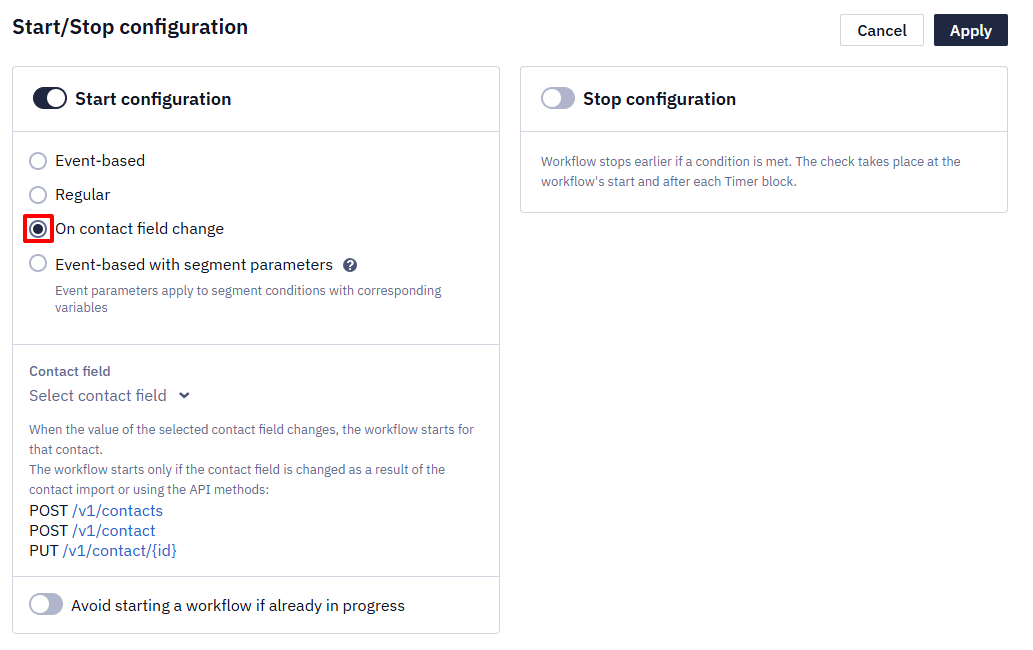
The workflow starts when the contact field changes as the result of the contact importing or using the following API methods:
Event-based with Segment Parameters Start Configuration
The workflow starts when the segment parameter matches the event parameter.
Example of use: When new chapters are released in a certain book, you need to send a corresponding notification to all contacts who have read this book.
Settings
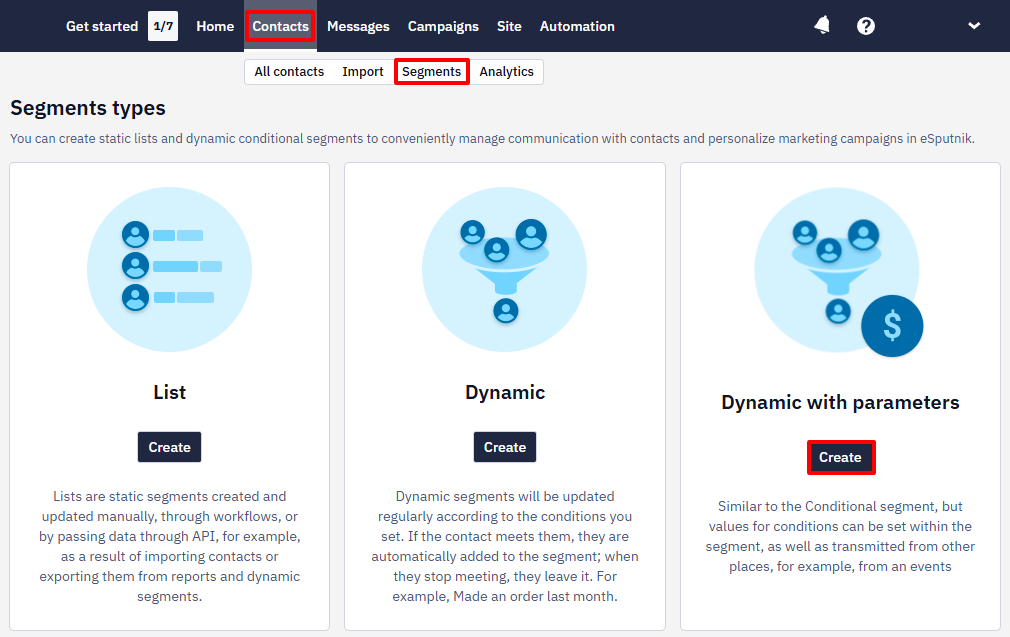
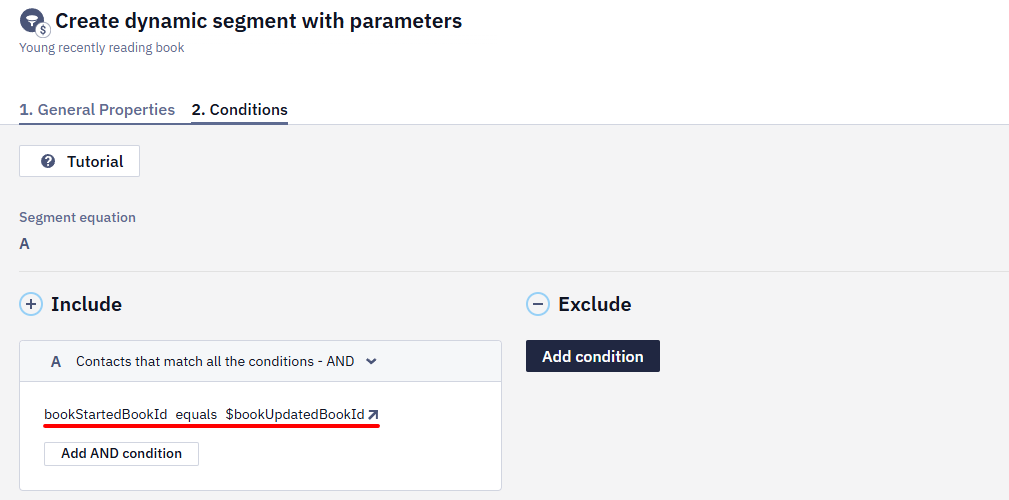
- Go to the Contacts → Segments section and select New segment → Dynamic with parameters.
- In the conditions, specify the segment parameter that should correspond to the event parameter. In our case, the segment parameter is the ID of the book the contact is reading (
bookStartedBookId), and the event parameter is the dynamic variable of the updated book ($bookUpdatedBookId).
- Save the segment and go to the workflow start settings, where you need to specify the appropriate event and parameter segment.
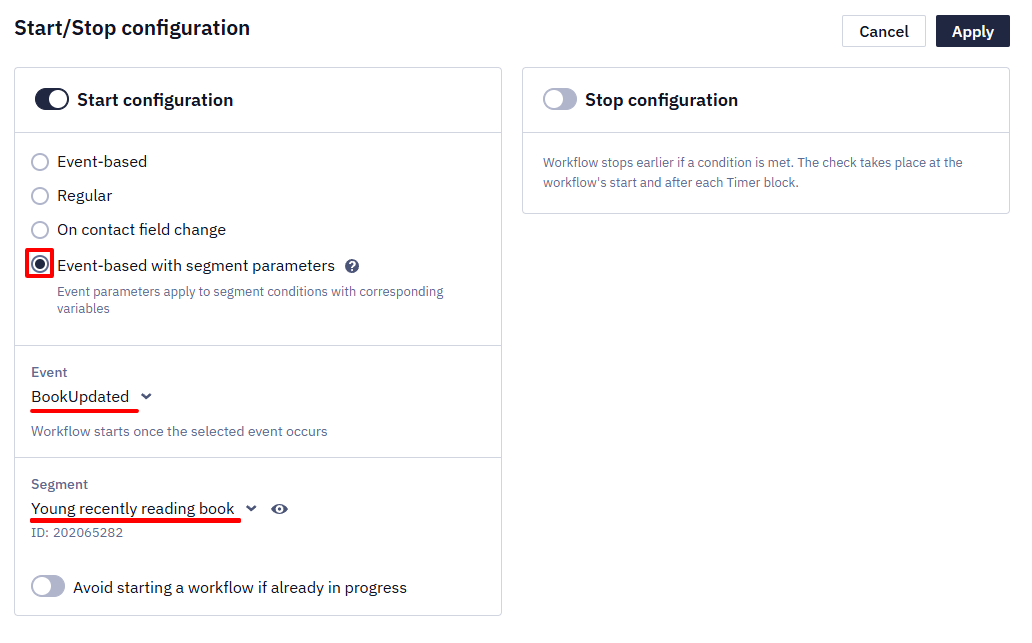
When an event with the ID of an updated book is received, contacts reading the same book will receive a notification through the workflow.
Setting Up Stop Configuration
NoteStop Configuration is defined inside the same Start block settings as Start Configuration — despite the name, both are part of one JSON object in the Start block. This is expected behavior, not a configuration error.
You can't edit Start/Stop Configuration from inside an open workflow. Go to Automation → Workflows and click Start/Stop configuration next to the workflow instead.
To set up stop configuration for a workflow:
-
Enable Stop Configuration slide button.
-
Select one of the following conditions:
- Event-based
- Included in a segment
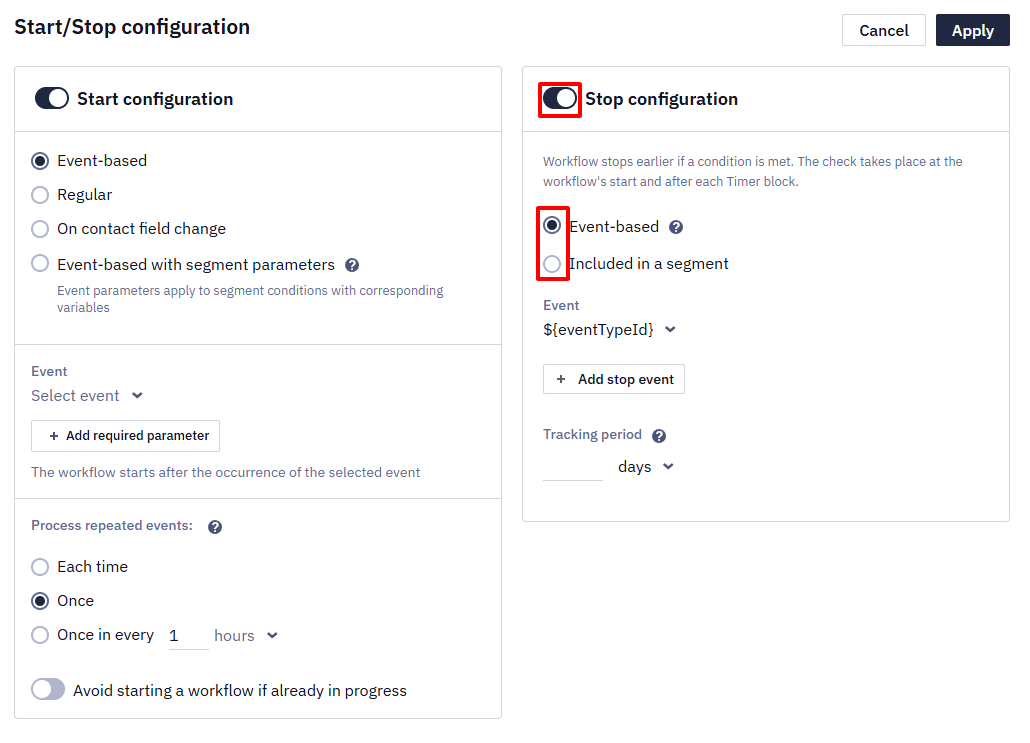
- Select the settings specific to the selected condition, as described below, then click Apply.
NoteWorkflow stops earlier if a condition is met. The check takes place at the workflow's start and after each Timer block.
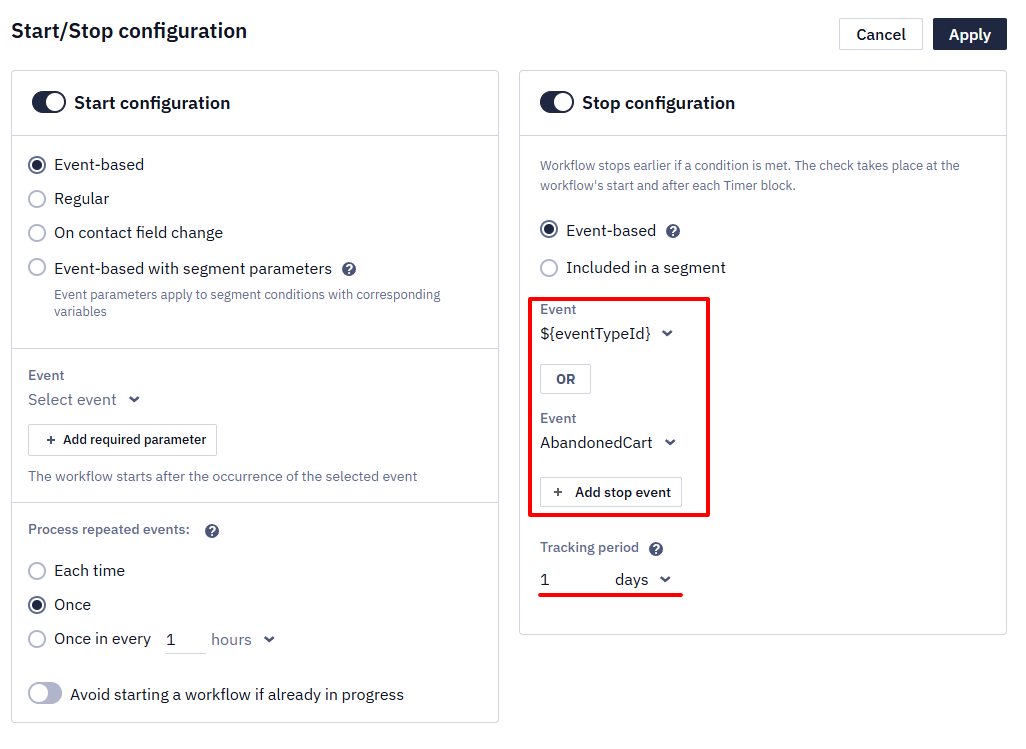
Event-based Stop Configuration
The event-based condition stops the workflow when one of selected events occurs (or happened before the workflow was started).
To configure the stop on the event option:
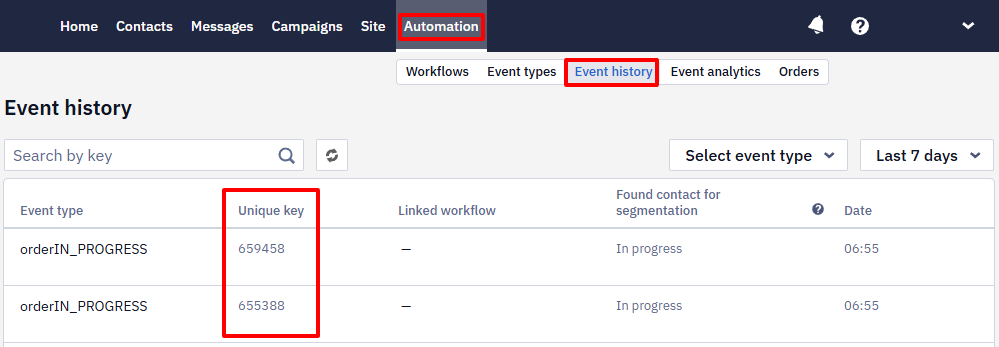
- Select one or more events. The workflow will stop by
contactIdif it is contained in one of the specified events, even if they have different unique keys. If the event does not contain acontactId, the workflow stops by the unique key of that event. To view unique event keys, go to Automation → Event history.
- Enter the period value (max 2 years). The workflow will stop if the event occurs within the specified period before its launch.
Included in a Segment Stop Configuration
The Included in a segment condition stops the workflow when the contact is included in a specified segment.
To set up a stop condition by including in a segment, select it from the list or specify a dynamic variable in brackets – the name of the start event parameter containing the segment ID.
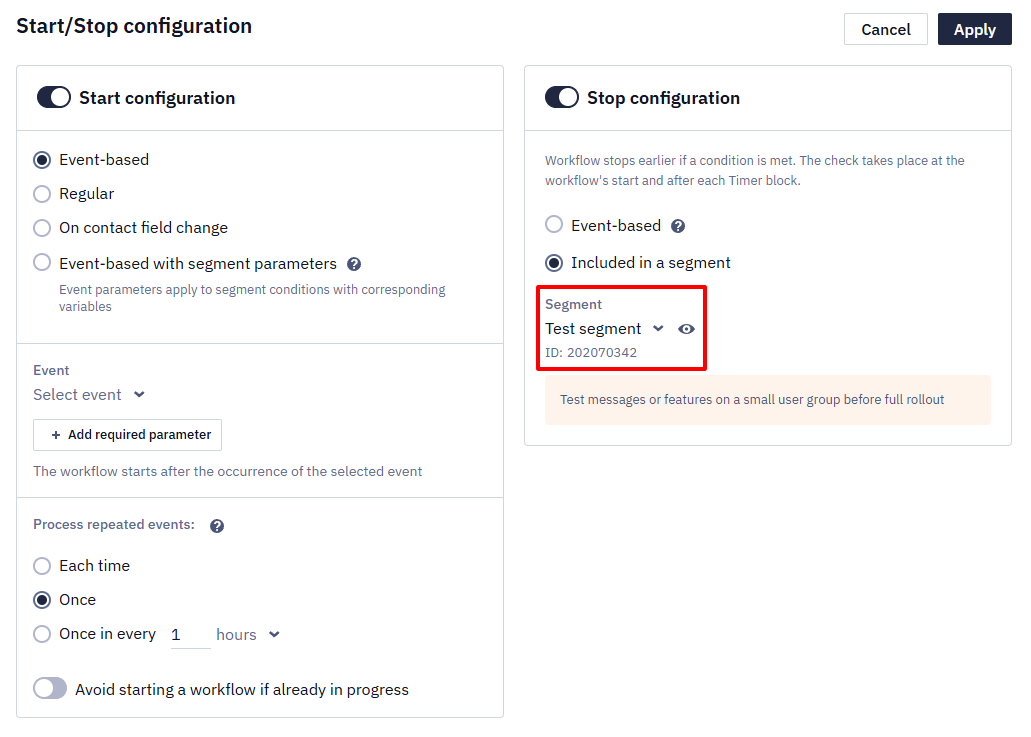
After selecting the segment, you can preview it by clicking the preview icon.
NoteWhen the workflow is stopped by including in a segment, the system searches for a contact by
contactId, if it is not specified, by other identifiers.
Updated 8 days ago