Connecting to PostgreSQL
Connection to PostgreSQL would be the most optimal option if you need to
- add extra fields for segmentation by contact fields;
NoteWhen using PostgreSQL as a data source (import), it is recommended to use the
snake_casestyle for table and column names, for example:first_name,loyalty_card_number,order_date.
- configure seamless synchronization of content component;
- get extra data on contacts in order to build precise segments based on specific conditions.
ImportantPlease note that this integration is available only in the Growth and Enterprise plans
Step 1. Set up a Connector
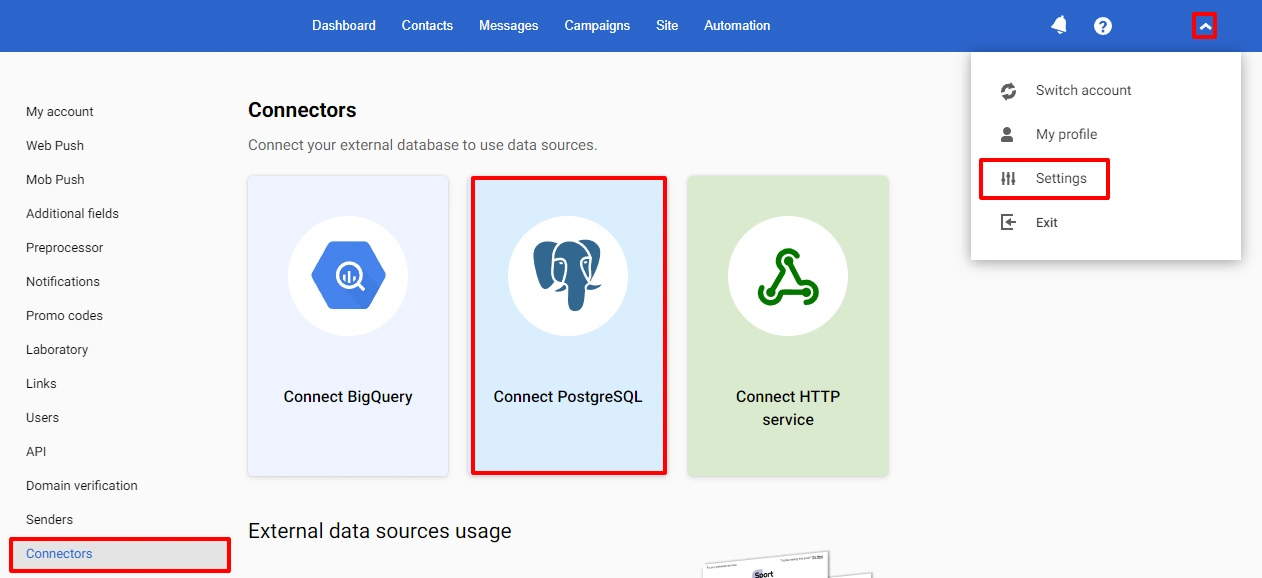
- Go to your personal profile → Settings → Connectors → and select Connect PostgreSQL.
- Fill in all fields:
- Name. Required.
- Host. It can be the domain name of the remote server or its IP address.
- Port. Entered automatically by default.
- Database. Name of the database on a remote server.
- Username. User's database login (read only user role is enough). Required.
- Password. Required.
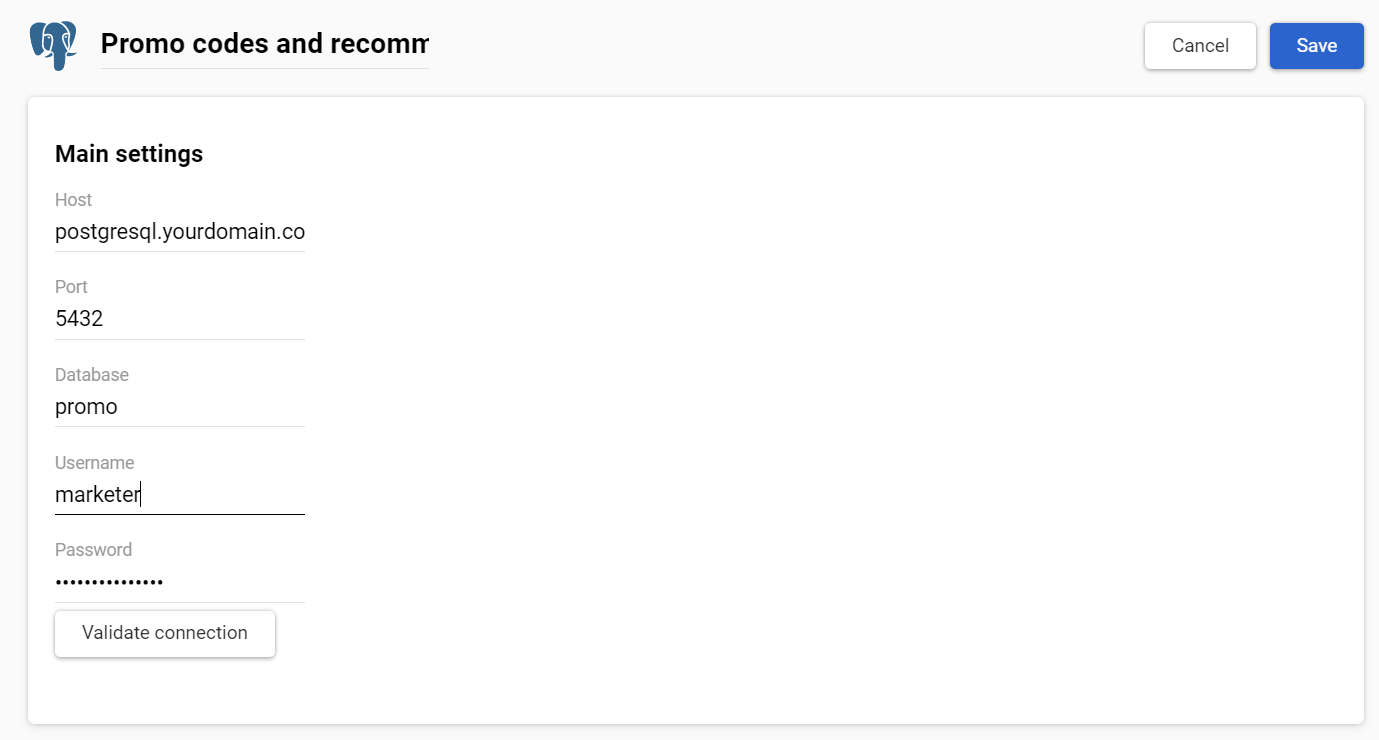
You may click Validate connection to test whether authorization data is entered correctly.
NoteWhen connecting to PostgreSQL, we recommend using a secure SSL connection for secure data transfer.
If you are not using an SSL connection, the system will warn you:

In case of a successful connection, the corresponding service notification will appear in the top right corner. If the connection fails, check the entered data and contact your system admin if needed.
- In Set unique contact field, select a table column that contains a unique contact key and Reteno unique contact key. They should match.
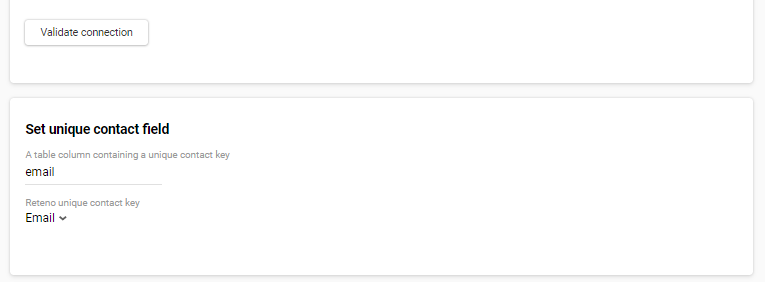
For example, you select Email. After connection, the column of the PostgreSQL table with email addresses will be mapped to the corresponding field in the Reteno system.

Aside from email addresses, the uniqueness of contacts can be determined by a phone number, external ID, or additional contact field.
ImportantYou can use the created connector to connect to several data sources. All of them will have the same unique contact key so we recommend using one key in all tables. To use a different key, create another connector to the same database and set another unique contact field.
- Click Save.
Step 2. Configure a Data Source
Your external database may contain several tables, and you need to select which one you want to connect to.
- Go to your profile → Settings → Data sources, click New data source and select External data source.
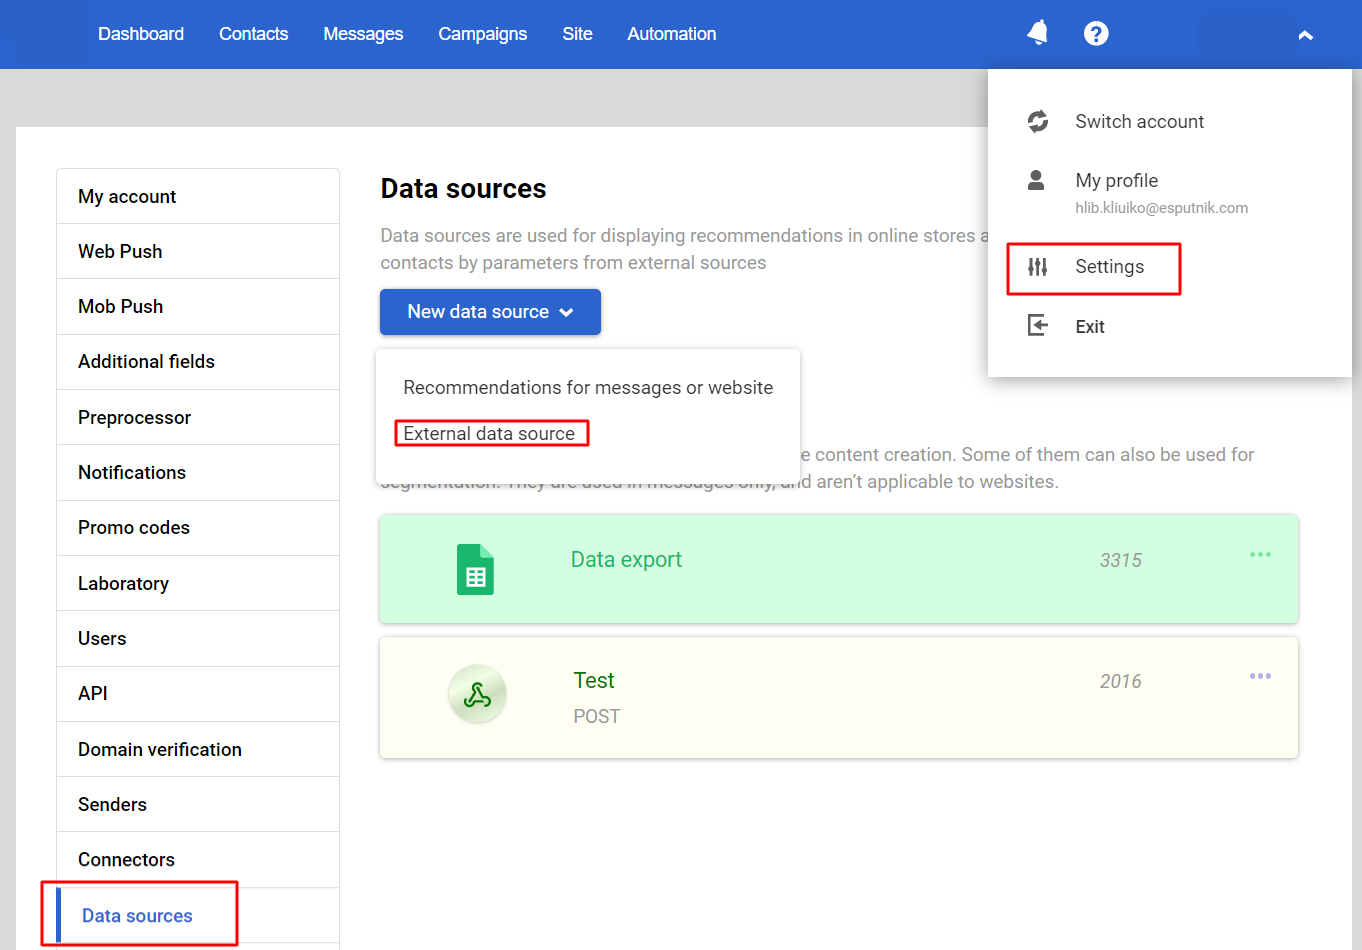
- Select the created connector.

- Select the dataset and table and enter a source name. Click Save.
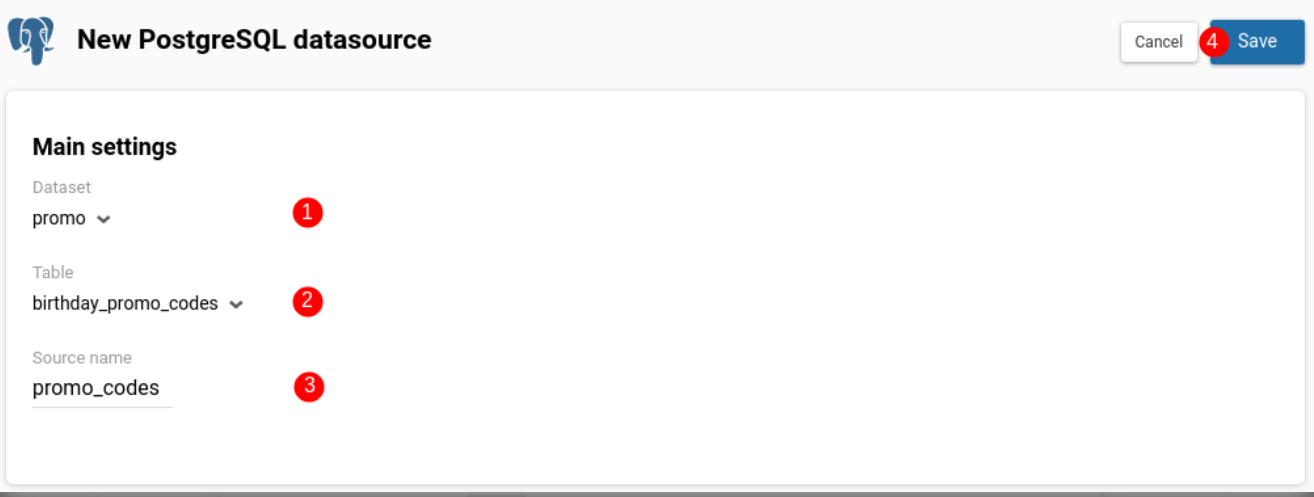
- Now, import contacts to Reteno and fill the external source with data.
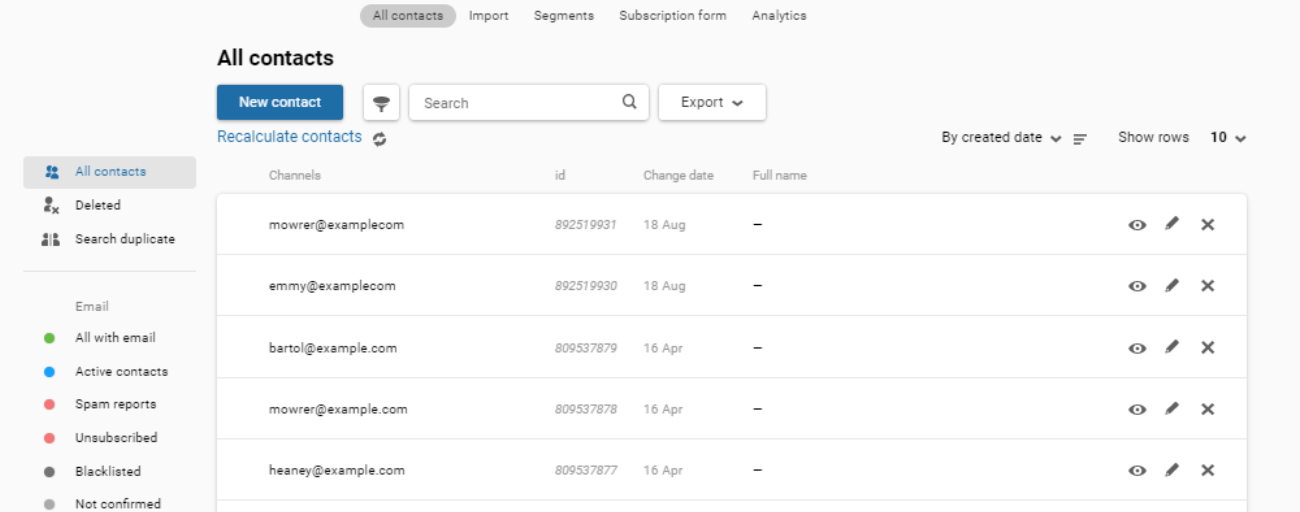
Now you can build segments based on the imported contact fields.
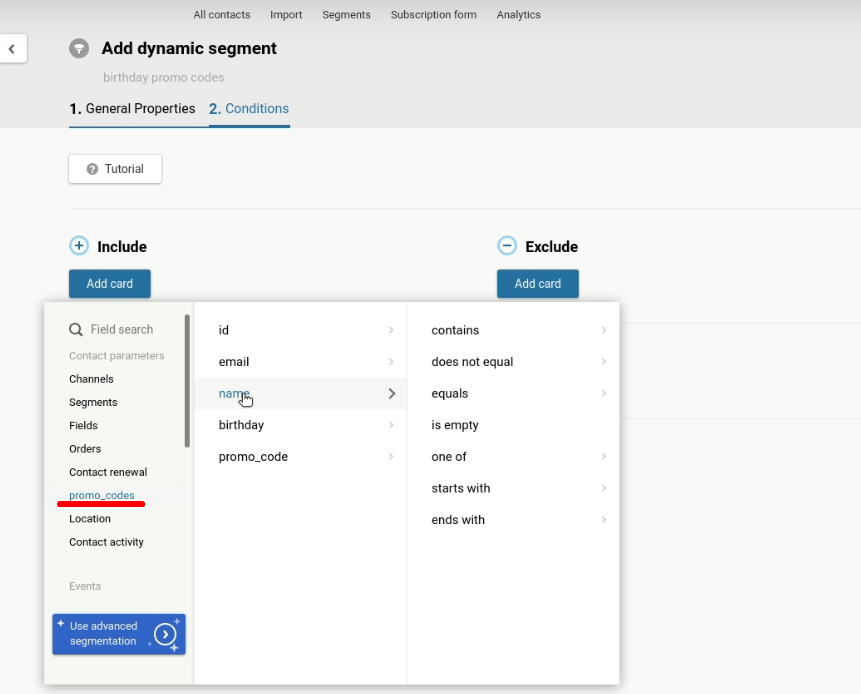
ImportantConnection to the external database doesn’t presuppose contact import. Segmentation is only available for contacts that exist both in your Reteno account and in the external database. Synchronize and update contacts before creating campaigns.
Step 3. Add data to a message
To insert data, you need to reference it using a Velocity parameter $!data.get('source_name'). As an example, we will use the created source with the name promo_codes.
Bulk campaign to a segment
For example, you plan a campaign to contact [email protected]
A set of data will be extracted from the table and inserted into an object:
{
  "data": {
    "promo_codes": [
      {
        "id": "2",
        "email": "[email protected]",
        "name": "Dina Kozak",
        "birthday": "2020-09-02T00:00:00Z",
        "promo_code": "AAAA-BBBB-DDDD"
      }
    ]
  }
}
Fields of the array promo_codes can be referenced in two ways:
- With parameters (if you know the number of parameters in the array).
$!data.get('promo_codes').get(0).get('name')

$!data.get('promo_codes').get(0).get('promo_code')- With a loop (most common method).
#foreach($pc in $!data.get('promo_codes'))

$!pc.get('name')

$!pc.get('promo_code')

#end
Triggered campaign
First, you need to create a dynamic segment with certain conditions. For example, your segment will include only contacts who have a birthday today.
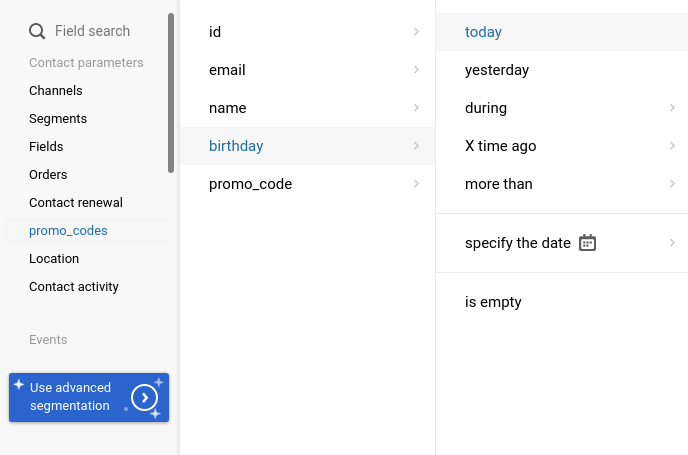
When the workflow is triggered for contacts that match this condition, the system generates the event. The name of the event is formed from the static part (regularEventType) and the segment ID the campaign is sent to. It can be, for example, regularEventType-170531841.
The event contains contact data, contact ID in Reteno (ContactId), email address (EmailAddress), and data from an external table.
The data from each table field is converted into a key and is placed in an array with a numerical name corresponding to the ID of the data source.

This array is serialized and placed as a string in the field jsonParam. The body of the event may look as follows:
{
  "params": [
    {
      "name": "ContactId",
      "value": "623927159"
    },
    {
      "name": "jsonParam",
      "value": "{\"1043\":[{\"id\":123,\"email\":\"[email protected]\",\"name\":\"Dina Kozak\",\"birthday\":\"2020-09-02T00:00:00Z\",\"promo_code\":\"AAAA-BBBB-DDDD\"}]}"
    },
    {
      "name": "EmailAddress",
      "value": "[email protected]"
    }
  ]
}
Having set up the workflow, configure triggers:
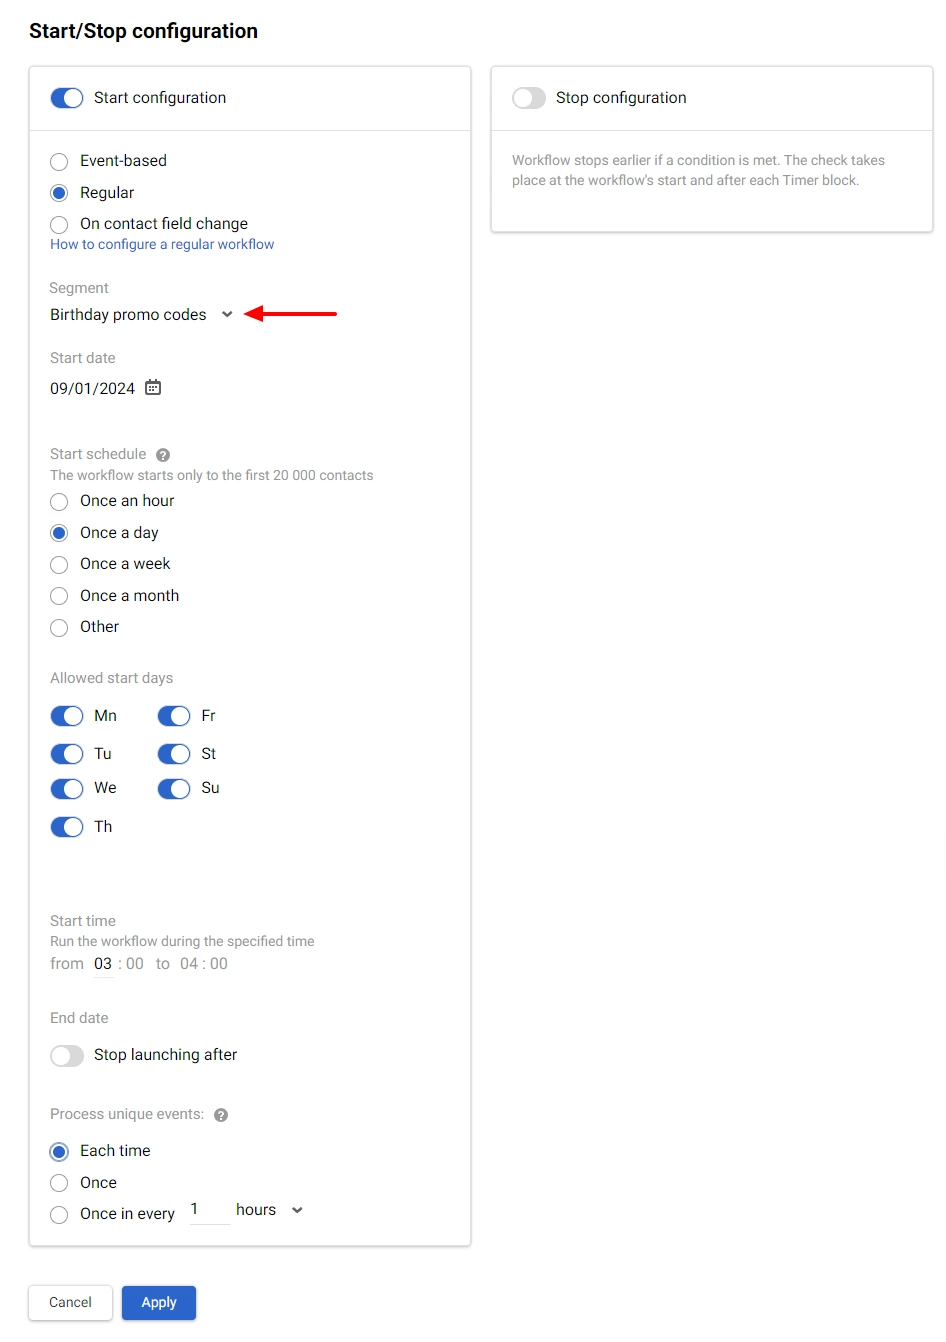
The same approach as for a bulk campaign is used to extract data from the event, with little difference in the name of the array. The following object will be in the email:
{
  "data": {
    "1043": [
      {
        "id": "2",
        "email": "[email protected]",
        "name": "Dina Kozak",
        "birthday": "2020-09-02T00:00:00Z",
        "promo_code": "AAAA-BBBB-DDDD"
      }
    ]
  }
}
The fields of the array 1043 can be referenced in two ways:
- With parameters (if you know the number of parameters in the array).
$!data.get('1043').get(0).get('name')
$!data.get('1043').get(0).get('promo_code')- With a loop (most common method).
#foreach($pc in $!data.get('1043'))

$!pc.get('name')

$!pc.get('promo_code')

#end
Connect PostgreSQL as an external data source to fulfill a wide range of marketing tasks. For example, substitute promo codes in triggered campaigns or build complex segments based on data collected on different platforms.
Step 4. Set up Data Export
To regularly update information about the audience, orders and campaign results in PostgreSQL, set up data export from the Reteno to tables. For example, you can export responses to an NPS survey, purchase history, date of the last click in a message, etc.
Available datasets for export:
- contactActivities;
- contacts;
- devices;
- events;
- messages;
- orderItems;
- orders;
- revenue.
List of Data Export Parameters
Broadcasts
Parameter | Type | Description |
|---|---|---|
createdDate | timestamp | Day and time of message creation (format: '2021-10-08 11:11:02') |
groupId | int | Segment IDs participating in the broadcast |
id | int | Broadcast ID |
mediaType | varchar (50) | Media type (SMS, Email, WebPush, MobilePush, AppInbox, Widget) |
messageId | int | Message ID |
name | varchar (1000) | Broadcast name |
startedDate | timestamp | Day and time of broadcast sending (format: '2021-10-08 11:11:02') |
status | varchar (50) | Broadcast statuses: • IDLE - completed; • RUNNING - started; • PAUSED - paused (if the mailing was not stopped manually by you, contact support for more details); • SCHEDULED - planned; • UNCONFIRMED - in queue for moderation; • CONSIDERATION - under moderation; • BLOCKED - blocked by moderator. |
updatedDate | timestamp | Day and time of broadcast updating (format: '2021-10-08 11:11:02') |
ContactActivities
Parameter | Type | Description |
|---|---|---|
activity (activityStatus) * | varchar (100) | Activity status: • DELIVERED – the message was delivered. • UNDELIVERED – the message was undelivered (statusDescription contains the reason). • RECEIVED – the message was opened. • UNSUBSCRIBED – a contact unsubscribed from the broadcasting list. • CLICKED – a contact clicked links in the message. • SPAM – a contact reported spam. • SUBSCRIPTION_CHANGED – a contact changed the subscription category. • PUSH_SUBSCRIBED — a contact subscribed to push notifications. |
broadcastId | int | Broadcast ID |
campaignType | varchar (50) | Campaign type: • IM — triggered message, • Group — bulk campaign. |
clickEventLink | varchar (1000) | Contains the link clicked by a contact (when the status is CLICKED) |
contactId | bigint | Contact ID in Reteno (Internal) |
errorCode (statusDescription) * | varchar (1000) | Delivery error SMTP and description |
eventKey | varchar (100) | Event key |
eventTypeKey | varchar (100) | Event type key |
externalCustomerId | varchar (100) | Contact ID in your system (External) |
iid | string | Sender name for Email and SMS |
mediaType | varchar (50) | Media type (SMS, Email, WebPush, MobilePush, AppInbox, Widget, In-App) |
messageInstanceId | int | Service field |
messageLanguageCode | varchar (50) | Message language code |
messageName | varchar (100) | Message name in Reteno account |
messageId | int | Message ID |
messageTags | varchar (200) | Message tags |
messageURL | varchar (1000) | Contains the link to the email web-version |
osName | string | Device operating system |
osType | string | Device type |
started (activityDateTime) * | timestamp | Day and time of message sending (format: '2021-10-08 11:11:02') |
utmCampaign | varchar (400) | Campaign UTM |
workflowId | string | Workflow ID |
workflowInstanceId | varchar (200) | The identifier of a particular workflow launch. Use it to group mailings within the launch of a workflow. |
workflowBlockId | varchar (200) | Workflow block ID |
smsParts | int | Number of SMS parts |
*The field will be removed as overdated; use the field indicated in brackets
Contacts
Parameter | Type | Description |
|---|---|---|
contactId | bigint | Contact ID in Reteno (Internal) |
contactSource | varchar (50) | Contact source: • SITE_AUTOMATED - binding an email to a push subscriber (webPush collection script), • I_MESSAGE - sending a single message, • CAMPAIGN - workflow (block Create contact or Add to segment), • IMPORT - file import or Add contacts method, • MANUAL - manually created, • SUBSCRIPTION - subscription form (Subscribe a contact API method), • Add contact API method, • ORDER - order on the site (Add orders API method). |
createdDate | timestamp | Contact creation date and time (format: '2021-10-08 11:11:02') |
varchar (50) | Contact email | |
emailDomain | varchar (100) | Email domain |
emailStatus | varchar (50) | Email status |
externalCustomerId | varchar (100) | Contact ID in your system (External) |
firstName | varchar (50) | Contact first name |
languageCode | varchar (20) | Contact language code |
lastClickedDate | timestamp | Day and time of the last click (format: '2021-10-08 11:11:02') |
lastName | varchar (50) | Contact last name |
lastReceivedDate | timestamp | Day and time of the last delivery (format: '2021-10-08 11:11:02') |
lastSentDate | timestamp | Day and time of the last sending (format: '2021-10-08 11:11:02') |
lastViewedDate | timestamp | Day and time of the last opening (format: '2021-10-08 11:11:02') |
sms | varchar (50) | Phone number |
totalClicked | int | Total clicks amount |
totalReceived | int | Total received messages amount |
totalSent | int | Total sent messages amount |
totalViewed | int | Total viewed messages amount |
Devices
| Parameter | Type | Description |
|---|---|---|
| appVersion | varchar (50) | App version |
| applicationId | int | App ID |
| category | varchar (50) | Category |
| contactId | bigint | Contact ID |
| deviceId | varchar (250) | Device ID |
| deviceModel | varchar (100) | Device model |
| externalCustomerId | varchar (100) | External customer ID |
| languageCode | varchar (20) | Language code |
| osType | varchar (50) | OS type |
| osVersion | varchar (50) | OS version |
| pushToken | varchar (max) | Push token |
| timeZone | varchar (100) | Time zone |
Events
| Parameter | Type | Description |
|---|---|---|
| contactId | int | Contact ID |
| eventId | int | Event ID |
| eventTypeKey | string | Event type |
| keyValue | string | Event key |
| occured | timestamp | Date and time of occurrence (format: '2021-10-08 11:11:02') |
| paramsJson | json | 50 first event parameters and values (name/value); up to 300 characters of values are transferred. |
Messages
| Parameter | Type | Description |
|---|---|---|
| annoyanceLevel | int | Message annoyance level |
| language | varchar (50) | Language of the main version of the message |
| mediaType | varchar (50) | Media type (SMS, Email, WebPush, MobilePush, AppInbox, Widget, In-App) |
| messageId | int | Message ID |
| name | varchar (200) | Message name |
| replyTo | varchar (200) | Reply-to address |
| sender | varchar (200) | Sender |
| subject | varchar (1000) | Subject |
| tags | varchar (200) | Tags |
| translations | varchar (200) | Language versions of the message |
| updateDate | timestamp | Day and time of message updating (format: '2021-10-08 11:11:02') |
OrderItems
| Parameter | Type | Description |
|---|---|---|
| cost float | numeric | Product price |
| description | varchar (300) | Product description |
| externalProductId | varchar (100) | External product ID |
| imageUrl | varchar (200) | Product image link |
| name | varchar (100) | Product name |
| orderDate | timestamp | Order creation date (format: '2021-10-08 11:11:02') |
| orderId | int | Order ID in Reteno (Internal) |
| quantity | int | Number of products |
| url | varchar (200) | Product URL |
Orders
Parameter | Type | Description |
|---|---|---|
contactId | bigint | Contact ID in Reteno (Internal) |
deliveryAddress | varchar (100) | Delivery address |
deliveryMethod | varchar (50) | Delivery method |
discount | numeric | Discount |
varchar (50) | ||
externalOrderId | varchar (100) | External order ID |
firstName | varchar (50) | Contact first name |
lastName | varchar (50) | Contact last name |
orderCreatedDate | timestamp | Date of order creation in Reteno (format: '2021-10-08 11:11:02') |
orderDate | timestamp | Order creation date (format: '2021-10-08 11:11:02') |
orderId | int | Order ID in Reteno (Internal) |
paymentMethod | varchar (50) | Payment method |
Phone | varchar (50) | Phone number |
Status | varchar (50) | Order status: • INITIALIZED, • IN PROGRESS, • DELIVERED, • CANCELED. |
totalCost | numeric | Total order cost |
Revenue
Parameter | Type | Description |
|---|---|---|
activity (activityStatus)* | varchar (100) | Activity status: • DELIVERED – the message was delivered. • UNDELIVERED – the message was undelivered (statusDescription contains the reason). • RECEIVED – the message was opened. • UNSUBSCRIBED – a contact unsubscribed from the broadcasting list. • CLICKED – a contact clicked links in the message. • SPAM – a contact reported spam. • SUBSCRIPTION_CHANGED – a contact changed the subscription category. • PUSH_SUBSCRIBED — a contact subscribed to push notifications. |
campaignType | varchar (50) | Campaign type: • IM — triggered message, • Group — bulk campaign. |
clickEventLink | varchar (1000) | Contains the link clicked by a contact (when the status is CLICKED) |
contactId | bigint | Contact ID in Reteno (Internal) |
currency | varchar (3) | Currency |
externalCustomerId | varchar (100) | Contact ID in your system (External) |
externalOrderId | varchar (200) | External order ID |
mediaType | varchar (50) | Media type (Sms, Email, WebPush, MobilePush, AppInbox, Widget, In-App) |
messageInstanceId | int | Service field |
messageName | varchar (100) | Message name in Reteno account |
messageTags | varchar (200) | Message tags |
messageUrl | varchar (1000) | Contains the link to the email web-version |
orderDate | timestamp | Order creation date (format: '2021-10-08 11:11:02') |
started (activityDateTime)* | timestamp | Day and time of message sending (format: '2021-10-08 11:11:02') |
totalCost | numeric | Total order cost |
utmCampaign | varchar (400) | Campaign UTM |
*The field will be removed as overdated; use the field indicated in brackets
NoteExisting entries in the Revenue table (for orders placed after 03.08.2024) can be updated along with the upload of new orders. Updating may be necessary, for example, if the total cost of the order has changed.
This information will be transferred to PostgreSQL and will update the data in the tables.
ImportantYou don’t need to pre-create PostgreSQL tables. They will be generated automatically at the first export, and since that all the incoming data will be updated. All the table names will correspond to the data sets (contact activities, contacts, order items, orders, revenue)
Setting up PostgreSQL connector for data export
- Go to Settings → Data export and click New data export. Select one of the created PostgreSQL connectors.
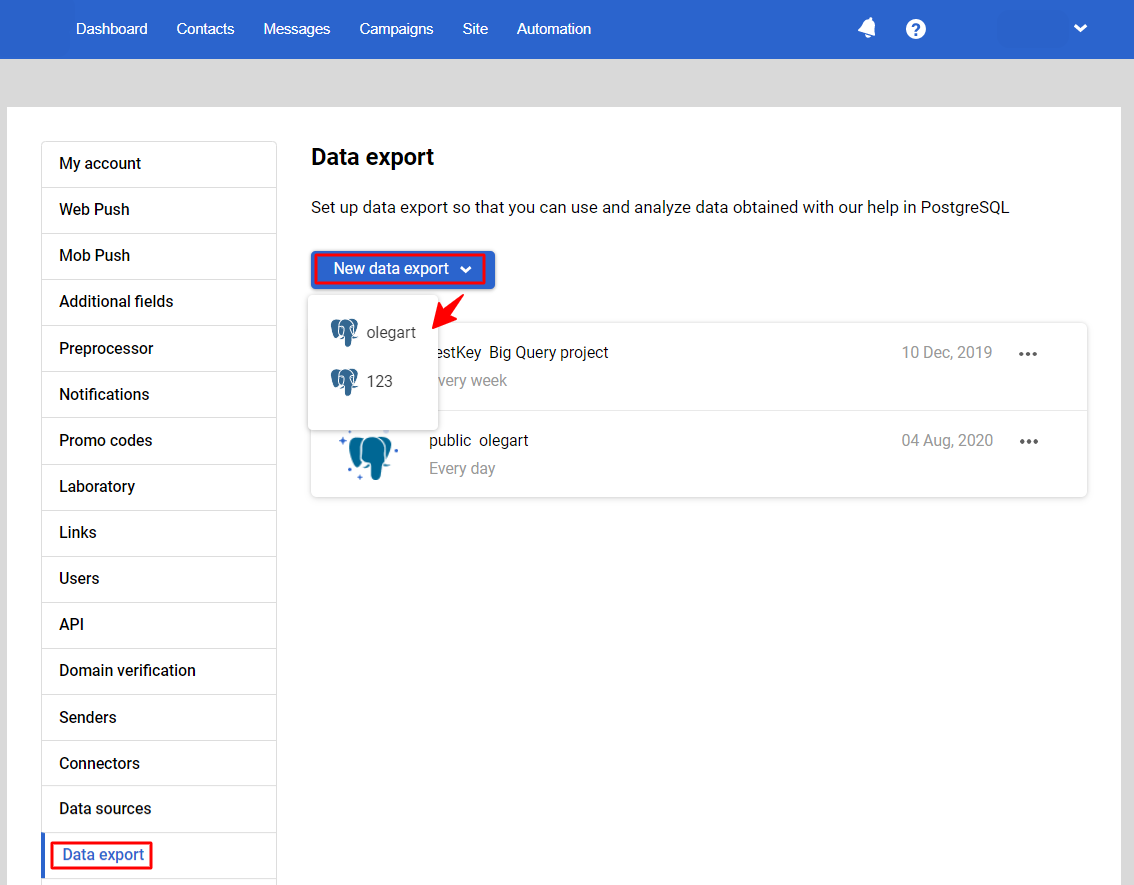
- Select upload interval and check the boxes for the data sets you want to upload. The data set type by default is public, you can select another type if you have specified it in your PostgreSQL settings. Click Save.
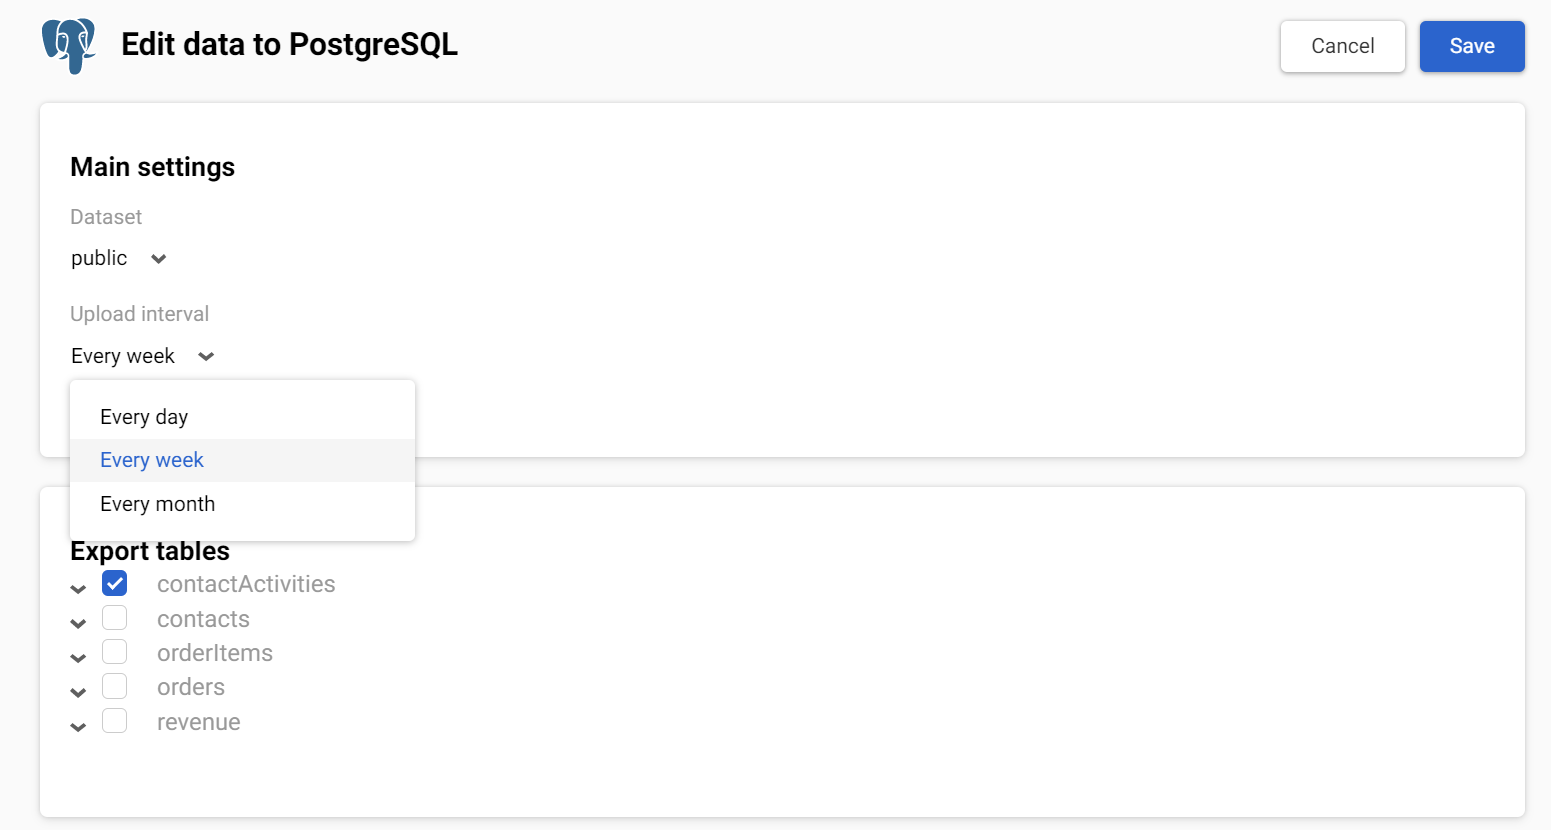
The connection will be displayed in the Data export section, here you can edit its settings.
Updated 22 days ago
