Authorization Using OAuth 2.0
We recommend setting up authorization using OAuth 2.0 to integrate a third-party app with Reteno.
OAuth 2.0 is an authorization protocol that allows third-party apps to securely access certain Reteno data and capabilities without providing user credentials and API keys.
Granting Access Rights to Your Reteno Account
You can restrict access to your resources in Reteno with OAuth 2.0. For example:
- Stripo.email allows only to export email templates to Reteno.
- A CRM (for example, AmoCRM) allows only to add and edit contacts in Reteno when they are changed in the CRM. Or CRM can also receive contact activity data and display it on its own.
- A CMS (for example, Wix) only allows the use of standard subscription forms to add subscribers directly to Reteno.
Access to Reteno resources is limited by the rights granted during app registration:
- Full access to API
- Access to events
- Access to events and contacts
- Access to messages
You can restrict access to any of the rights from this list.
Groups of API Methods by Functions in the System
1. General Methods
Methods from this group do not require special permissions; only Reteno account authorization is required.
1.1 Protocol version information:
GET version
1.2 Account information:
GET account/infoGET balanceGET subscriptionsGET addressbooks
1.3 Message management
POST messages/emailGET messages/emailGET messages/email/{id}DELETE messages/email/{id}PUT messages/email/{id}DELETE messages/email/{id}/{language}PUT messages/email/{id}/{language}GET messages/email/{id}/viewLinkGET messages/smsGET messages/sms/{id}
1.4 Interface management
GET interfaces/emailGET interfaces/sms
1.5 Statistics
GET callouts/smsGET contact/token/activated/{app_uuid}/{token_id}PUT contact/token/activated/{app_uuid}/{token_id}PUT interactions/{interaction_id}/status
2. Methods for Updating Contacts and Segments
Typically, integration involves updating contacts rather than reading them. Therefore, you can limit access rights only to updating contacts to avoid data leakage.
POST contactsPOST contacts/uploadGET importstatus/{sessionId}POST contactPUT contact/{id}DELETE contact/{id}PUT contact/{id}/subscriptionsPOST contact/subscribePOST emails/unsubscribed/addPOST emails/unsubscribed/deletePOST group/{id}/contacts/detach
3. Methods for Reading Contacts and Segments
GET contactsGET contact/{id}GET contacts/emailGET contact/{id}/subscriptionsGET groupsGET group/{id}/contacts
4. Methods for Obtaining Contact Activity Data
GET contacts/activity
5. Methods for Managing Events
POST eventPOST past_eventsDELETE past_events
6. Methods for Managing Messages
POST message/{id}/smartsendPOST message/{id}/send OLDGET message/statusPOST message/emailGET message/email/status OLDPOST message/smsGET message/sms/status OLDPOST broadcastGET broadcast/{broadcast_id}DELETE broadcast/{broadcast_id}GET broadcasts
Registering, Editing, and Deleting an App in Reteno
Before you start integrating using OAuth 2.0, register your app with Reteno.
App Registration
- Click on your organization name in the upper right corner and select the For partners tab.

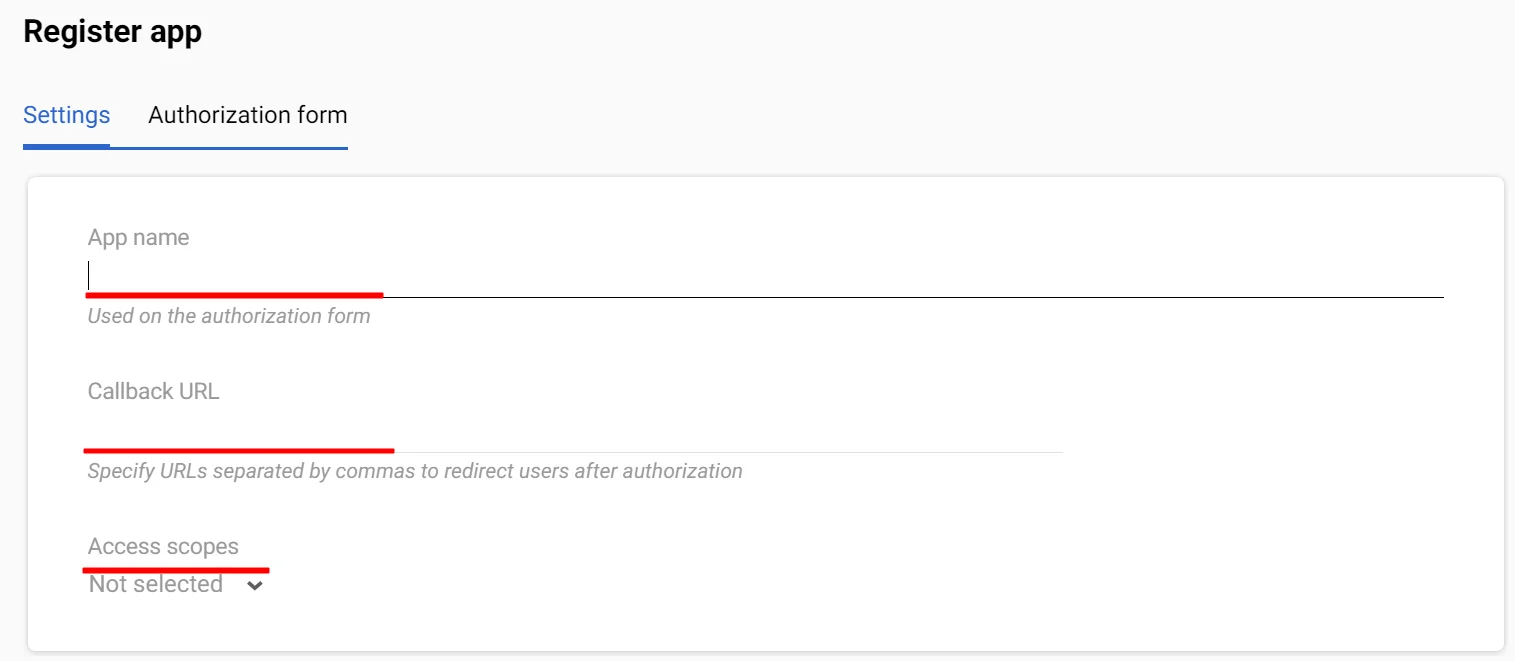
- Click Register app.

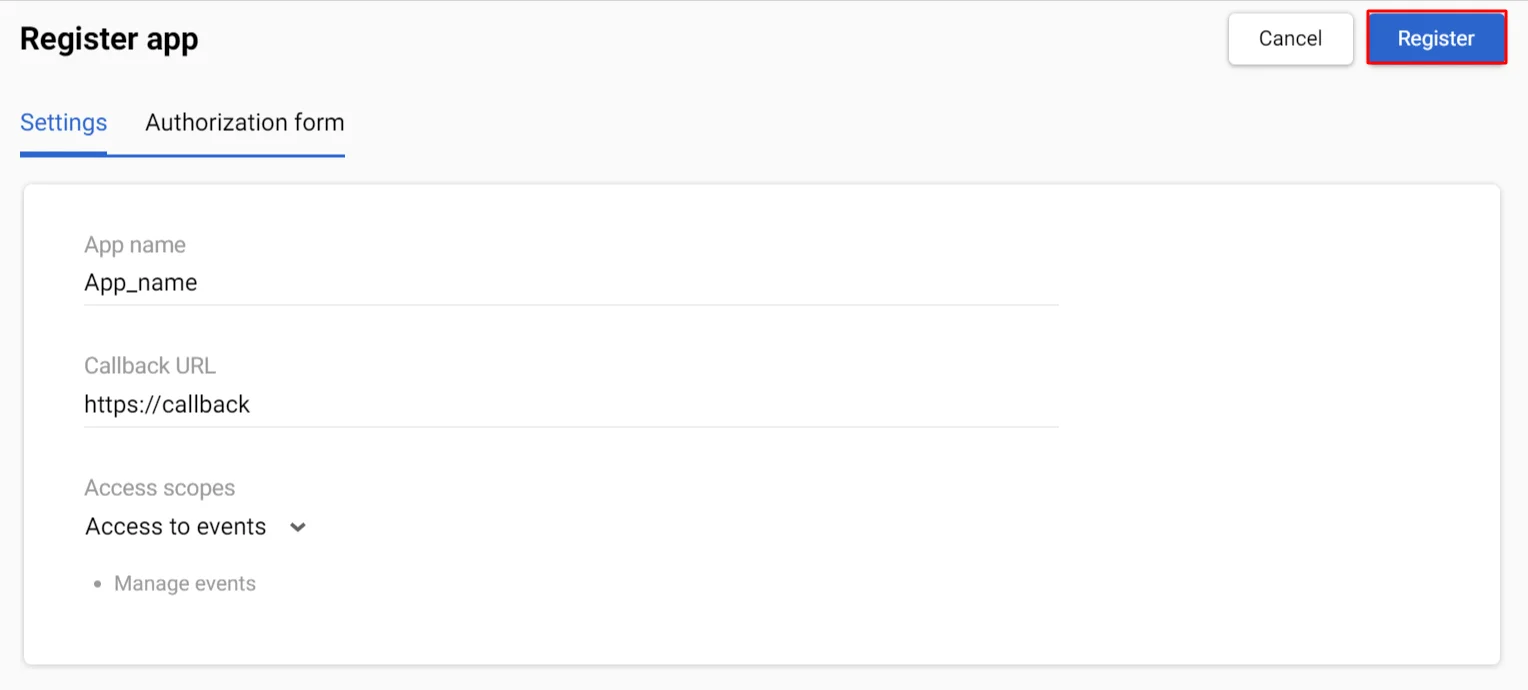
- Provide app information:
- Name;
- Callback URL – the address to which the service will redirect the user after authorization or authorization refusal (you can create an app without Callback URL and specify it later);
- Select access scopes.

- Click Register.

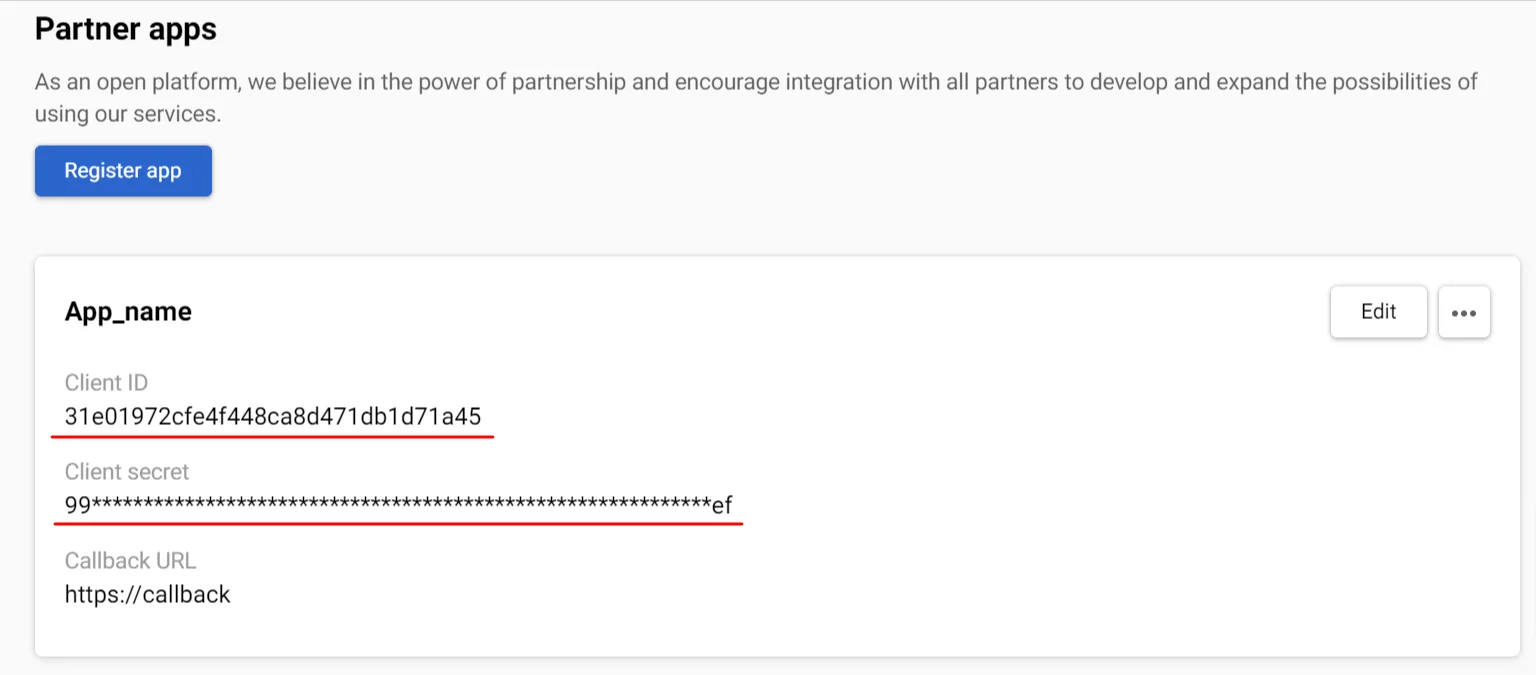
After registering, the app will be assigned a Client ID and Client Secret. Write them down and store them in a safe and secure storage facility.

- Customize the appearance of the authorization form:
- Click Edit;

- Go to the Authorization form tab;
- Enter the app name if needed;
- Upload logo: maximum
JPG,GIF, orPNGsize is 1 MB; recommended aspect ratio is 1:1 (96×96px); larger images will be cropped to 100% width and center-aligned (you can create an app without a logo and upload it later).

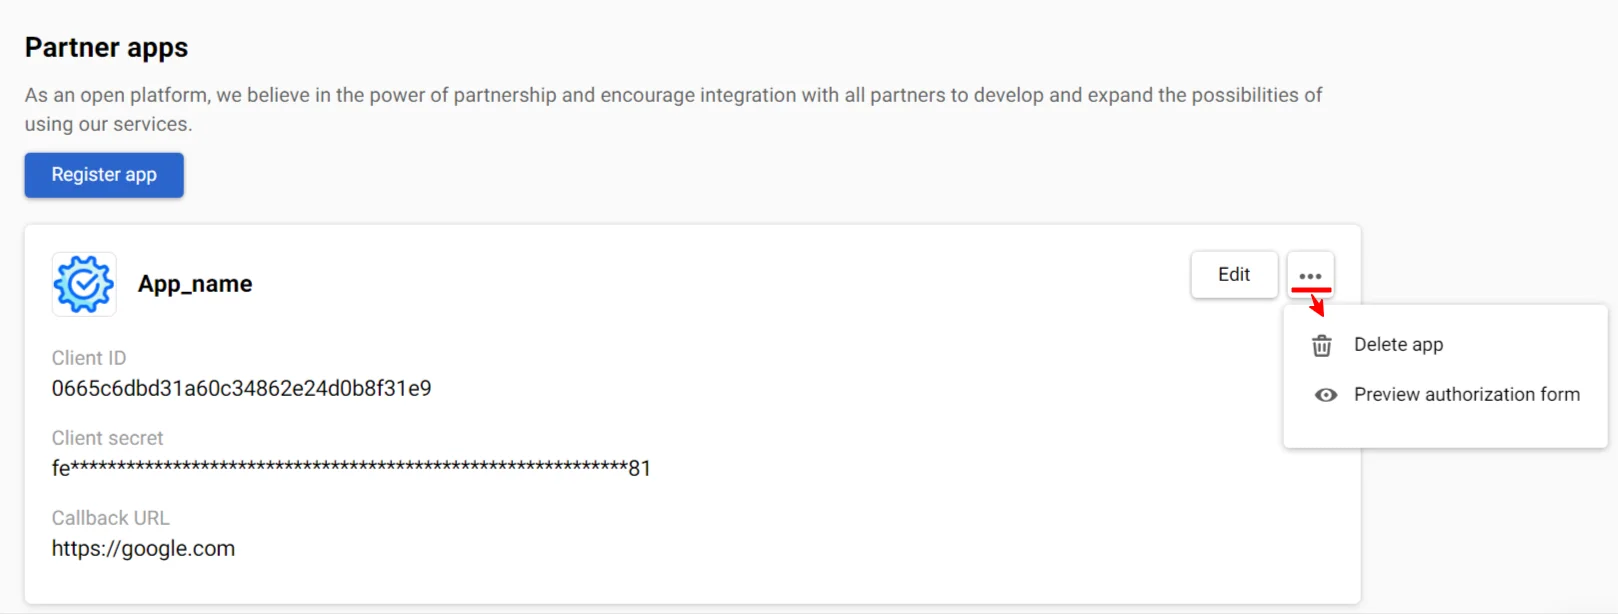
After registering the app, a window with information about it will appear on the Partner apps tab.
Click on the three dots to preview the authorization form or delete the app. Once deleted, all keys/tokens/integrations will become invalid.

Integrating with OAuth 2.0
NoteThe implementation is supported only for apps with a server part, i.e.,
response_type=code.
1. Authorization
Send a GET request to the authorization URL https://uaa.reteno.com/uaa/oauth/authorize.
The request must contain the Client ID received when registering the app in Reteno.
Request format:
https://uaa.reteno.com/uaa/oauth/authorize/oauth/authorize?response_type=code&client_id=YOUR_CLIENT_ID&redirect_uri=YOUR_CALLBACK_URL
As a result, an authorization window will appear.
Enter your Reteno login and password, and confirm access.
The request will be redirected to the Callback URL with the code used to obtain tokens.
>
2. Obtaining Access and Refresh Tokens
Send a POST request to the Access Token URL https://uaa.reteno.com/uaa/oauth/token.
The request must contain:
- Client ID and Client Secret that you received when registering the app in Reteno
- a code you received during the authorization
Request format:
https://reteno.com/uaa/oauth/token?grant_type=authorization_code&client_id=YOUR_CLIENT_ID&client_secret=YOUR_CLIENT_SECRET&code=YOUR_CODE&redirect_uri=YOUR_CALLBACK_URL
In the response, you will receive an Access Token for accessing the Reteno API and a Refresh Token for updating the Access Token.
Response format:
{
  "access_token": "YOUR_TOKEN",
  "token_type": "bearer",
  "refresh_token": "YOUR_REFRESH_TOKEN",
  "scope": "UseRestApi",
  "expires_in": 172541
}
NoteThe validity period of a token starts from the moment of its creation. The default is 172,800 seconds for an Access Token and 2,592,000 seconds for a Refresh Token.
3. Refreshing Token
Send a POST request to the Access Token URL https://uaa.reteno.com/uaa/oauth/token.
The request must contain:
- Client ID and Client Secret received when registering the app in Reteno
- a code you received during authorization
- the last refresh token you received
Request format:
https://reteno.com/uaa/oauth/token?grant_type=refresh_token&refresh_token=YOUR_REFRESH_TOKEN&client_id=YOUR_CLIENT_ID&client_secret=YOUR_CLIENT_SECRET&code=YOUR_CODE&redirect_uri=YOUR_CALLBACK_URL
The response contains a new Access Token and a new Refresh Token that should be used the next time the Access Token is refreshed.
4. Authorization Testing
Send a GET request to the https://reteno.com/api/v2/version URL with authorization in the form of the Authorization: Bearer <YOUR_ACCESS_TOKEN> header.
You should see the current API version and API protocol version in the response.
Example of Authorization Using Python
import requests, json
import subprocess
import sys
authorize_url = "https://uaa.reteno.com/uaa/oauth/authorize"
token_url = "https://uaa.reteno.com/uaa/oauth/token"
callback_uri = "http://my_host:8081/test/callback"
protected_api_contacts = "https://reteno.com/api/v1/contacts"
test_api_url = protected_api_contacts
client_id = 'daf4ba310fe44961fabc80ce2d1f67cd'
client_secret = '6c573654f43bc05c13c6b0d0bc65d6a65fe38a09f84e84ac37c3210e78b06b3e'
#step A - simulate a request from a browser on the authorize_url - will return an authorization code after the user is
# prompted for credentials.
authorization_redirect_url = authorize_url + '?response_type=code&client_id=' + client_id + '&redirect_uri=' + callback_uri
print("go to the following url on the browser and enter the code from the returned url: ")
print("---  " + authorization_redirect_url + "  ---")
authorization_code = input('code: ')
# step I, J - turn the authorization code into a access token, etc
data = {'grant_type': 'authorization_code', 'code': authorization_code, 'redirect_uri': callback_uri}
print("requesting access token")
access_token_response = requests.post(token_url, data=data, verify=False, allow_redirects=False, auth=(client_id, client_secret))
print("response")
print(access_token_response.headers)
print('body: ' + access_token_response.text)
# we can now use the access_token as much as we want to access protected resources.
tokens = json.loads(access_token_response.text)
access_token = tokens['access_token']
print("access token: " + access_token)
api_call_headers = {'Authorization': 'Bearer ' + access_token}
#api_call_response = requests.post(test_api_url, headers=api_call_headers, verify=False, json=json)
api_call_response = requests.get(test_api_url, headers=api_call_headers, verify=False)
print(api_call_response.text)
Connected Apps
Integrated apps are displayed on the Connected apps tab in your organization settings. To disconnect an app, click on three dots opposite its name and select the appropriate option.

Updated 6 months ago
