
Setting Up SMS Processing
You can send SMS messages through your service provider using processing in our system. For that, you have to configure the sender settings in your profile. A provider is connected over an HTTP integration, through the settings described below; the older SMPP connection isn't offered for new setups.
The delivery status comes from the provider: if it reports Delivered, the report shows that status. On routes with several intermediaries — in the USA, for example — the message can still fail to arrive after that status, and there's no way to tell at which step it was lost. For critical messages such as login codes or password resets, connect a local provider's processing.
Configuring the Sender Settings
To configure SMS processing for registered senders:
- Go to your profile → Settings → Senders.
- Select the SMS tab and click the New sender button.
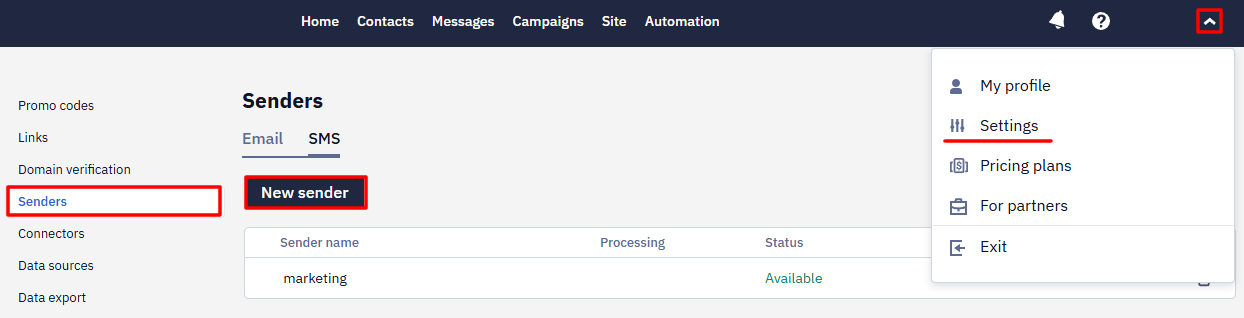
- In the slide-out window, select the I’ve already contracted an SMS service provider and have a registered sender option and select your service provider from the list:
- GMS Hyber
- Infobip
- TurboSMS
- Omnicell
- Textlocal
- Acemount Media
- SMSBAT
- Streamtools
- Vodafone
- Intel Telecom
- PROCONTEXT
- Decision Telecom
- AlphaSMS
- ServerSMS
- SMS Club 2.0
- Enter the required technical parameters of your provider, as listed below:
NoteThe Sender name is an internal name used to display the sender in your Reteno account. It doesn't affect delivery and can be any value. The alpha name — the sender ID that recipients see — must be registered with your SMS provider: sending with an unregistered alpha name isn't possible.
GMS Hyber
- Sender name
- Login
- Password
- URL
- Timeout
Use Reteno tags so that when uploading reports from GMS Hyber, you can quickly analyze how many messages of a specific type were sent: collecting feedback, installing an application, etc. If you use more than one tag in a message, they are substituted in the report separated by commas: tag=tag1, tag2,tag3.
Ask GMS Hyber to add the 52.210.222.17 and 52.16.166.210 IP addresses to the allowed list.
Infobip
- Sender name
- Login
- Password
- Alpha name
TurboSMS
- Sender name
- Authorization token
To receive the message status, add the following link in your TurboSMS cabinet:
https://esputnik.com/dlr/v2/turbosms/status
Omnicell
- Sender name
- Login
- Password
To receive the message status, add the following link in your Omnicell cabinet:
https://esputnik.com/dlr/v1/omnicell/status
Textlocal
- Sender name
- API key
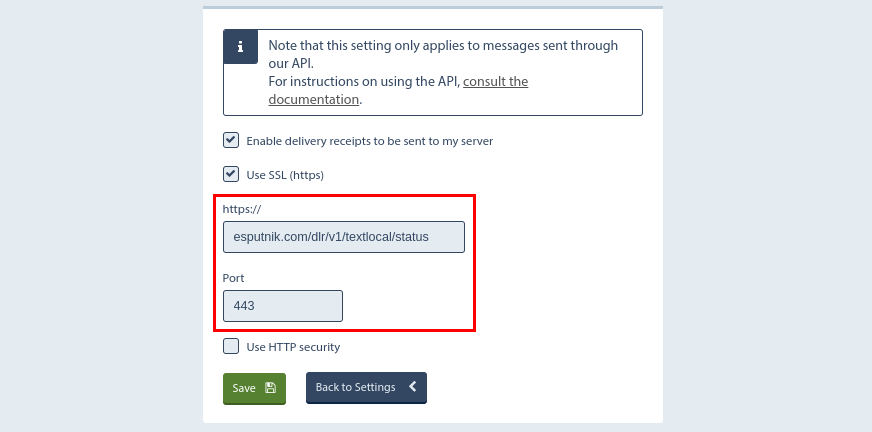
To receive the message status, add the next parameters in your Textlocal cabinet:
- https:// filed:
esputnik.com/dlr/v1/textlocal/status - Port field: 443
Acemount Media
- Sender name
- API key
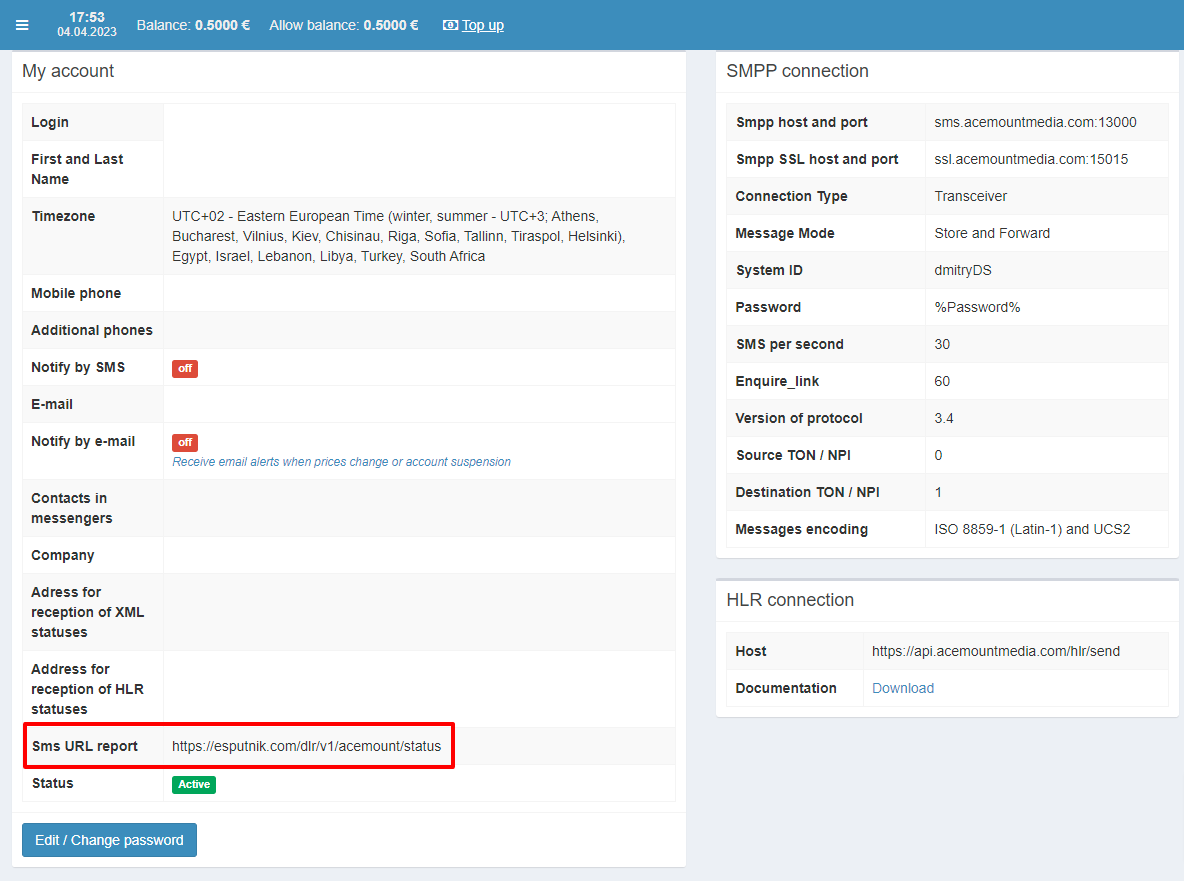
To receive the message status, add the next parameter for Sms URL report field in Acemount Media user account:
https://esputnik.com/dlr/v1/acemount/status
SMSBAT
- Sender name
- Login
- Password
- Timeout
Streamtools
- Sender name
- Login
- Password
Vodafone
- Sender name (can be any, as it is displayed only in the Reteno account).
- Login
- Password
- Sender ID — Sender ID from your Vodafone account. Message recipients will see the sender name corresponding to this ID.
Intel Telecom
- Sender name: You can find this name in the Senders menu in Intel Telecom.
- User name: Your login name to the Intel Telecom account.
- API key: You can create API keys in Intel Telecom in Developers → API key.
PROCONTEXT
The provider supports message delivery only to Moldovan phone numbers. There are two types of messages:
- Notifications — important triggers that are sent around the clock and as quickly as possible. The content of notifications must be approved by the provider.
- Marketing — promotional messages sent only during business hours. Approval from the provider is not required.
Parameters for sender setup:
- Alias — alpha name;
- Partner’s ID — login;
- Password.
To connect PROCONTEXT, submit a request at [email protected].
Decision Telecom
Parameters for sender setup:
- Sender name
- Authorization token — key from Decision Telecom account in BASE64 format
- Alpha-name
To connect Decision Telecom, submit a request at [email protected].
AlphaSMS
Parameters for creating a sender:
- Sender name
- API key
ServerSMS
Parameters for creating a sender:
- Sender name
- User name (user name for logging into the ServerSMS account).
- Password.
SMS Club 2.0
Parameters for creating a sender:
- Sender name
- Authorization token
SMS Club 2.0
SMS Club 2.0 is a new version of the SMS Club API integration. It appears in the system as a separate provider and will gradually replace the previous integration version.
- To switch to SMS Club 2.0, SMS Club must migrate your account from the previous system to the new one.
- After the migration on the SMS Club side, you will need to select the new provider type — SMS Club 2.0 — in Reteno and update your access credentials.
- SMS Club 2.0 uses an authorization token instead of a login and password.
Now, you can proceed with creating and sending SMS messages. Read this article to learn more about it.
One account can hold several processing senders — repeat these steps for each one. With a single provider, each sender needs its own alpha name registered on the provider's side. SMS Club and SMS Club 2.0 are separate providers, so the same alpha name can be added for both. You choose the sender you need in the message settings.
Short Links in SMS
Links in SMS are shortened through the esclick.me domain. A shortened link can be longer than one from a general-purpose shortener such as Bitly, and that affects the character count and therefore the number of SMS parts — allow for it when you plan the message length.
To make links shorter and recognizable, add your own domain for link shortening. This is an account-level setting: it applies to every channel and every sender, SMS included. There is no per-sender or per-campaign shortening domain.
Keep the https:// protocol in the link: without it, many messaging apps don't render the text as a clickable link.
Troubleshooting: SMS_UNDELIVERABLE_STATE
SMS_UNDELIVERABLE_STATESMS_UNDELIVERABLE_STATE is a generic non-delivery status returned by the SMS operator or provider, not a single detailed reason. It can stand for a non-existent or blocked number, a switched-off phone or no network coverage, an unsupported country, or other provider-side causes. To find the precise reason, look the message up in your provider's own logs.
NoteCheck the sender first: if a newly created alphanumeric sender ID is still awaiting operator approval, every message can come back with this status until approval lands. Approval takes at least two weeks, so re-test after two to three weeks. See SMS Sender ID.
Deleting a Sender
To delete a sender:
- Go to your profile → Settings → Senders.
- Select the SMS tab and click the Delete icon at the right-hand side of the sender name you wish to delete.
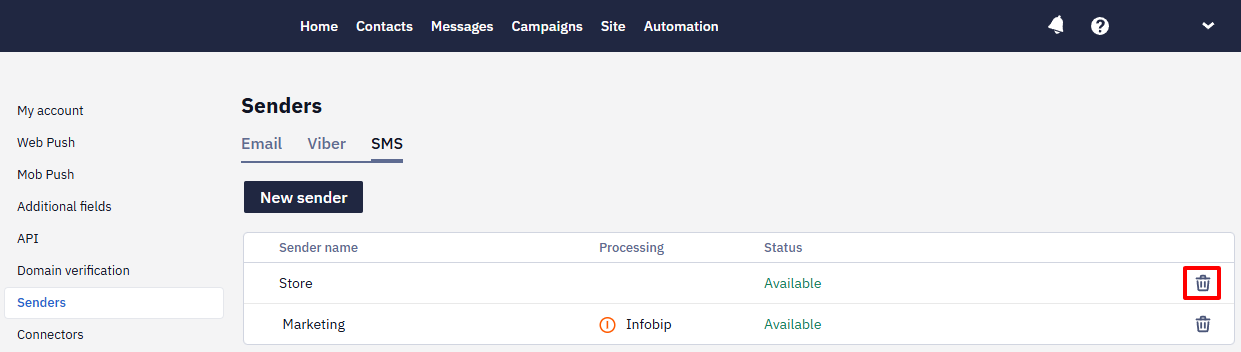
- On the dialog window, select Delete. The confirmation message appears for a short while.
ImportantBefore deleting a sender, you need to create or select another one, otherwise, you will be unable to send messages.
Deleting a sender does not reliably stop SMS sending on its own. The sender name is stored as text inside each already-created message, so campaigns or API calls referencing that message can keep sending through the Send prepared message resource even after the sender is deleted. To stop such sends, stop the API requests on the integration side or delete the corresponding SMS messages in your account. To reliably stop all SMS sending for your account, contact support — this needs to be handled at the account level rather than through the sender or message settings in the UI.
Changing an SMS Sender
To change a sender in existing SMS messages:
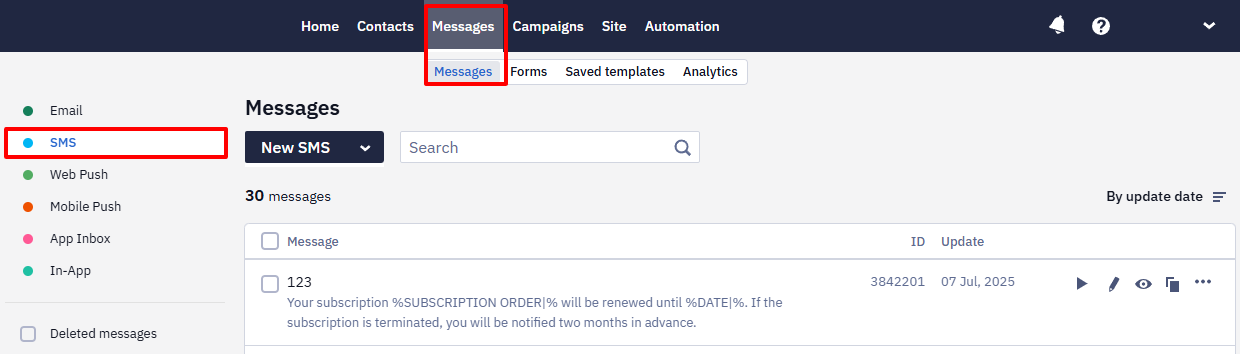
- Go to Messages → Messages → SMS and select an SMS.
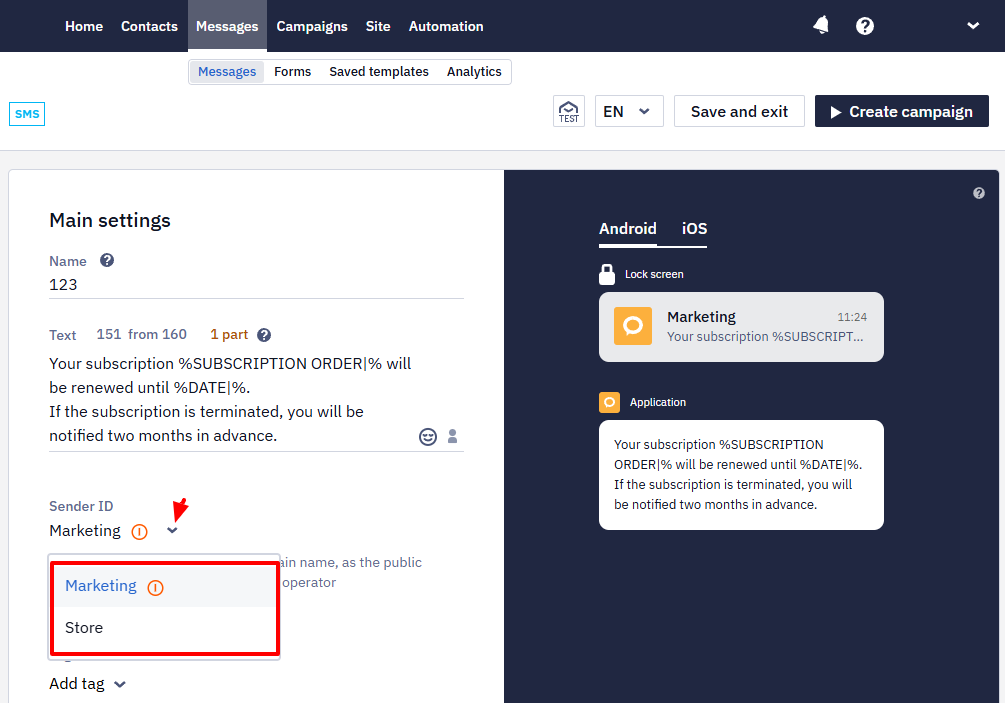
- In the Main settings section, expand the dropdown list below Sender and select another sender for this message from the list.
Updated 7 days ago