
General Blocks
General blocks are basic blocks necessary to build a workflow. There are six general blocks in the system:
- Start
- End
- Timer
- Start on date
- Task
- Condition
Start
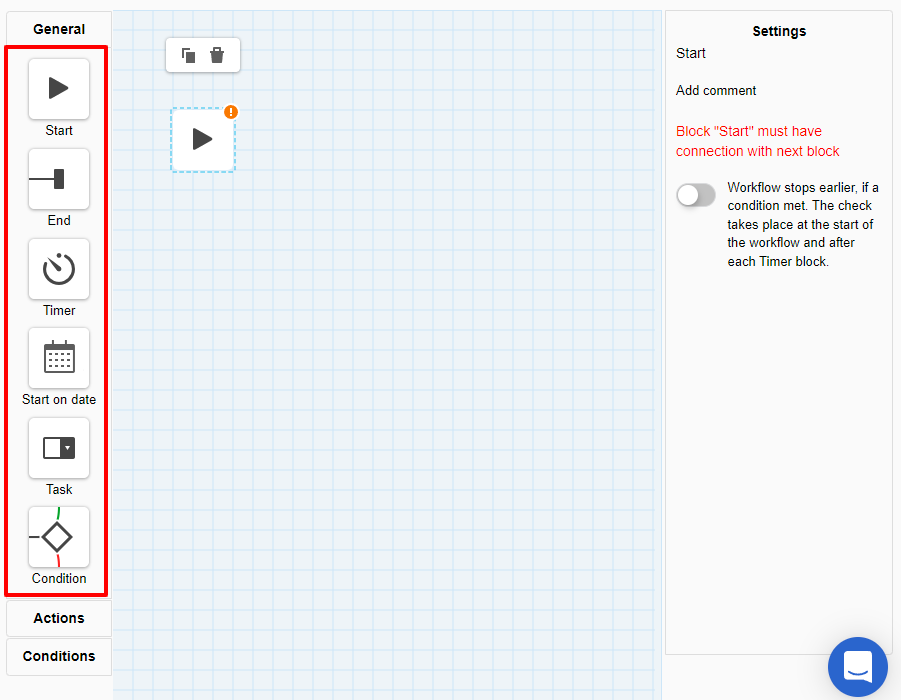
The Start block is required to create a workflow. It automatically appears in a new workflow by default. To add it manually, click the Start block icon on the left or drag it to the editor. There can only be one Start block in the workflow.
You can enable automatic checking of contacts participating in the workflow:
- whether they participated in a certain event (for example, they signed up for a course and already received tutorial series);
- whether they are in a certain segment (for example, it is necessary to cover newcomers with a campaign and not launch it on active buyers);
- whether they made an order (for example, 7 days before the start of the workflow).
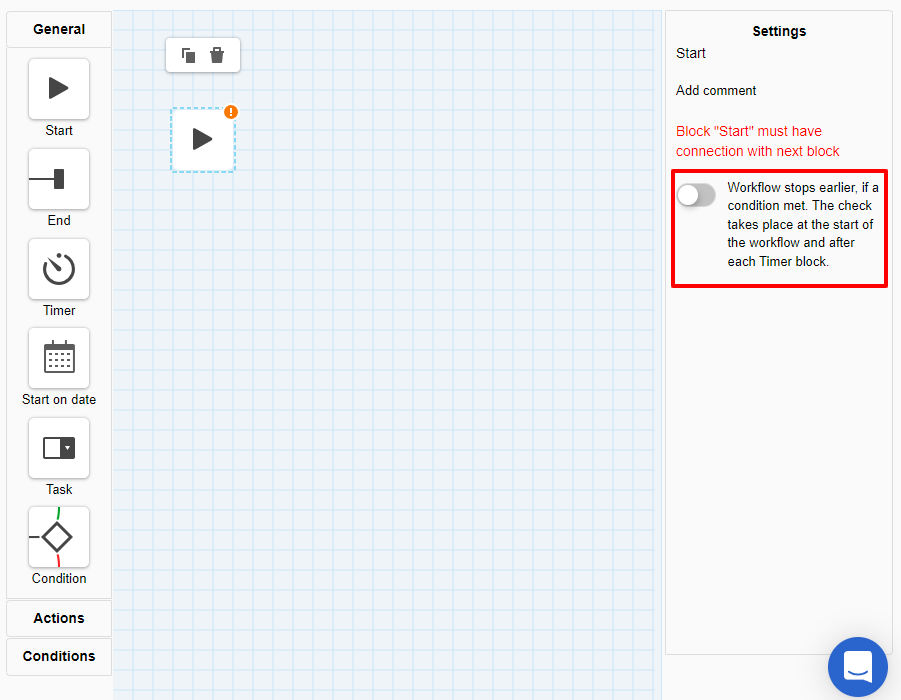
Workflow stops earlier, if a condition met. The check takes place at the workflow's start and after each Timer block.
The check switcher is placed in the right settings panel.
After enabling, specify the conditions for early stopping of the workflow for the contact:
- By event;
- If the contact is included in a segment;
- Order-based.
Select one of the check types using the radio button.
End workflow by event
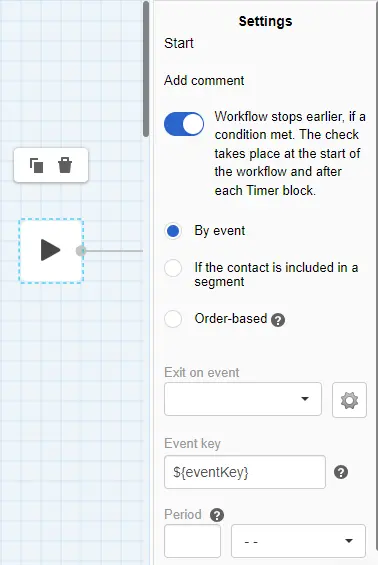
In the Exit on event drop-down list, select the event that will stop the workflow for the corresponding contact. The workflow stops if the event happens within the selected period before the workflow starts or any time after it starts. In the Period field, you can set the time before the start of the workflow, during which the event must be checked. By default, the block checks for events since the activation of the workflow.
${eventKey} is the universal variable for the event key specified in the block by default. When the system starts a workflow, it checks the selected event: if it finds the event key, the workflow ends for this contact.
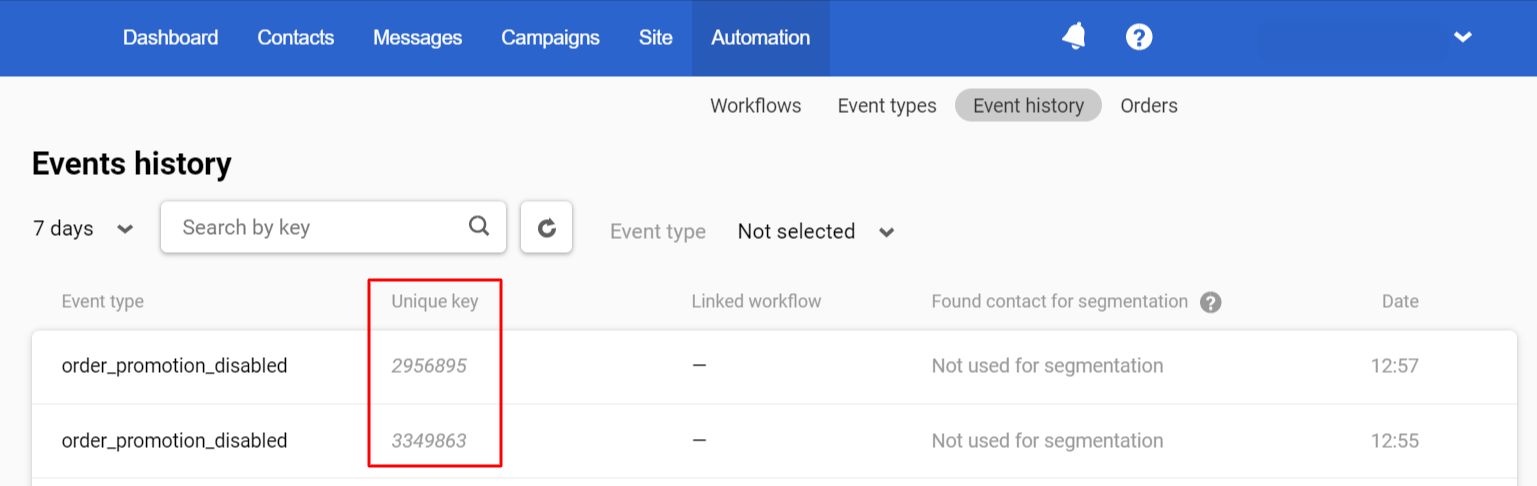
You can see the event unique key in the Automation → Event History section.
ImportantThe event key (email, contact ID, etc.) must match in the event that started the workflow and the event that should end the workflow.
End workflow if the contact is included in a segment
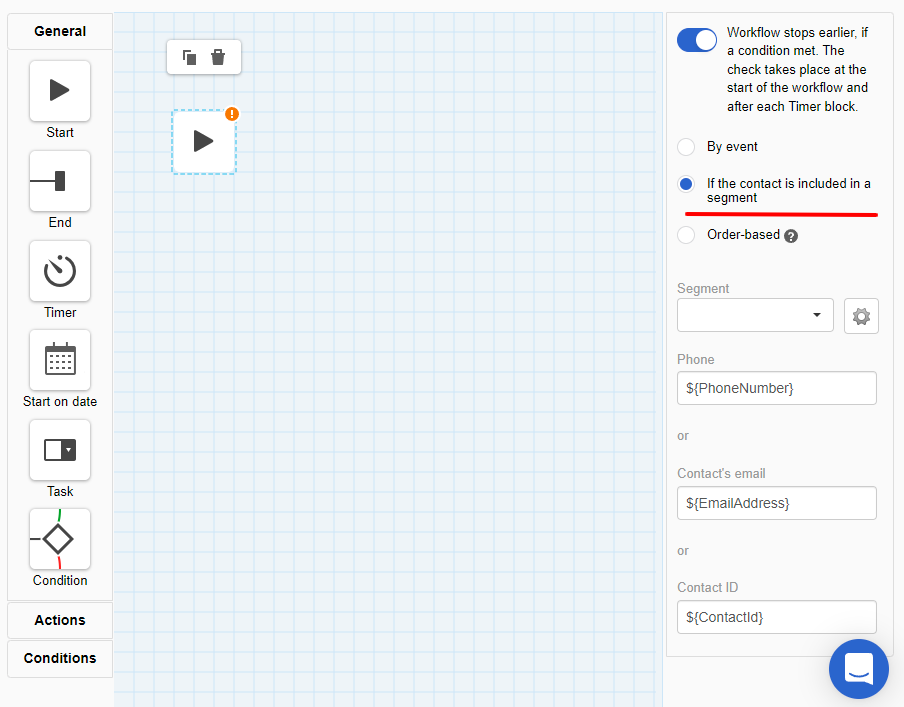
Select a segment from the drop-down list in the Segment field. If the system detects that a contact enters a specified segment, it will stop the workflow for them. The system identifies contacts by one of the parameters:
- phone number;
- email;
- conact ID in Reteno.
Order-based workflow end
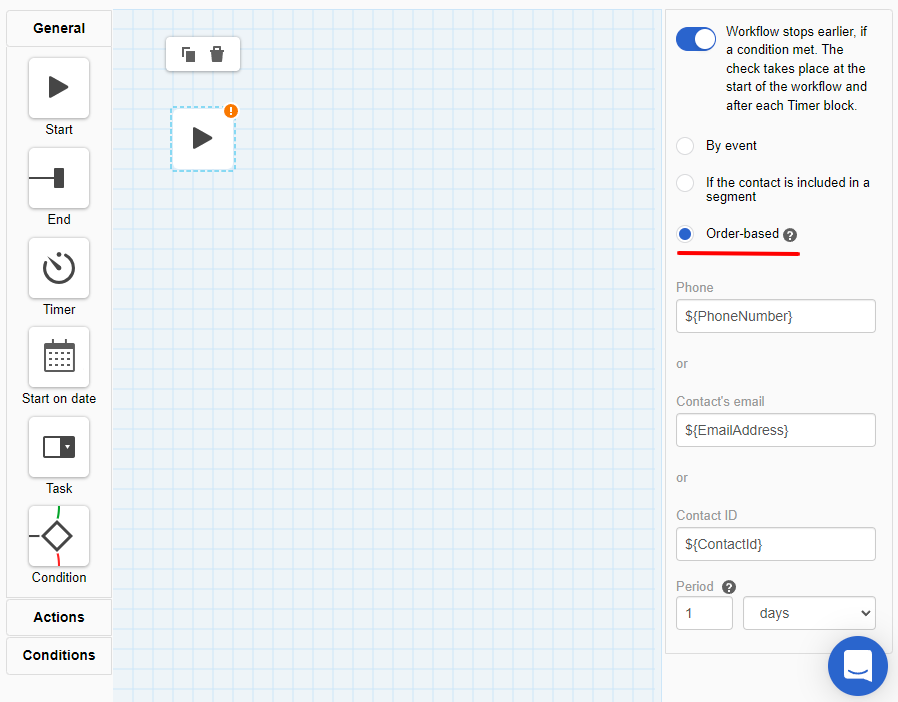
The workflow stops if the contact has placed an order within the selected period before the workflow starts or any time after it starts. Set the time to check in the Period field.
The system searches contacts by one of the parameters:
- phone number;
- email;
- conact ID in Reteno.
First, the system uses contact ID, if it’s not specified, then by externalCustomerId to search for a contact, if this is present in the event parameters.
End
This block is also required. It ends the workflow and can be used several times. All workflow paths must be ended with the End block.
Timer
The block is used to set a time gap before the following action or message sending. It is placed before a block you want to delay.

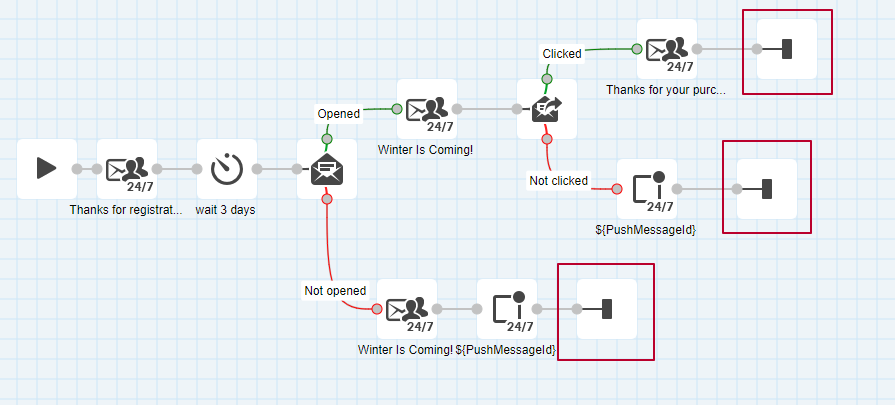
Contact confirmation triggers the workflow with a drip welcome series in the example. A new user receives a welcome email after confirmation, a second email after two days, and a third after the next three days.
To set up Timer, configure one of 2 or both parameters:
- Wait time;
- Wait until.
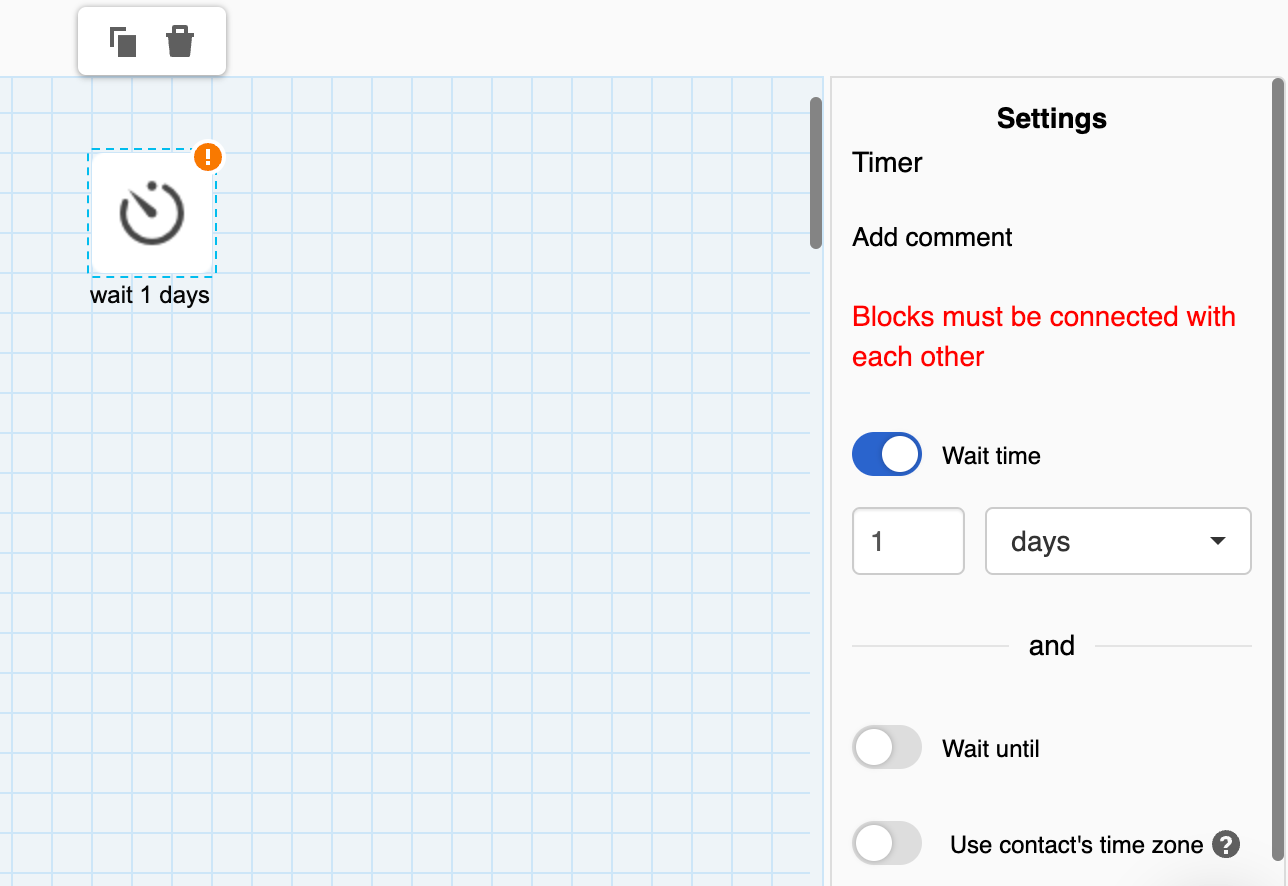
Wait time
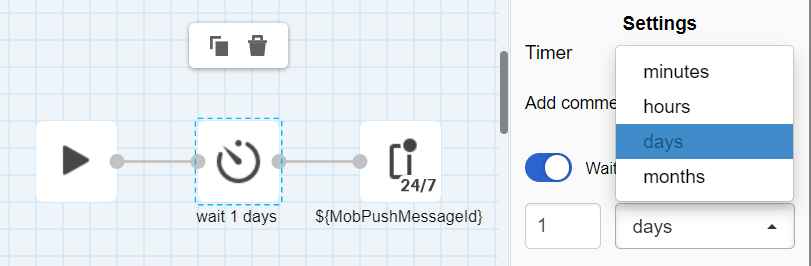
Enter the wait time and select the parameter to which it will be applied:
- minutes;
- hours;
- days;
- months.
ImportantIf you delay 1/2/3 days, the delayed action will start 24/48/72 hours after the workflow is triggered. If a person registers at 7 a.m., they will receive the first message at 7 a.m. the next day.
Wait until
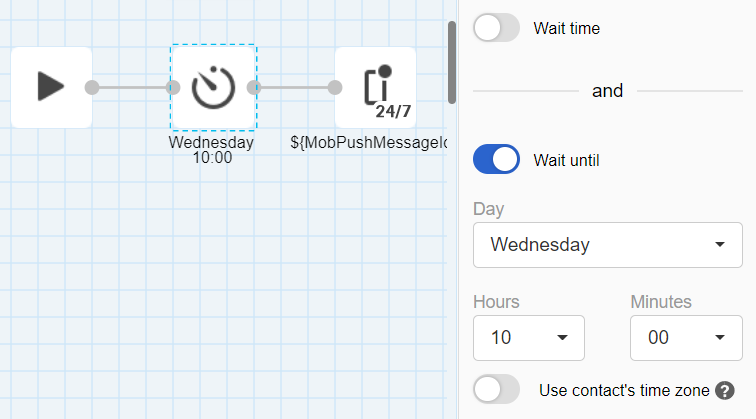
Here you can select the day of the week and the time for sending.
If you set the sending time at 8:45 a.m. and the workflow starts at 3:00 p.m., the subscriber will receive the message at 8:45 a.m. the next day.
ImportantIf today is Tuesday and you've chosen to send a message on Monday, the message will be sent next Monday. If it's Monday today, the subscriber will receive the message today.
Parameter Priority Example
You've configured the following delay parameters:
- wait 1 day;
- send on Monday at 8:45 a.m.
The workflow starts on Sunday at 3 p.m. The system waits for 1 day (24 hours). Then it's Monday. The Wait 1 day parameter expires at 3 p.m. on Monday. The system checks the Send parameter. You have chosen Monday, today is Monday, so far everything is fine.
The system checks Wait until. It’s set for 8:45 a.m., and the workflow is triggered at 3 p.m. The subscriber will receive the message not this Monday but only the next one at 8:45 a.m.
Configure the settings carefully!
Start on date
The block is used to send a message days/hours/minutes before the date and time you send in the event or set manually. If the start time is taken from the event, the transferred time zone is applied. If the start time is set manually, the block will start in the time zone specified in your personal profile.
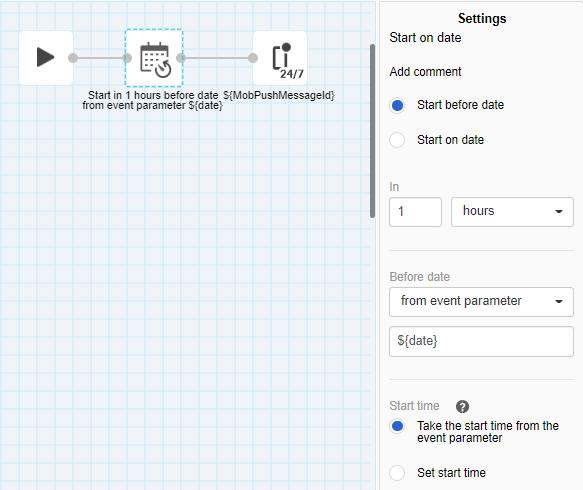
In In, specify when before the date to send the message: 1 hour, 3 days, 10 minutes, etc.
In Before date, you can take the required date from the sent event. In the box below insert the parameter name from the event, for example, ${date}.
ImportantThere are two supported formats for the date and time:
- UTC: 2011-12-03T10:15:30;
- UTC offset: 2011-12-03T10:15:30+02:00.
The UTC offset is the difference in hours and minutes from UTC for a particular place and date. UTC+02:00 is used in some countries of Central Africa Time, Eastern European Time, and South African Standard Time. See the full list here.
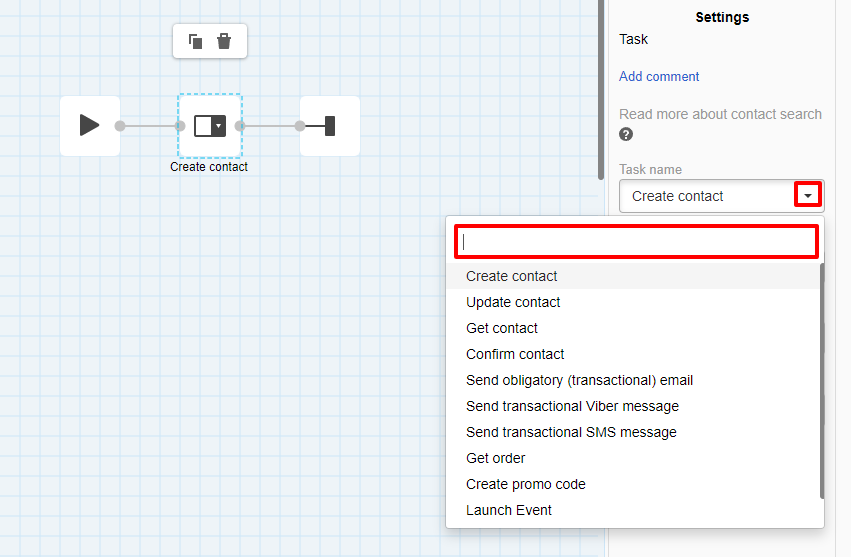
Task
The block is used to set for the workflow one of the following tasks:
- Create contact;
- Update contact;
- Get contact;
- Confirm contact;
- Send obligatory (transactional) email;
- Send transactional Viber message;
- Send transactional SMS message;
- Get order;
- Create promo code;
- Launch Event;
- Get promo code.
Create contact
The task is to create a contact in the system. If the contact with this email address already exists in the system, it will be updated.
Important!Use this task only when the contact data is passed via the API method Generate event, and only a part of the data needs to be specified when a contact is created. For example, you sent the event via Generate event for a new contact. With this block, you add this contact to the system. For all other methods, this block is not needed.
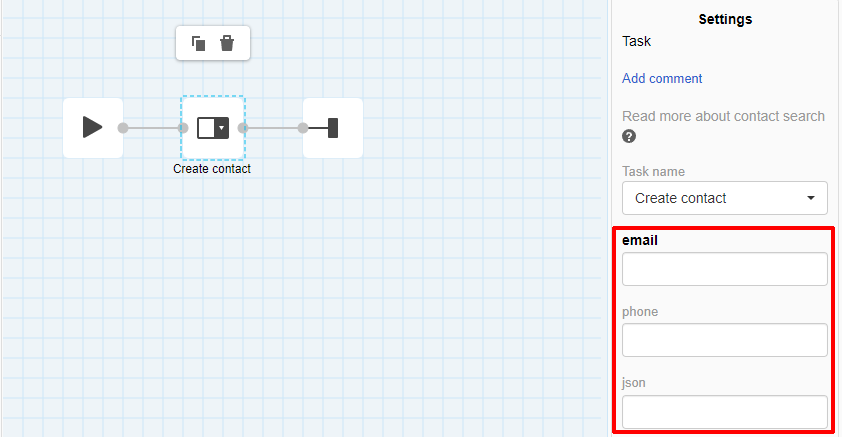
The task has 3 parameters:
- Contact’s email: required field. By default, it contains the variable ${email}. If your event has a different variable, specify it in the field.
- Phone: required field if you create a contact by phone number. By default, it’s filled with the variable $'phoneNumber. If you have a different name for the variable in the event, specify it in the field.
- JSON: field contains a line or a variable with a line in JSON format with contact data (phone number, name, surname, city, additional fields). Email address is specified by default; if needed, specify other additional data.
You can pass the contactJson variable in the JSON field. In this case, REST API will validate the values passed together with this parameter. In case of passing the contact’s parameters with mistakes, the error message returns the parameters containing errors and the valid values.
Request body for the json field:
{"firstname":"...","lastname":"...","sms":"...","town":"...","timeZone":"Etc/GMT+03","languageCode":"uk","profileInputs":
[{"profileInputId":10001,"value":"..."}],"confirmed":false}
where
- profileInputs - additional field array;
- profileInputId - additional field ID;
- value - additional field value;
- confirmed - contact email address status (confirmed/unconfirmed)
ImportantTo create an unconfirmed contact, add "confirmed":false to the request body:
{"firstname":"...","lastname":"...","sms":"...","town":"...","profileInputs":

[{"profileInputId":10001,"value":"..."}],"confirmed":false}
To create a contact with a value in the date field, use the format YYYY-MM-DD:
{"profileInputs": [{"profileInputId":10001,"value":"2023/11/06"}]}To create a contact with a value in the date with time field, use the format YYYY-MM-DDThh:mm":
{"profileInputs": [{"profileInputId":10001,"value":"2023/11/06 16:42"}]}Update contact
The task is to update the contact information. If the contact exists in the system, their info will be updated; if the contact doesn’t exist, the system will skip them.
Use this task to update the contact data from an event sent via the API method Generate event, or to set a fixed value of the additional field in the workflow.
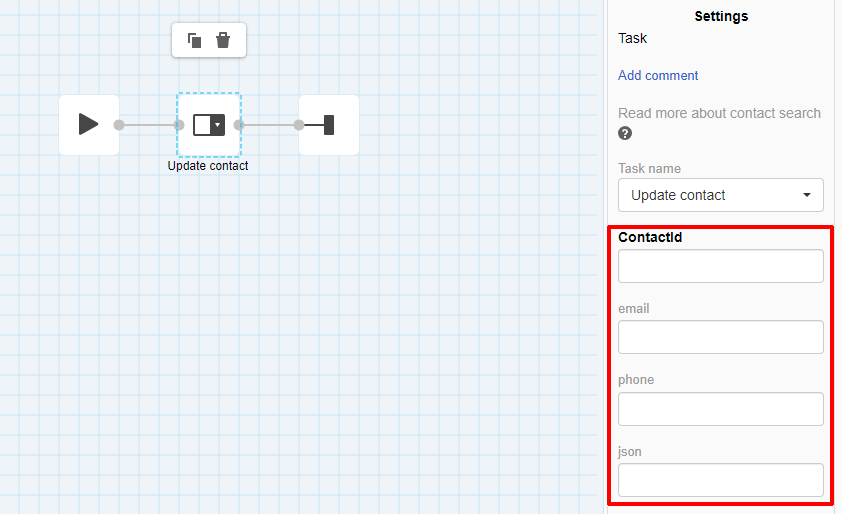
The task has 3 parameters:
- contact’s email: required field. By default, it contains the variable ${email}. If your event has a different variable, specify it in the field. In the system events, the variable is called EmailAddress. System events are the events generated within the system (click on an email CTA, regular workflow launch, filled subscription form, reactivation with RFM analysis). For them, enter ${EmailAddress} in the field.
- phone: required field if you update a contact by phone number. Specify the variable $'phoneNumber in the field. If you have a different name for the variable in the event, specify it in the field.
- JSON: field contains a line or a variable with a line in JSON format with contact data (phone number, name, surname, city, additional fields). Email address is specified by default; if needed, specify other additional data. The parameter confirmed is ignored.
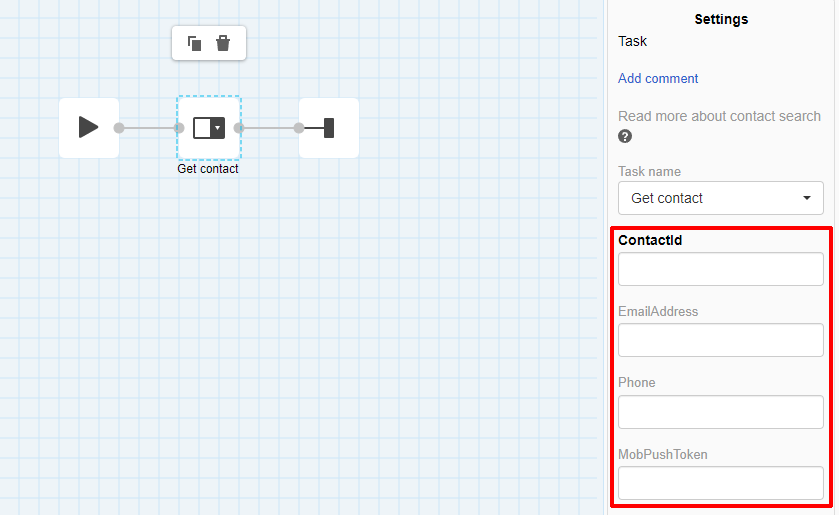
Get contact
The task is to get contact data and pass it to the message or to the Condition block. For example, you want to send a notification email with contact data every time a new subscriber is added to the database, or send the subscriber registration details after registration.
The task works as follows:
- The event that contains contact data is created (registered) in the system.
- The task extracts out all available contact data stored in the database.
- Block passes this data to the email.
The task has 4 parameters:
- ContactId: contact ID in the system;
- EmailAddress: email address of the contact;
- Phone: phone number of the contact;
- MobPushToken: mobile token of the contact.
EmailAddress, ContactId, Phone, and MobPushToken are used to identify a contact. One of these fields must be filled with relevant data.
For example, if you want to identify a contact not by email but by ID in the system, specify the name of the variable that contains the contact ID. By default, it's ${ContactId}.
You can use these variables in the message:
- $!data.get('firstName') - name;
- $!data.get('lastName') - surname;
- $!data.get('email') - email address;
- $!data.get('sms') - phone number;
- $!data.get('contactKey') - contact key;
- $!data.get('id') - contact ID in the system;
- $!data.get('createdDate') - creation date;
- $!data.get('updatedDate') - date of the last contact update;
- $!data.get ('confirmed') - contact’s email address status (true - confirmed, false - not confirmed);
- $!data.get('fields').get('12345') - additional fields. Insert an ID of the additional field instead of 12345.
Confirm contact
The task is to confirm the email address of the subscriber, add them to the system and make available for receiving.
For example, a person fills in a subscription form, their email address gets to the system and they receive a confirmation email. They can not receive promotional campaigns until they confirm subscription. A successful confirmation link triggers the task and starts the corresponding workflow.
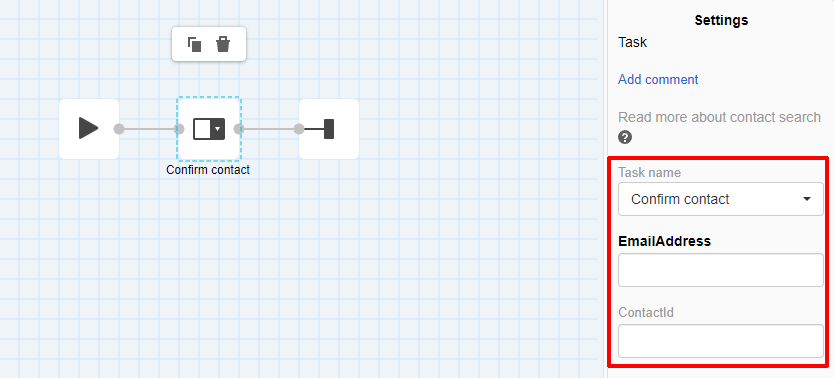
The task has 2 parameters:
- email: contains the variable ${EmailAddress} by default so you don’t need to fill it. You only change it if you create your own variable that contains an email address.
- contact_id: if a contact is confirmed not by the email address but by the contact ID in the system, specify the name of the variable that contains the contact ID. By default, it is ${ContactId}.
We recommend that you leave the default settings in this block. If your workflow needs adjustments, please contact support.
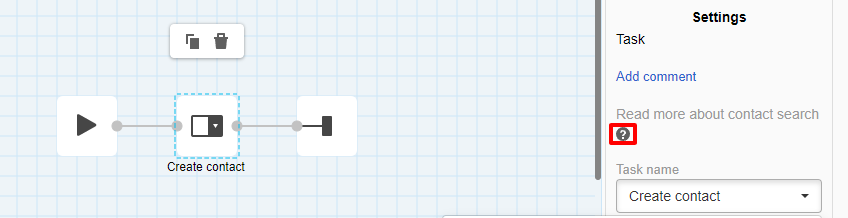
ImportantWhen searching contacts for tasks Create contact, Update contact, Get contact and Confirm contact the following rules apply:
- Contact ID has the highest priority among all parameters
- If externaiCustomerId is specified, contact search will be performed by externaiCustomerId.
- If externaiCustomerId is not specified, contact search will be performed by email address or phone number.
To read more about contact search, hover over the question icon in the settings panel:
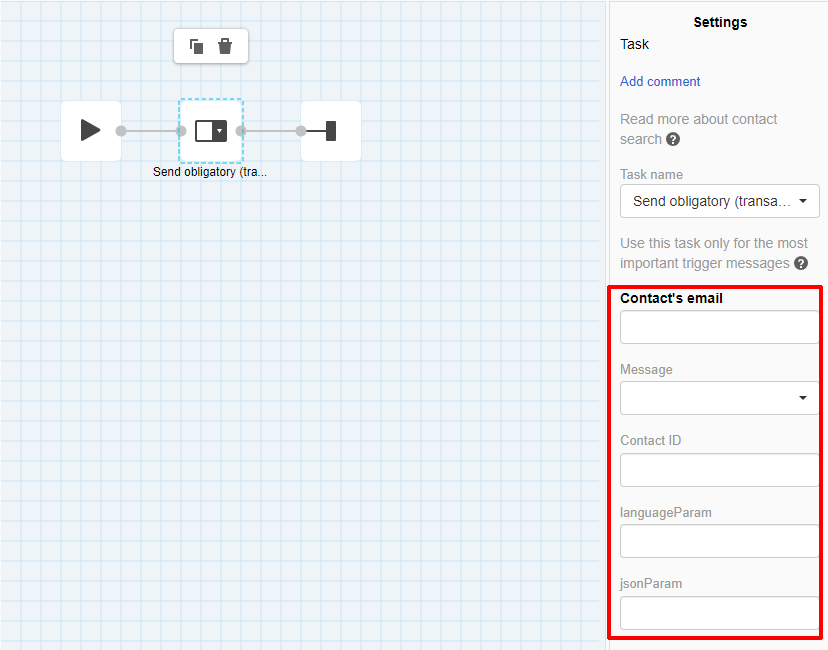
Send obligatory (transactional) email
The task is to send an email to the contact regardless of their status in the system. With it, you can send an email to any email address (confirmed, unconfirmed, unsubscribed, spam report) except for blacklisted contacts.
Important!Use this task only if absolutely necessary. It ignores the contact status which may result in spam reports and harm sender reputation. Use the task only to send a transactional email (subscription confirmation, order confirmation, change in a pricing plan) to a new unconfirmed contact. In all other cases, use the task Email form the block Actions.
The task has 5 parameters:
- Message: required parameter. Select it from the drop-down menu or specify the message ID.
- Contact's email: email address of the contact or the event parameter that contains an email address. The variable ${EmailAddress} is specified by default. If in your event this parameter has a different title, enter it.
- Contact ID: contact ID in the system. It can be used for contact identification instead of the email address.
- languageParam: language ID or the event parameter containing it. It is needed to create multilingual messages. Leave the field blank if you don't use Multilanguage, or the language of the contacts is specified in their cards.
- jsonParam: random data in the JSON format that is passed to the email. If you pass a line with such data in the event, specify the parameter name in the JSON field. For example, you pass the order data and you need to list the ordered items in the email. The request body would look as follows:
{

"name": "items",

"value": "{"array":[{"name":"Women's Grand Court Sneaker","price":"341.00","url":"https://site.com/catalog/Womens-Grand-Court-Black","imageUrl":"https://site.com/uploads/product/big/20161122/20161122_7zvb.jpg"},{"name":"Women's Cloudfoam Advantage Cl Sneaker ","price":"78.00","url":"https://site.com/catalog/Womens-Advantage-Sneaker-Metallic","imageUrl":"https://site.com/uploads/product/big/23112013/2125.jpg"}]}"

}
The example contains items. Accordingly, in the JSON field, ${items} is specified.
Send transactional Viber message
The task is to send a Viber message to the contact regardless of their status in the system.
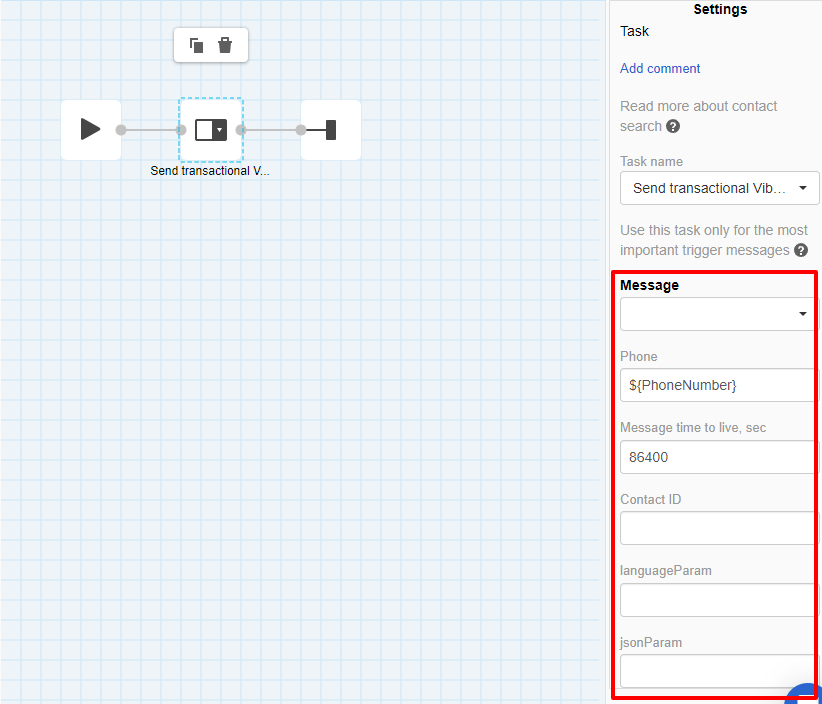
The task has 6 parameters:
- Message: required parameter. Select it from the drop-down menu or specify the message ID.
- Phone: required parameter, a phone number of the contact or the event parameter containing it. The variable ${PhoneNumber} is specified by default. In your event, the variable may be called ${SMS}, ${PhoneNumber}, ${Phone}.
- Message time to live, sec: after the specified time, the message will be deleted from the phone.
- languageParam: language ID or the event parameter containing it. It is needed to create multilingual messages. Leave the field blank if you don't use Multilanguage, or the language of the contacts is specified in their cards.
- contact_id: contact ID in the system. It can be used for contact identification instead of the phone number.
- jsonParam: random data in the JSON format that is passed to the message. If you pass a line with such data in the event, specify the parameter name in the JSON field.
Send transactional SMS message
The task is to send a SMS message to the contact regardless of their status in the system.
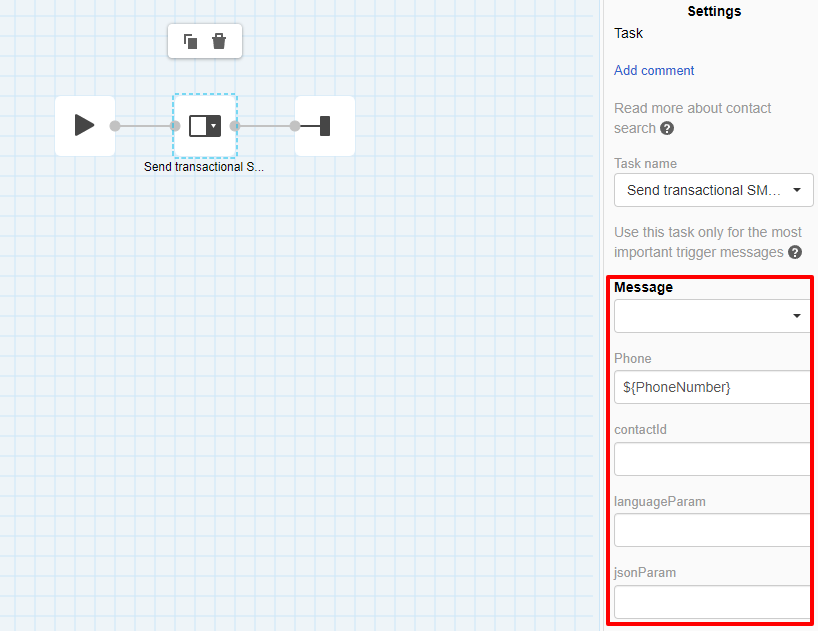
The task has 5 parameters:
- Message: required parameter. Select it from the drop-down menu or specify the message ID.
- Phone: required parameter, a phone number of the contact or the event parameter containing it. The variable ${PhoneNumber} is specified by default. In your event, the variable may be called ${SMS}, ${PhoneNumber}, ${Phone}.
- languageParam: language ID or the event parameter containing it. It is needed to create multilingual messages. Leave the field blank if you don't use Multilanguage, or the language of the contacts is specified in their cards.
- contact_id: contact ID in the system. It can be used for contact identification instead of the phone number.
- jsonParam: random data in the JSON format that is passed to the message. If you pass a line with such data in the event, specify the parameter name in the JSON field.
ImportantWhen searching contacts for tasks Send obligatory (transactional) email, Send transactional Viber message and Send transactional SMS message the following rules apply:
- Contact ID has the highest priority among all parameters.
- Entered contact email, phone number, or token are used for sending.
- If exteralCustomerId is specified, the sending is made to the contact it belongs to; among those contacts that were found by email address, phone number or token.
- If exteralCustomerId is not specified, the sending is made to the contact found by email address, phone number or token.
- If contact is not found, new contact will be created for sending.
Get order
The Task block extracts the data from an order and passes it to the message. You can use this block in the workflows that include transaction-related messages (for example, order confirmation, order delivery). Use this task only if you send the order data to our platform using the Add orders API method.
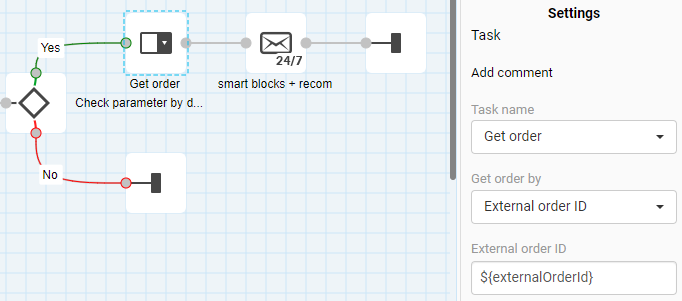
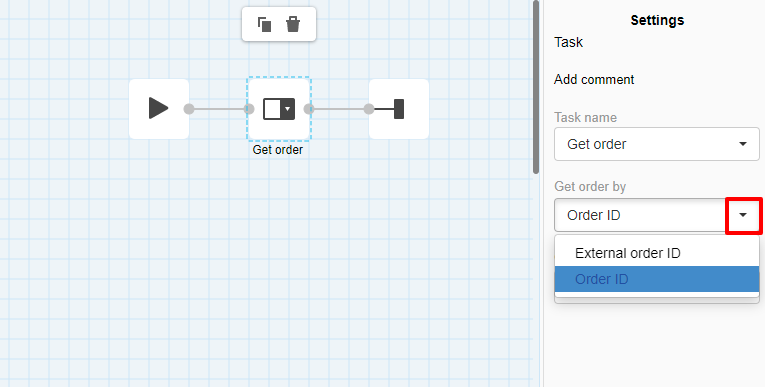
To configure the Get order task block:
Click the Get order by dropdown list and select one of the following options:
- Order ID. Choose this option when you wish to get the order data by the ID generated by our system.
- External Order ID. Choose this option when you wish to get the order data using the order ID that you pass to our system.
You don’t have to fill in the Order ID/External order ID field. The task extracts automatically all the parameters from the order event.
The task works as follows:
- The system receives the order information.
- The task extracts all the data from the order and passes it to the email as variables.
Read more about the Task block in the Order automation article.
Create promo code
The task is to create (generate) a promo code and pass it to a message that goes next in the workflow. The algorithm encrypts the parameters by your key, and the reverse algorithm decrypts it when a promo code is entered on the website. Learn more.
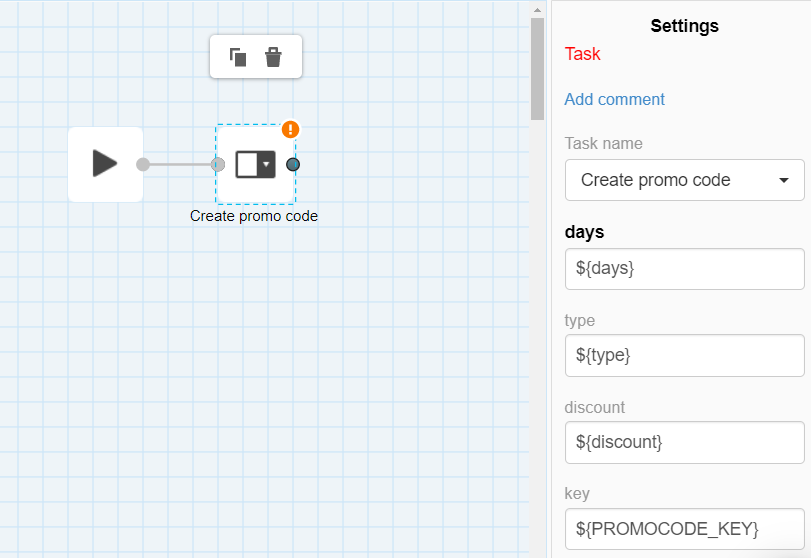
The task has 4 parameters:
- days: number of days until the promo code is expired. The system will add them to the current date, and the resulting expiration date will be encrypted into the promo code.
- type: promo code type. You can set up 32 promo code types. For example, assign type 0 to a subscription promo code, type 1 to a birthday code, type 3 to reactivation code, etc. Pass in the variable the number from 0 to 31 that corresponds to the right type.
- discount: size of the discount. Used to generate a promo code when a discount is given as a % off the order cost. It is always a double-digit number, so discounts of up to 10% should go with zero ahead. For example, specify 05 for an email with a 5% discount.
- key: encryption key. You can leave the default value.
Important!All parameter fields are required.
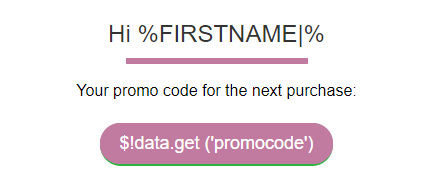
In a workflow, this block is followed by one of the Actions blocks (Email, SMS, Viber, etc.). For example, in the email template, you can put a variable $!data.get ('promocode') in the place intended for a promo code.
Launch Event
The task is to launch any event from the workflow. For example, one workflow can trigger the launch of another. To use the task, you need to previously create the event you plan to launch.
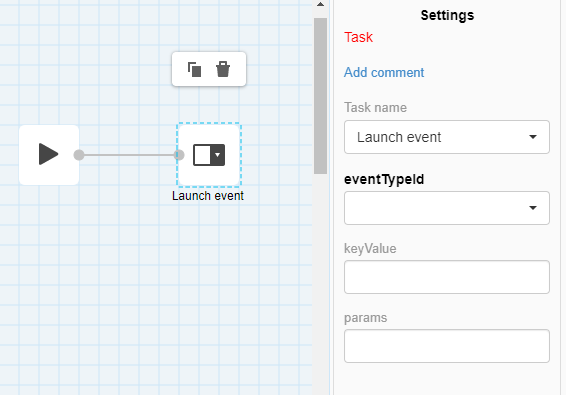
The task has 3 parameters:
- eventTypeId: required field. Select the type of the event to launch.
- keyValue: key of the event you’re launching, for example, a variable with an email address. If the field is not filled, the key from the event that triggered the current workflow will be used.
- params: array of parameters we want to pass to a launched event. If the field is not filled, the parameters from the event that triggered the current workflow will be passed.
The format of the parameters:
[{"name":"paramName,"value":"parameter value"}]Get Promo Code
The task is to pass a promo code from the base to the email. More about uploaded promo codes.
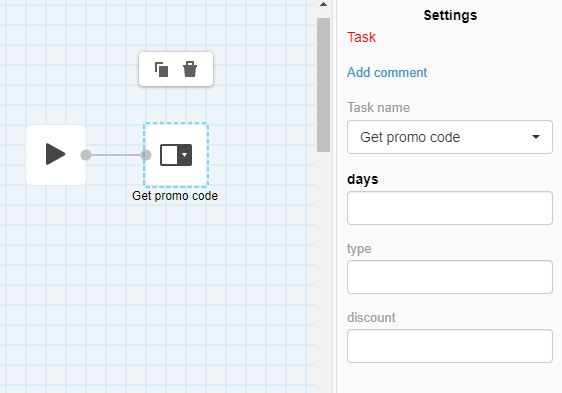
The task has 3 parameters (all are required):
- days: number of days after the current date during which the promo code is valid;
- type: promo code type;
- discount: discount size from 01 to 99.
Based on them, the system selects promo codes from the loaded base.
For example, we have the following parameters: days - 10, type - newyear, discount - 25. The workflow will extract from the newyear segment a promo code with a 25% discount that is valid for at least 10 days. If several promo codes meet these criteria, the system will choose one of them.
In a workflow, this block by message sending block (Email, SMS, Viber, etc.). In the email template, put a variable $!data.get ('promocode') in the place intended for a promo code.
Condition
The block is used to check whether certain workflow conditions are met or not. Depending on this, the workflow is further split into two paths - Yes or No - with different tasks.
The block has one Start block and two End blocks (for Yes/No paths).
The Condition block has 7 tasks:
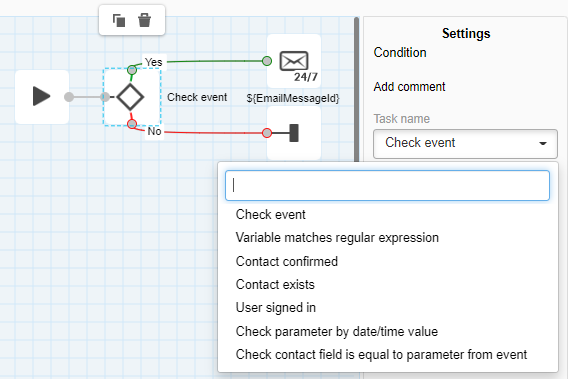
Check event is a default task. When needed, choose the necessary task from the drop-down menu.
Check event
The task is to check whether a particular event occurred. Events are searched by keys.
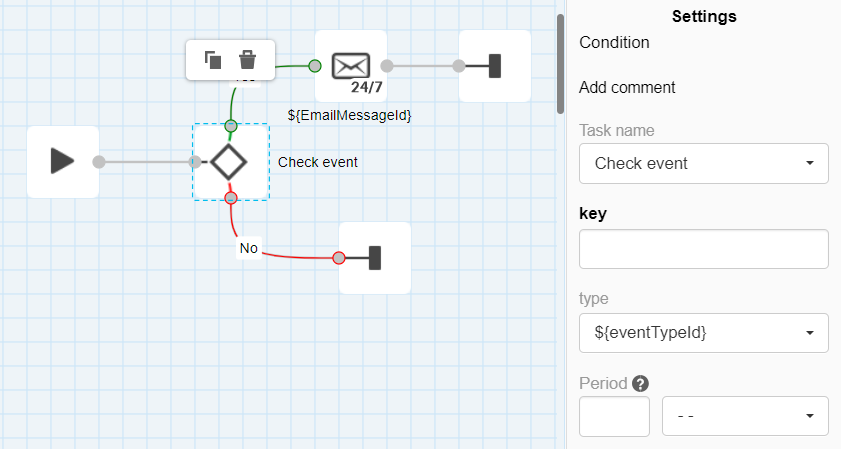
The task has 3 parameters:
- key: event key. For example, it can be an email address; thus, this field should contain a parameter with an email address. If it's EmailAddress, enter
${EmailAddress}in the field. - type: event type. This is a required field without which the workflow will not start.
- Period: you can set the time before the start of the workflow, during which the event must be checked. By default, the block checks for events since the activation of the workflow.
Variable matches regular expression
The task is to check a certain variable from the event or the data received from other blocks.
For example, you can check who your recipient is - male or female - and send them different messages.
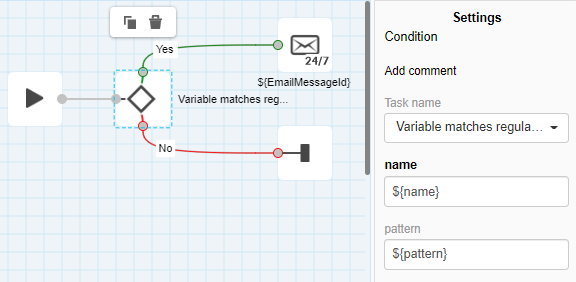
The task has 2 parameters:
- name: variable name. It could be an event parameter. The parameter name is entered in this field without ${}. If you check the data obtained by other workflow blocks (for example, Get contact), specify the system variable smartMessageJson in the field.
- pattern: regular value checked for compliance. For example, to check whether the event parameter address contains the word “London”, specify .*London.* in the pattern parameter.
Contact confirmed
The task is to check whether the contact's email has been confirmed.
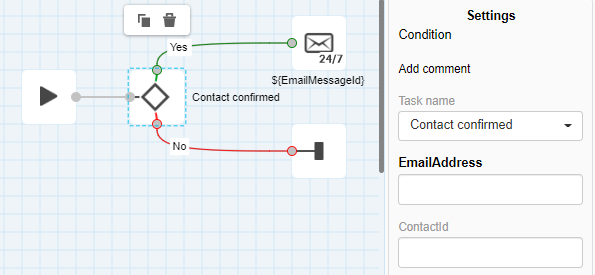
For example, a person has subscribed to your newsletter, and you want to send a welcome email.
The task works as follows:
- The contact is added to the Reteno database but has an unconfirmed status.
- A confirmation email is sent to the contact.
- The task checks whether the subscription is confirmed.
- If it is confirmed, the Yes path is triggered, and a welcome email is sent.
- If it isn’t confirmed, the No path is triggered.
The task has 2 parameters:
- EmailAddress: contact’s email address;
- ContactId: contact’s ID in the system.
By default, the system uses the variable EmailAddress with the email address to check whether the contact is confirmed. If the event variable is called different, specify ${event variable name} in the parameter field, for example, ${MailAddress}.
If you want to use a contact ID for confirmation, specify ${ContactId} in the ContactId field.
One of the parameters must be specified.
Contact exists
The task is to check whether the contact exists. It works similarly to Contact confirmed.
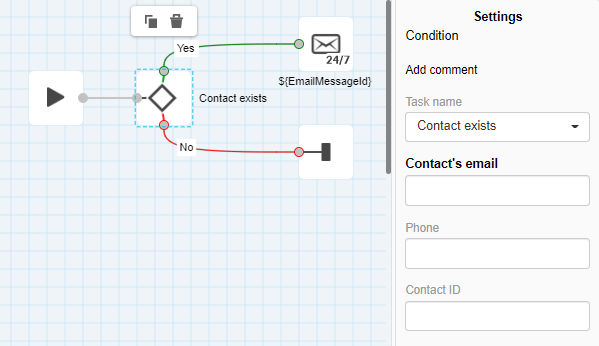
The task has 3 parameters:
- Contact’s email;
- Phone;
- Contact ID.
By default, the system uses an email address. If you want to use a contact ID, specify ${ContactId} in the ContactId field.
Check parameter by date/time value
The purpose of the task is to check the date from the event parameter.
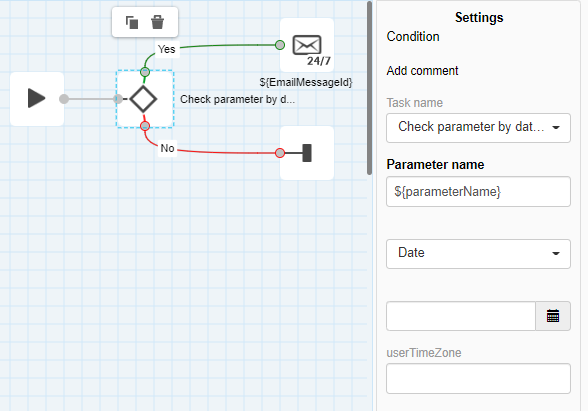
When creating a workflow, the user's time zone is taken into account, the time will be saved in UTC.
For example, we check the date with the time 2020-07-30 13:00. The user's time zone is (GMT +3) Europe/Kyiv, respectively, 2020-07-30T13:00+03:00 will be transferred in the event.
ImportantPay attention to the time zone and take into account the daylight saving time
- Parameter name - you must specify the value of the parameter that is transferred in the event. The required date format is ISO 8601.
- Date - you must select a specific date or range of dates from the drop-down list.
- Select a specific date.
Check contact field is equal to parameter from event
The task allows you to check if the contact field matches the transferred value in the event parameter. For example, you want to check if the user's city matches the city value transferred in the event. If not, you can use a contact update block after this block.
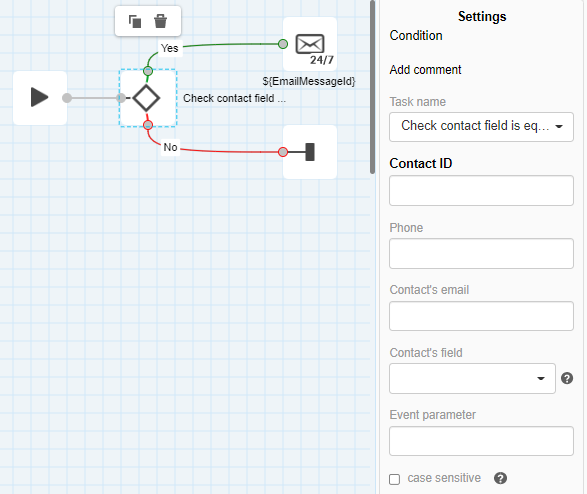
The task has 5 parameters:
- Contact ID;
- Phone;
- Contact’s email;
- Contact's field - the field from the contact card, the compliance of which needs to be checked. You can select from a drop-down list or by using the search bar. The fields of the following types are subject to comparison: text field, text area, number, fractional number, drop-down list;
- Event parameter , for compliance with which we check the contact field. The value can be specified as a variable
${parameterName}(parameter name in the event, for example,${city}). In this case, the contact field specified in Contact's field is compared with the value from the specified parameter in the event. You can also specify a string in the format 123abc (for example, London) - then the contact field is compared with the specific value specified in the parameter (that is, is Contact's field equal to 123abc?). Select the appropriate check box below this field if you want the operation to be case-sensitive when comparing.
The first three parameters are used to select how the contact is identified. For the task to work correctly, one of these fields must be filled in with the appropriate data. For example, if you need to identify a user by ID in the system, you need to set the ${ContactId} variable. The fields can be left empty if the Check contact field is equal to parameter from event block is preceded by the Get contact block. In this case, the contact will be identified by the identifier specified in its settings.
Updated 8 months ago